
In this tutorial I show you how to set up the KISS FC / CC to use LUA Script with your remote control.

Thanks Alex
Do you like the contributions (e. g. KISS GUI and LUA Script) by Alex aka FedorComander?
 We at Flyduino do! Alex chose to setup a PayPal donation button. So if you appreciate his efforts please donate here: https://www.paypal.me/FedorCommander
What you need
Hardware:
- KISS FC or KISS CC
- FrSky Taranis X9D, X9D Plus or Q X7
- ImmersionRC Tramp HV
- TBS Unify Pro HV
- FRSky receiver with smartport (z.B XSR or X4R-SB)
Software:
- Taranis with at least OpenTX Version 2.2.0 (RC16 (N369) was used in this tutorial)
- MicroSD card with correct folder structure (for RC16 it is 2.2v0009)
- KISS FC / CC Firmware 1.2 [Download]
- LUA Scripts for Taranis Q X7 or X9D Plus
Flash the Taranis
At the beginning, your FRSky Taranis X9D Plus or Q X7 must be flashed at least to the OpenTX version 2.2. Currently the version 2.2 is still in the beta, but the current Nightly version (RC16 (N369) works perfectly and of course also supports the LUA script.
In the following tutorial you will learn how to flash the Taranis X7. The process is identical to the flash process of the X9. [old tutorial]
Make sure you are using the SD card content that matches your OpenTX. You can find this in the description for the respective OpenTX release.

Furthermore, you must not forget the hook in “lua” in the software compilation.

Copy the LUA script
After copying the correct folder structure to your SD card, you should copy the LUA scripts into the following folder. “D:\SCRIPTS\TELEMETRY”
KissX7.lua is for the Taranis Q X7
KissFC.lua is for the Taranis X9D Plus

Flash the KISS FC / CC
Next, you must flash your KISS FC / CC with firmware 1.2.
Instructions for Windows and OS X can be found here:


ImmersionRC Tramp HV
The ImmersionRC Tramp HV is connected to the KISS FC / CC via a serial interface.
Flyduino KISS FC
To do this, you connect the ImmersionRC Tramp HV with the T-pin to the TX port of the KISS FC.

Connect your XSR or X4R-SB as usual to the FC. In addition, you must connect the SmartPort to the AUX 1 port of the KISS FC.
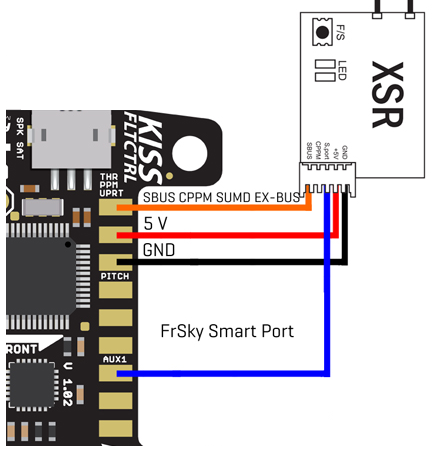
You can find an overview of the complete wiring of a KISS FC here:

Flyduino KISS CC
For the KISS CC, the T-pin of the ImmersionRC Tramp HV must be connected to the TX connector. The SmartPort must also be connected to the TLM solder pad.

You can find an overview of the complete wiring of a KISS CC here:

TBS Unify Pro HV / Race
Currently the TBS Unify Pro HV is not yet supported, but we are working on that. Soon there will be a firmware update. We are currently testing the firmware for the Unify Pro.
Configure KISS FC / CC
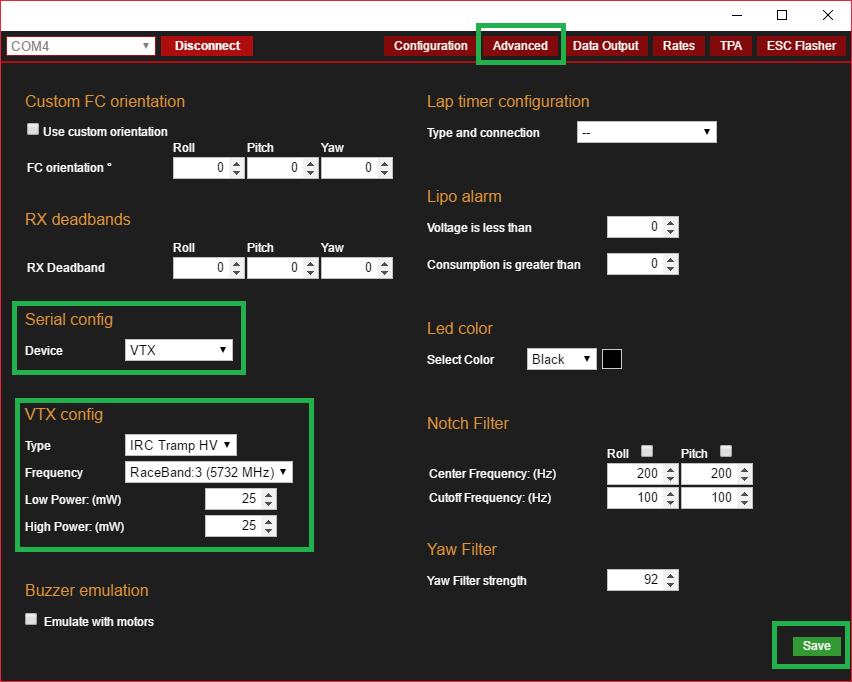
In the “Advanced” tab of the Kiss Gui you have to define the following settings.
Serial Config -> Device “VTX”
VTX Config -> Type “IRC Tramp HV”
Do not forget to press “Save”. 
Configure Taranis
Go to page 12 – Display in your model settings. Specify the LUA script on screen 1.

Search for telemetrie sensors
The telemetry function must be activated in advance, so that it works at all. For this, you have to delete all telemetry sensors and search again with the copter switched on. Go to page 11/12 of your model settings and click “Delete all sensors” and then “Find new Sensors”.

Now you can open the script at any time by pressing the “PAGE” button.
Within the LUA script you navigate through the different pages with the “MENU” button.


If you want to change a setting, select it with the wheel and then configure it. To send the changes to KISS FC / CC, simply press and hold “MENU” and select “save page”. Use the “EXIT” button to return to your normal model screen.

Done! Have fun with the LUA Script! =)
Der Beitrag Flyduino KISS FC/CC – LUA Script for PIDs, Settings and VTX erschien zuerst auf Phils Blog.