Quantcast
Channel: Phils FPV Blog
Viewing all 212 articles
Browse latest View live

Team Blacksheep Cloud für TBS Crossfire und TBS Fusion einrichten

$
0
0

Team Blacksheep Cloud


Die Team Blacksheep Cloud verbindet mithilfe von WLAN eine Reihe von TBS Produkten miteinander. Man kann nun so gut wie alle Einstellungen per Bildschirm oder LUA Script einstellen. Ebenso wurden Funktionen eingeführt mit denen zum Beispiel der Videosender dem eingestellten Kanal des TBS Fusion Brillenmoduls folgen kann. Nachfolgend möchte ich erklären, was du benötigst um die Team Blacksheep Cloud zu verwenden.

Voraussetzungen

  • TBS Crossfire TX Sende Modul
    • Firmware 3.24 oder höher
    • integriertes WiFi Modul
    • WiFi Modul mit Firmware 1.08 oder höher (Download)
  • TBS Fusion FPV Brillen Modul
    • Firmware 1.0 oder höher
    • WiFi Modul mit Firmware 1.08 oder höher (Download)
    • externe/zusätzliche Stromversorgung für das Brillenmodul, wenn keine Fatshark HDO2 verwendet wird

Habe ich ein WiFi Modul?

Als aller erstes solltest du prüfen, ob du in deinem Crossfire Sende-Modul ein WiFi Modul verbaut hast. Nicht alle Module verfügen über ein WiFi Modul ab Werk.

Um zu prüfen, ob ein Wifi Modul vorhanden ist kannst du einfach auf die Crossfire Version 3.24 oder höher updaten und schauen, ob nach dem Firmware-Update eines der folgenden WiFis erscheint (Der Name des Geräts kann abweichen).
Danke an Marc (kamikatze-fpv.de) für den Tipp.

Team Blacksheep Cloud Hotspot

Alternativ kannst du das Modul einfach kurz aufschrauben und nach folgendem Bauteil Ausschau halten: (Dies ist ein Micro TX Modul, welches immer ein WiFi Modul installiert hat. Das Foto dient nur dazu, zu zeigen wie das WiFi Modul aussieht.)

Team Blacksheep Cloud Wifi module ESP12

Solltest du kein WiFi Modul haben, kannst du es zum nachrüsten bei Team Blacksheep kaufen.

Firmware Versionen prüfen

Als erstes solltest du alle Firmwares überprüfen und ggf. aktualisieren.

Hier nochmal eine Liste der benötigten Firmwares:

  • TBS Crossfire TX: Version 3.24 oder höher
  • TBS Crossfire TX WiFi Modul: Version 1.08 oder höher
  • TBS Fusion FPV Brillen Modul : Version 1.0 oder höher
  • TBS Fusion FPV WiFi Modul: Version 1.08 oder höher
  • TBS Agent X Version 2.0.25 oder höher

Dazu öffnest du den TBS Agent X und schließt dein Fusion Modul sowie Crossfire Modul per USB an.

Nun sollten folgende „Karten“ erscheinen. Überprüfe nun die Version. Es sollte mindestens die Versionen, wie oben erwähnt installiert sein.

Team Blacksheep Cloud Firmwares Agent X

Firmware aktualisieren

Sollte eine oder mehrere Firmwares nicht aktuell sein oder sollte die Karte „XF Wifi“ oder „Fusion WiFi“ nicht angezeigt werden, müssen Firmware Updates durchgeführt werden.

Firmware Update – TBS Crossfire Micro TX

Info zur TBS Cloud Synchronisierung:
Oben rechts in der Ecke jeder Karte, gibt es einen Punkt. Dieser Punkt kann 3 verschiedene Farben haben.

  • grau – Das Gerät ist offline, also nicht per USB angeschlossen
  • orange – Das Gerät ist verbunden, aber nicht mit der Cloud synchronisiert
  • grün – Das Gerät ist verbunden und erfolgreich mit der Cloud synchronisiert

Sobald das Gerät mit der Cloud synchronisiert ist, wurde es auf dem TBS Server gespeichert und deiner E-Mail Adresse zugeordnet mit der du dich in dem TBS Agent X angemeldet hast.

Als erstes nehmen wir uns das Crossfire Micro TX Modul vor. Schließe das Modul dazu per USB an den TBS Agent X an und klicke auf „MANAGE„.

Team Blacksheep Cloud Firmwares Agent X

Nun klickst du auf „FIRMWARE“ und du erhältst folgende Liste.

Team Blacksheep Cloud Firmwares Agent X

Firmware Bedeutung

  • Beta – Firmwares, die über die Öffentlichkeit zum testen freigegeben worden sind. Meistens sind diese Firmwares schon relativ gut getestet/stabil. Im täglichen Gebrauch bitte mit Vorsicht verwenden (Verwendung auf eigene Gefahr)
  • keine Bezeichnung – Diese Firmware sind „stable“ bzw „stabil“ (also ausreichend getestet) und können in jedem Fall geflasht werden.

Firmware Update Arten

  • UPDATE – Aktualisiert auf eine höhere Firmware Version
  • REFRESH – Aktualisiert die aktuelle Firmware Version („CURRENT“ markiert die aktuelle Firmware Version)
  • DOWNGRADE – Aktualisiert auf eine niedrigere Firmware Version

Mit einem Klick auf „RELEASE NOTE“ erfährst du, was an dieser Firmware geändert, wie zum Beispiel welche Bugs behoben wurden oder welche neuen Funktionen hinzugekommen sind.

Sollte dir keine Beta Firmware angezeigt werden, musst du diese zunächst aktivieren. Klicke dazu oben rechts auf die drei Punkte.

Nun setze ein Häkchen bei „Include beta firmware„, drücke auf „SAVE“ und danach auf „RELOAD PRODUCT FIRMWARE„. Danach sollte dir die Beta Firmware angezeigt werden.

Team Blacksheep Cloud Agent X

Mit einem Klick auf UPDATE führst du das Firmware Update aus. Warte so lange bis 100% erreicht sind (die Prozent-Anzeige kann mehr als 1 Mal durchlaufen) und ein Haken bei „Complete“ erscheint. Danach kannst du mit den Pfeil oben links neben „Devices“ zurück gehen.

Team Blacksheep Cloud Update complete

Die Firmware wurde erfolgreich aktualisiert! =)

Firmware Update – TBS Fusion Module

Das Firmware Update des Fusion Moduls wird genau so ausgeführt. Achte darauf, dass dein USB Port genügend Spannung für das Modul bereitstellt. Sollte das nicht der Fall sein, kann das Modul während des Vorgangs aus gehen. Setze Das Modul sicherheitshalber in eine Brille ein und versorge das Modul über die Brille und/oder externe Stromversorgung mit Spannung.

Tipp: TBS Fusion Handbuch

Firmware Update – WiFi Modul

Nun geht es darum, beide WiFi Module zu aktualisieren. Dazu benötigen wir folgende Firmware: tbs-cloud-activation.zip
Entpacke das Zip Archiv auf eurem Computer oder Smartphone und du erhältst folgende zwei Dateien:

  • Crossfire_WiFi_V0108.bin – Firmware für das Crossfire WiFi Modul
  • Fusion_WiFi_V0108.bin – Firmware für das Fusion WiFi Modul

Info: Die Firmware Version kann natürlich höher als 108 (1.08) sein, wenn du diesen Artikel zu einem späteren Zeitpunkt ließt.

Als erstes flashen wir das TBS Crossfire Micro TX Modul. Versorge es mit einer sicheren Stromquelle. Entweder per USB oder in einer Fernsteuerung.

Wichtig: Die Stromversorgung darf während des kompletten Flash-Vorgangs nicht unterbrochen werden, da das Modul sonst Schaden nehmen kann und unter Umständen nicht mehr über den TBS Agent X geflasht werden kann. Ebenso das frühzeitige unterbrechen, des Vorgangs führt zu dem selben Ergebnis! Also abwarten!

Nun sollte sich einer dieser Hotspots erstellen.

Team Blacksheep Cloud hotspot

Verbinde dich entweder mit deinem Smartphone oder Computer mit dem Wifi „tbs_crossfire_XXXXXX„.
Nun tippe in deinem Internet-Browser die folgende IP-Adresse in die Adressleiste ein: 192.168.4.1

Du solltest zu einem Webinterface kommen mit einer Auswahl zwischen „Upgrade“ und „Wifi

Team Blacksheep Cloud WiFi module Team Blacksheep Cloud WiFi module

Auf der Seite WiFi kannst du erkennen mit welchem WLAN das Wifi Modul verbunden ist. Du kannst mit einem Klick auf Scan nach neuen WLAN Netzen suchen und dich damit verbinden. Außerdem erfährst du welche IP Adresse das Wifi Modul im aktuellen WLAN Netz zugewiesen bekommen hat. In unserem Fall ist dies 192.168.0.66 (ist immer unterschiedlich). Über diese IP Adresse kannst du mit jedem anderen Gerät aus dem WLAN auf das Webinterface zugreifen. Wenn du dich mit einem Smartphone direkt in das WLAN des Wifi Moduls einloggst, kannst du das selbe Interface über die IP Adresse 192.168.4.1 erreichen.

Auf der Seite „Upgrade“ kannst du die Firmware aktualisieren. Wähle dazu einfach das passende Firmware File aus.

  • Crossfire_WiFi_V0108.bin – Firmware für das Crossfire WiFi Modul
  • Fusion_WiFi_V0108.bin – Firmware für das Fusion WiFi Modul

Lade die passende Datei auf das Modul hoch, indem du sie auswählst und auf „Upgrade“ klickst. Bitte warte solange, bis der Vorgang abgeschlossen ist.

Team Blacksheep Cloud WiFi module

Er wird dir mit folgender Meldung quittiert. Danach ist die Firmware des WiFi Moduls aktualisiert.

Bitte beachten: Bitte in keinem Fall die Stromversorgung trennen, oder das Modul versuchen zu „rebooten“. Das Modul startet sich von alleine wieder neu und geht danach selbständig wieder online.

Übrigens, das Wifi Modul vom Fusion und dem Crossfire werden auf die selbe Weise aktualisiert. Der Vollständigkeit halber hier zwei Screenshots des Crossfire Moduls.

Team Blacksheep Cloud WiFi module Team Blacksheep Cloud WiFi module

Nun sind alle Firmwares aktuell!

Team Blacksheep Cloud WiFi module

Team Blacksheep Cloud Registrierung überprüfen

Schließe nun noch einmal das Fusion Modul sowie das Crossfire Modul an deinen TBS Agent an. Du solltest folgende 4 Karten sehen. Alle Karten müssen oben rechts einen grünen Punkt anzeigen.

Team Blacksheep Cloud Agent X

Team Blacksheep Cloud Verbindung überprüfen

Wir sind auf der Zielgeraden und prüfen nun nur noch einmal sicherheitshalber ob die WiFi Module auch mit dem TBS Server verbunden sind.

Im Fusion Modul: Gehe in das Menü „Settings“ -> „CRSF“ -> „Fusion Wifi“ -> „About„. Dort muss „Server Online“ stehen.

Team Blacksheep Cloud Fusion Module

Das selbe prüfen wir mit dem Crossfire Modul.

In meinem Fall über die Tango 1: „Devices“ -> „XF Wifi“ -> „About„. Dort muss „Server Online“ stehen.

Team Blacksheep Cloud Tango 1

Fertig!

Nun kannst du über die Team Blacksheep Cloud mit deiner Tango 1 zum Beispiel das Fusion Modul konfigurieren. Hier ein paar Fotos der Einstellungen, die getätigt werden können.

Team Blacksheep Cloud Tango 1 Team Blacksheep Cloud Tango 1 Team Blacksheep Cloud Tango 1 Team Blacksheep Cloud Tango 1

Die Team Blacksheep Cloud bietet allerdings noch weitere Features. Du kannst zu Beispiel dem Fusion Modul sagen, dass es wenn man an dem Modul einen Kanal umschaltet, den Videosender am Copter/Wing ebenfalls auf diesen Kanal schaltet. So kannst du zum Beispiel während des Fluges einfach den Kanal umschalten ohne Bildunterbrechung (ok, ganz kurz wird es eine Unterbrechung geben 😉 ). Ebenso ist es möglich dem Fusion Modul zu sagen, es soll dem Video-Kanal des Videosenders folgen. Wenn du zum Beispiel zwei Copter mit unterschiedlichen Video-Kanälen hast, stellt sich das Fusion Modul immer auf den richtigen Kanal ein.

Meine persönliche Erfahrung mit der Team Blacksheep Cloud

Ich habe aktuell einige Schwierigkeiten, die Team Blacksheep Cloud 100%ig ans laufen zu bekommen. Sehr oft verbinden sind die Module nicht mit dem TBS Server und wenn ich auf Einstellungen ändere werden diese oft nicht übernommen. Ebenso dauert das laden der Einstellungen oftmals sehr lange oder der Bildschirm bleibt einfach leer. Dadurch, dass das System sehr neu ist finde ich es aber nicht wirklich schlimm und ich gebe TBS noch etwas Zeit alle Funktionen hinzuzufügen, die versprochen worden sind. Ich bin natürlich mit TBS in Kontakt und teile alle meine Probleme, Erfahrungen und Bugs um das System zu verbessern.

Alles in allem, ist die Team Blacksheep Cloud eine super Ergänzung und verbindet nun nahezu alle Hardware-Komponenten (Crossfire, Videosender, Brillenmodul) von TBS miteinander.

Credits: Infographic vector created by freepik – www.freepik.com

Der Beitrag Team Blacksheep Cloud für TBS Crossfire und TBS Fusion einrichten erschien zuerst auf Phils FPV Blog.


How to use Team Blacksheep Cloud for TBS Crossfire and TBS Fusion

$
0
0

Team Blacksheep Cloud


The Team Blacksheep Cloud connects a number of TBS products using WIFI. You can now make almost all settings via screen or LUA script for all those connected devices. New features like TBS Fusion Goggle Modules will follow the VTX channel have also been introduced. In this article, you will learn how to configure and use the new Team Blacksheep Cloud.

Requirements

  • TBS Crossfire TX module
    • Firmware 3.24 or higher
    • integrated WiFi module
    • WiFi module with Firmware 1.08 or higher (Download)
  • TBS Fusion FPV Goggle module
    • Firmware 1.0 or higher
    • WiFi module with Firmware 1.08 or higher (Download)
    • external/additional power for goggle module when using no Fatshark HDO2

Do I have a WiFi module?

First of all, you should check if you have a WiFi module in your Crossfire transmitter module. Not all modules have a WiFi modules installed.

To check whether a WiFi module is installed, you can simply update to Crossfire version 3.24 or higher and see whether one of the following WiFi networks appears after the firmware update (the name of the wifi may vary).
Thanks Marc (kamikatze-fpv.de) for the hint.

Team Blacksheep Cloud Hotspot

Alternatively, you can simply open up the module and look for the following component: (this is a Micro TX, don’t open it, it has always a WiFi module, this is just to show you how the WiFi module looks like)

Team Blacksheep Cloud Wifi module ESP12

If you don’t have a WiFi module, you can buy it from Team Blacksheep to retrofit it.

Check firmware versions

First you should check all firmwares and update them if necessary.

Here is a list of the required firmware:

  • TBS Crossfire TX: Version 3.24 or higher
  • TBS Crossfire TX WiFi module: Version 1.08 or higher
  • TBS Fusion FPV goggle module: Version 1.0 or higher
  • TBS Fusion FPV WiFi module: version 1.08 or higher
  • TBS Agent X version 2.0.25 or higher

To do this, open the TBS Agent X and connect your Fusion module or Crossfire module via USB.

The following „cards“ should appear. Now check the version. At least the versions as mentioned above should be installed.

Team Blacksheep Cloud Firmwares Agent X

Update firmware

If one or more firmwares are not up to date or if the „XF Wifi“ or „Fusion WiFi“ card is not displayed, firmware updates are required.

Firmware update – TBS Crossfire Micro TX

About the Team Blacksheep Cloud synchronization:
There is a dot in the top right corner of each card. This point can have 3 different colors.

  • gray – The device is offline, i.e. not connected via USB
    orange – The device is connected but not synchronized with the Team Blacksheep Cloud
    green – The device is connected and successfully synchronized with the Team Blacksheep Cloud

As soon as the device is synchronized with the cloud, it is on the TBS server and assigned to the email address you used to log into TBS Agent X.

First, let’s uodate the Crossfire Micro TX module. To do this, connect the module to the TBS Agent X via USB and click on „MANAGE„.

Team Blacksheep Cloud Firmwares Agent X

Now click on „FIRMWARE“ and you will get the following list:

Team Blacksheep Cloud Firmwares Agent X

Firmware meaning

  • Beta firmwares that have been released for testing by the public. Most of these firmwares are already relatively well tested/stable. Please use with caution in daily use (use at your own risk)
  • no name – These firmware are  „stable“ (i.e. sufficiently tested) and can be flashed in any case.

Firmware update types

  • UPDATE – Updates to a higher firmware version
  • REFRESH – Updates the current firmware version („CURRENT“ marks the current firmware version installed on your device)
  • DOWNGRADE – Updates to a lower firmware version

With a click on „RELEASE NOTE“ you can find out what has changed in this firmware, such as which bugs have been fixed or which new functions have been added.

If you don’t see any beta firmware, you have to activate it first. To do this, click on the three dots at the top right.

Now check „Include beta firmware„, press „SAVE“ and then „RELOAD PRODUCT FIRMWARE„. Then you should see the beta firmware.

Team Blacksheep Cloud Agent X

With a click on „UPDATE“ you inititate the firmware update. Wait until 100% is reached (the percentage can go from 0-100% several times) and a check mark appears above „Complete„. Then you can go back with the arrow at the top left next to „Devices„.

Team Blacksheep Cloud Update complete

The firmware was updated successfully! =)

Firmware update – TBS Fusion Module

The firmware update of the Fusion module is done in exactly the same way. Make sure that your USB port provides enough power for the module. If this is not the case, the module can shut down during the process. For safety’s sake, insert the module into your FPV goggle and supply the module with voltage via the goggle and / or external power supply.

Hint: TBS Fusion Manual

Firmware update – WiFi module

Now we need to update both WiFi modules. For this we need the following firmware: tbs-cloud-activation.zip
Unzip the zip archive on your computer or smartphone and you will get the following two files:

  • Crossfire_WiFi_V0108.bin – Firmware for the Crossfire WiFi module
  • Fusion_WiFi_V0108.bin – Firmware for the Fusion WiFi module

Info: The firmware version can of course be higher than 108 (1.08) if you read this article at a later date.

First we flash the TBS Crossfire Micro TX module. Provide it with a safe power source. Either via USB or in a remote control.

Important: The power supply must not be interrupted during the entire flash process, as the module may otherwise be damaged and may no longer be possible to flash via the TBS Agent X. Interrupting/stopping before the update is finished, leads to the same result! So please wait!

Now one of these hotspots should be created.

Team Blacksheep Cloud hotspot

Connect to the wifi „tbs_crossfire_XXXXXX“ either with your smartphone or computer.
Now type the following IP address into your Internet browser: 192.168.4.1

You should see a web interface with a choice between „Upgrade“ and „Wifi

Team Blacksheep Cloud WiFi module Team Blacksheep Cloud WiFi module

On the „Wifi“ page you can see which WiFi the module is connected to. You can search for new WiFi networks by clicking on „Scan“ and connect to it. You will also find out which IP address the Wifi module has been assigned in the current WiFi network. In our case this is 192.168.0.66 (is always different). With this IP address you can access the web interface with any other device from the WiFi. If you log into the own Network of the WiFi module with a smartphone, you can reach the same interface via the IP address 192.168.4.1.

On the page „Upgrade„, you can update the firmware. Simply select the appropriate firmware file.

  • Crossfire_WiFi_V0108.bin – Firmware for the Crossfire WiFi module
  • Fusion_WiFi_V0108.bin – Firmware for the Fusion WiFi module

Upload the appropriate file to the module by selecting it and click on „Upgrade„. Please wait until the process is complete.

Team Blacksheep Cloud WiFi module

Once you see this message, the firmware of the WiFi module is then updated.

Please note: Please never disconnect the power or try to „reboot“ the module. The module restarts on its own and then goes online again on its own.

By the way, the Wifi module from the Fusion and the Crossfire are updated in the same way. For the sake of completeness, here are two screenshots of the Crossfire module.

Team Blacksheep Cloud WiFi module Team Blacksheep Cloud WiFi module

Now all firmwares are up to date!

Team Blacksheep Cloud WiFi module

Check Team Blacksheep Cloud registration

Now connect the Fusion module as well as the Crossfire module to your TBS agent. You should see the following 4 cards. All cards must show a green dot in the top right corner.

Team Blacksheep Cloud Agent X

Team Blacksheep check cloud connection

Nearly finished, now only check if both WiFi modules are connected to the TBS server.

In the Fusion module: Go to the menu „Settings“ -> „CRSF“ -> „Fusion Wifi“ -> „About„. You should see: „Server Online„.

Team Blacksheep Cloud Fusion Module

Check the same with the Crossfire module.

In meinem Fall über die Tango 1: „Devices“ -> „XF Wifi“ -> „About„. Dort muss „Server Online“ stehen.

In my case, the Tango 1: „Devices“ -> „XF Wifi“ -> „About„. You should see: „Server Online„.

Team Blacksheep Cloud Tango 1

Done!

Now you can configure the Fusion module with your Tango 1 via the Team Blacksheep Cloud. Here are a few photos of the settings that can be made.

Team Blacksheep Cloud Tango 1 Team Blacksheep Cloud Tango 1 Team Blacksheep Cloud Tango 1 Team Blacksheep Cloud Tango 1

The Team Blacksheep Cloud offers manny features, like if you change the Channel on the Fusion module, the video transmitter on the copter / wing also switches to this channel. Also, for example, you can simply switch the channel during the flight without interrupting the transmission (ok, there will be a short break;) ). It is also possible to configure the Fusion module to follow the video channel of the video transmitter. For example, if you have two copters with different video channels, the Fusion module will always switch to the correct channel of the aircraft.

My personal experience with the Team Blacksheep Cloud

I am currently having some difficulties getting the Team Blacksheep Cloud 100% up and running. Very often the modules are not connected to the TBS server and when I change the settings they are often not saved. Likewise, loading the settings often takes a long time or the screen simply remains blank. Because the system is very new, I don’t mind and I give TBS some time to add all the functions that were promised. Of course I am in contact with TBS and share all my problems, experiences and bugs to improve the system.

All in all, the Team Blacksheep Cloud is a great addition and now connects almost all hardware components (Crossfire, video transmitter, glasses module) from TBS.

Credits: Infographic vector created by freepik – www.freepik.com

Der Beitrag How to use Team Blacksheep Cloud for TBS Crossfire and TBS Fusion erschien zuerst auf Phils FPV Blog.

Zeez F7 Flight Controller Anschlussplan / Wiringplan

$
0
0

I created this high resolution connection plan for the Zeez F7 Flight Controller

This connection plan will be constantly updated.
Please always link to the original image (6614px × 4661px, right click -> save as) so that the latest version is always displayed.

https://blog.seidel-philipp.de/wp-content/uploads/2020/05/Zeez_F7_Flight-Controller_Anschlussplan_Wiringplan.png

Click the image to enlarge
If you are looking for more wiring plans, go here

Hardware used in this wiringplan

Created by Philipp Seidel
Credits: Icons by rdy_fpv , Albert K and Me 😉

Der Beitrag Zeez F7 Flight Controller Anschlussplan / Wiringplan erschien zuerst auf Phils FPV Blog.

How to setup TBS Crossfire Multibind

$
0
0

The Team Blacksheep Cloud connects a number of TBS products using Wifi. Among other things, a function has been added that allows you to bind one drone with multiple transmitters (Crossfire modules). This allows you to use two or more remotes without rebinding.

Requirements

  • TBS Crossfire TX Sende Modul
    • Firmware 3.70 or higher
    • integrated WiFi module
    • WiFi module with firmware 1.08 or higher
    • activated TBS Cloud
    • if necessary this Tutorial
  • TBS Crossfire RX
    • Firmware 3.70 or higher

What is needed

Do I have a WiFi module?

First of all, you should check if you have a WiFi module in your Crossfire transmitter module. Not all modules have a WiFi modules installed.

To check whether a WiFi module is installed, you can simply update to Crossfire version 3.24 or higher and see whether one of the following WiFi networks appears after the firmware update (the name of the wifi may vary).
Thanks Marc (kamikatze-fpv.de) for the hint.

Firmware update

In order to use Crossfire Multibind, your transmitters (TX) and your receivers (RX) must have installed at least firmware version 3.7. If this is not the case, please follow the update instructions below. You DON’T need the Fusion module.

Check TBS cloud status

First we have to check if your USER ID has been sent to your Crossfire module. This unique user ID is later stored on the receiver (RX) which can then be controlled with multiple Crossfire modules.

Open the LUA Script on your remote control and go to crossfire.lua -> XF Micro TX -> About -> User ID 

An ID should be displayed. Check on all Crossfire modules whether the same ID is displayed. Here you can also check again whether the firmware version is at least V 3.7.

With the LUA Script crossfire.lua -> XF Wifi -> About -> Server -> Online you can also check the TBS Cloud Server connection.

activate Multibind

Now use the Crossfire LUA Script again to configure your Crossfire module.

To do this, enable Multibind: crossfire.lua -> XF Micro TX -> General-> Multi-Bind -> Enable
You also have to do that that on every Crossfire module you want to use.

bind your receivers

Now you only have to bind your receivers with one of your Crossfire modules and it will automatically bind to any other crossfire module (which has the same USER ID) you turn on. If Autobind does not work, take a look at the FAQ at the end of this article

FAQ – Frequently asked questions

Do I need a permanent internet connection to bind?

No, each Crossfire module has to obtain the user ID from the TBS Cloud Server once and then does not require any further internet connection to bind.

In what order does my drone and several Crossfire modules connect to each other?

„First come first serve!“ – The drone always connects to the crossfire module which are switched on first. If two modules or drones are powered at the same time, binding sequenz may be random upon signal strength. Therefore please only power on one drone/module at a time.

Why is Autobind not working after activating Multibind?

As soon as Multibind is activated, the Crossfire module has a new ID. Accordingly, you MUST press the bind button once again to bind the RX to the TX. If you dont want to press the bind button, here is a workaround.

  1. Update the Crossfire module to at least 3.7 according to the instructions above
  2. Deactivate Multibind on Crossfire module
  3. Turn on the drone
  4. Update Crossfire RX firmware
  5. in bound state, activate multibind and wait briefly until the connection is re-established
  6. done, now the crossfire USER-ID is transferred

I’ve activated Crossfire Model Match, why doesn’t Multibind work anymore?

That is normal. Model Match is used to assign a RX to a specific model / profile on a radio. Disable Model Match to use multibind.

One of my modules has a different user ID, what should I do?

This can happen if you connect your own Crossfire module to a third-party Agent X and then synchronize it with the TBS Cloud. Your own Crossfire module then has a foreign ID. To undo this you have to do the following:
Connect the module to your own Agent X and wait until it synchronizes with the TBS Cloud

About the Team Blacksheep Cloud synchronization:
There is a dot in the top right corner of each card. This point can have 3 different colors.

  • gray – The device is offline, i.e. not connected via USB
  • orange – The device is connected but not synchronized with the Team Blacksheep Cloud
  • green – The device is connected and successfully synchronized with the Team Blacksheep Cloud

As soon as the device is synchronized with the cloud, it is on the TBS server and assigned to the email address you used to log into TBS Agent X.

Credits: Infographic vector created by freepik – www.freepik.com

Der Beitrag How to setup TBS Crossfire Multibind erschien zuerst auf Phils FPV Blog.

TBS Crossfire Multibind konfigurieren

$
0
0

Die Team Blacksheep Cloud verbindet mithilfe von WLAN eine Reihe von TBS Produkten miteinander. Unter anderem wurde nun eine Funktion hinzugefügt mithilfe du eine Drohne mit mehreren Sendern (Crossfire Modulen) binden kannst. Dies ermöglicht es dir zwei oder mehr Fernbedienungen zu verwenden ohne neu zu binden.

Voraussetzungen

  • TBS Crossfire TX Sende Modul
    • Firmware 3.70 oder höher
    • integriertes WiFi Modul
    • WiFi Modul mit Firmware 1.08 oder höher
    • TBS Cloud aktiviert
    • ggfs. folgendes Tutorial
  • TBS Crossfire RX
    • Firmware 3.70 oder höher

Was wird benötigt

Habe ich ein WiFi Modul?

Als aller erstes solltest du prüfen, ob du in deinem Crossfire Sende-Modul ein WiFi Modul verbaut hast. Nicht alle Module verfügen über ein WiFi Modul ab Werk.

Um zu prüfen, ob ein Wifi Modul vorhanden ist kannst du einfach auf die Crossfire Version 3.24 oder höher updaten und schauen, ob nach dem Firmware-Update eines der folgenden WiFis erscheint (Der Name des Geräts kann abweichen).
Danke an Marc (kamikatze-fpv.de) für den Tipp.

Firmware Update durchführen

Damit du Crossfire Multibind verwenden kannst müssen deine Sender (TX) sowie deine Empfänger (RX) mindestens auf Firmware Version 3.7 sein. Wenn das nicht der Fall ist, halte dich bitte an folgende Update Anleitung. Das Fusion Modul wird NICHT zwingend benötigt.

TBS Cloud Status überprüfen

Zuerst müssen wir prüfen, ob die TBS Cloud deinem Crossfire Modul deine User ID gesendet hat. Mit dieser einmaligen User ID wird später auf dem Empfänger(RX) gespeichert und kann fortan mit mehreren Crossfire Modulen angesteuert werden.

Öffne dazu das LUA Script auf deiner Fernbedienung und begib dich crossfire.lua -> XF Micro TX -> About -> User ID 

Dort sollte eine ID angezeigt werden. Prüfe auf allen Crossfire Modulen, ob die selbe ID hinterlegt ist. Hier kannst du auch nochmal prüfen, ob die Firmware Version mindestens V 3.7 ist.

Im LUA Script crossfire.lua -> XF Wifi -> About -> Server -> Online kannst du auch nochmal prüfen, ob du eine Verbindung zum TBS Cloud Server hergestellt hast.

Multibind aktivieren

Nutze nun das Crossfire LUA Script um dein Crossfire Modul zu konfigurieren.

Öffne dazu das LUA Script auf deiner Fernbedienung und begib dich crossfire.lua -> XF Micro TX -> General-> Multi-Bind -> Enable
Auch das musst du auf jedem Crossfire-Modul überprüfen.

Empfänger binden

Nun musst du nur noch nacheinander deine Empfänger mit einem deiner Crossfire Module neu binden. Am zweiten, dritten,… Modul musst du keine Empfänger binden! Sollte Autobind nicht funktionieren, wir einen Blick in die FAQ am Ende dieses Beitrags

FAQ – Häufig gestellte Fragen

Benötige ich dauerhaft eine Internet-Verbindung zum binden?

Nein, jedes Crossfire Modul (TX) muss einmalig die User-ID vom TBS Cloud Server beziehen und benötigt danach zum binden keine weitere Internet-Verbindung.

In welcher Reihenfolge verbinden sich Copter und mehrere Crossfire Module miteinander?

„Wer zuerst kommt mahlt zuerst!“ – Es verbindet sich immer der Copter mit der Fernbedienung, welcher als erstes angeschaltet werden. Wenn zwei Crossfire Module (TX) oder Copter gleichzeitig an sind, wird ein Copter zufällig mit einer Fernbedienung gebunden. Darum bitte immer nur einen Copter oder ein Crossfire Modul (TX) gleichzeitig betreiben.

Warum binden meine Empfänger sich nicht automatisch, nachdem ich Multibind aktiviert habe?

Sobald Multibind aktiviert wird, hat das Crossfire Modul (TX) eine neue ID. Dementsprechend MUSST du den Bind Knopf einmalig erneut drücken. Wenn du das umgehen möchtest, musst du wie folgt vorgehen.

  1. Crossfire Modul nach der obigen Anleitung auf mindesten 3.7 updaten
  2. Multibind Crossfire Modul deaktivieren
  3. Copter anschalten
  4. Crossfire Empfänger (RX) Firmware aktualisieren lassen
  5. im gebundene Zustand, Multibind aktivieren und kurz warten bis die Verbindung wieder aufgebaut ist
  6. fertig, nun ist die aktuelle ID übertragen

Ich habe Crossfire Model Match aktiviert, warum funktioniert Multibind nicht?

Das ist normal. Model Match wird dazu verwendet, einen Empfänger (RX) einem bestimmten Modell/Profil auf einer Fernbedienungen zuzuweisen. Deaktiviere Model Match, um Multibind zu verwenden.

Eines meiner Module hat eine andere User-ID, was tun?

Dies kann passieren, wenn du dein eigenes Crossfire Modul an einem fremden Agent X anschließt und der sich dann mit der TBS Cloud synchronisiert. Dein eigenes Crossfire Modul hat dann eine fremde ID. Um dies rückgängig zu machen musst du folgendes tun:
Schließe das Modul an deinem eigenen Agent X an und warte bis er sich mit der TBS Cloud synchronisiert

Info zur TBS Cloud Synchronisierung:
Oben rechts in der Ecke jeder Karte, gibt es einen Punkt. Dieser Punkt kann 3 verschiedene Farben haben.

  • grau – Das Gerät ist offline, also nicht per USB angeschlossen
  • orange – Das Gerät ist verbunden, aber nicht mit der Cloud synchronisiert
  • grün – Das Gerät ist verbunden und erfolgreich mit der Cloud synchronisiert

Sobald das Gerät mit der Cloud synchronisiert ist, wurde es auf dem TBS Server gespeichert und deiner E-Mail Adresse zugeordnet mit der du dich in dem TBS Agent X angemeldet hast.

Credits: Infographic vector created by freepik – www.freepik.com

Der Beitrag TBS Crossfire Multibind konfigurieren erschien zuerst auf Phils FPV Blog.

FETtec KISS FC Flight Controller + DJI Air Unit Anschlussplan / Wiringplan

$
0
0

I created this high resolution connection plan for the FETtec KISS FC Flight Controller

This connection plan will be constantly updated.
Please always link to the original image (6614px × 4661px, right click -> save as) so that the latest version is always displayed.

https://blog.seidel-philipp.de/wp-content/uploads/2020/05/FETtec_KISS_FC_F7_Flight-Controller_DJI_Air_Unit_Anschlussplan_Wiringplan.png

Click the image to enlarge
If you are looking for more wiring plans, go here

Hardware used in this wiringplan

Created by Philipp Seidel
Credits: Icons by rdy_fpv , Albert K and Me 😉
Please support Alex for his work on the KISS Firmware: https://www.patreon.com/fedorcommander

Der Beitrag FETtec KISS FC Flight Controller + DJI Air Unit Anschlussplan / Wiringplan erschien zuerst auf Phils FPV Blog.

BetaFPV Lite Radio 2 – Die perfekte Fernsteuerung für Einsteiger?

$
0
0

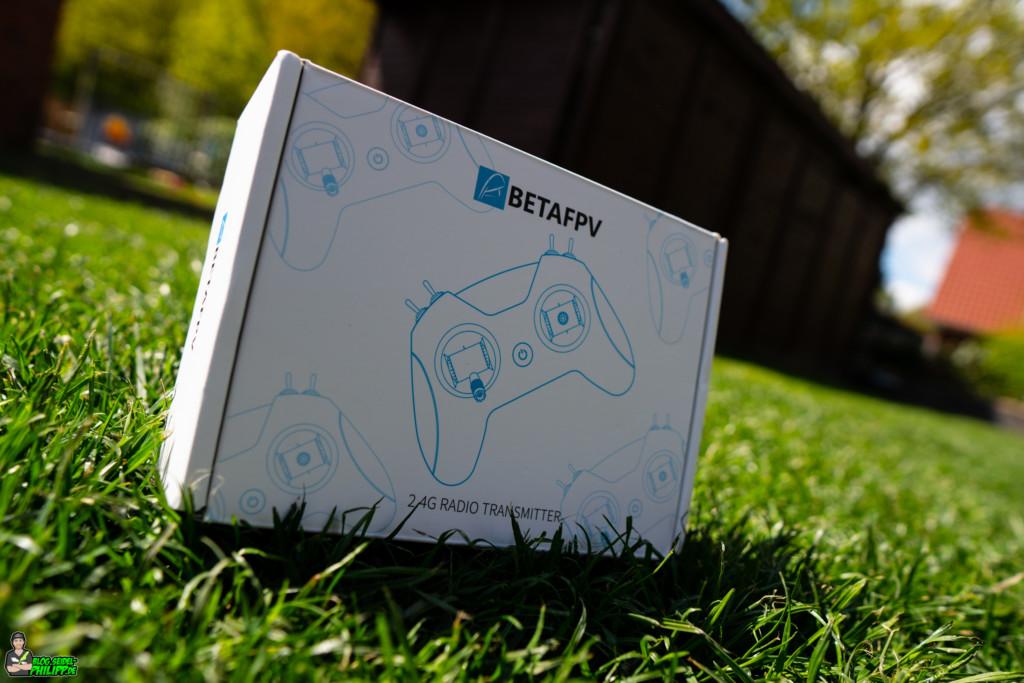
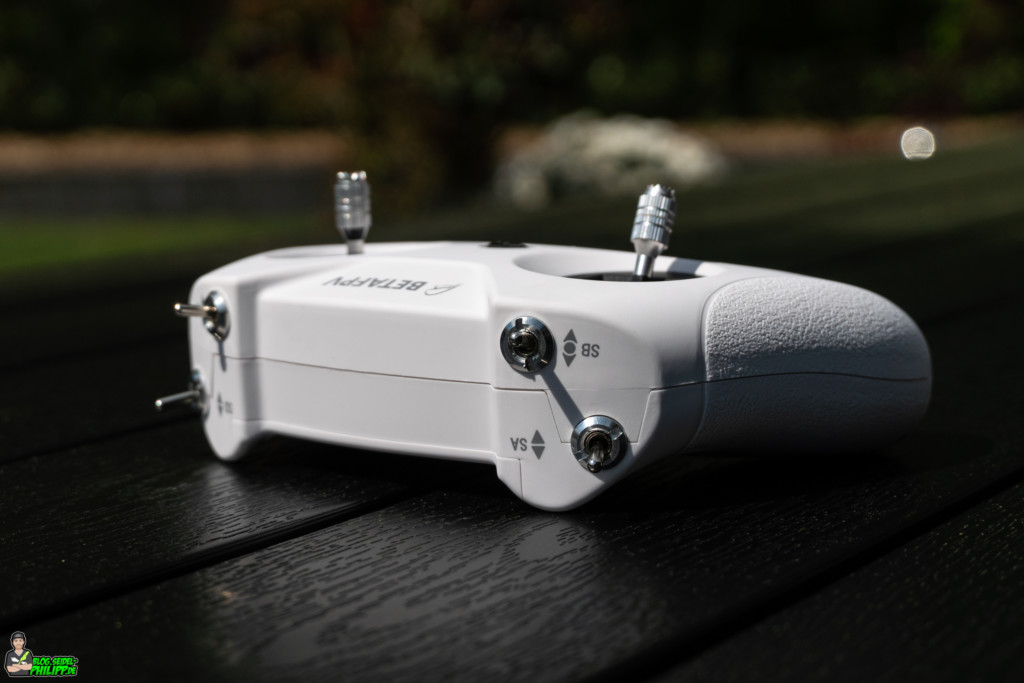
BetaFPV hat mir für diesen Artikel die neue BetaFPV Lite Radio 2 zugeschickt. Diese neue Fernsteuerung mit FrSky Protokoll kostet weniger als 40 US$. In diesem Artikel erfährst du, warum ich denke, dass es aktuell die beste Fernsteuerung für Einsteiger und Leuten mit TinyWoops ist.

Bezugsquelle

Die BetaFPV Lite Radio 2 findest du in folgenden Online-Shops:

  • China: betafpv.com
  • Deutschland: bisher nicht verfügbar

Lieferumfang BetaFPV Lite Radio 2

  • BetaFPV Lite Radio 2 Fernsteuerung
  • 1x 350 mAh 2S LiPo
  • Anleitung

Features

  • unterstützt folgende Protokolle: Frsky D8, Frsky D16 FCC/LBT oder Bayang Protokoll
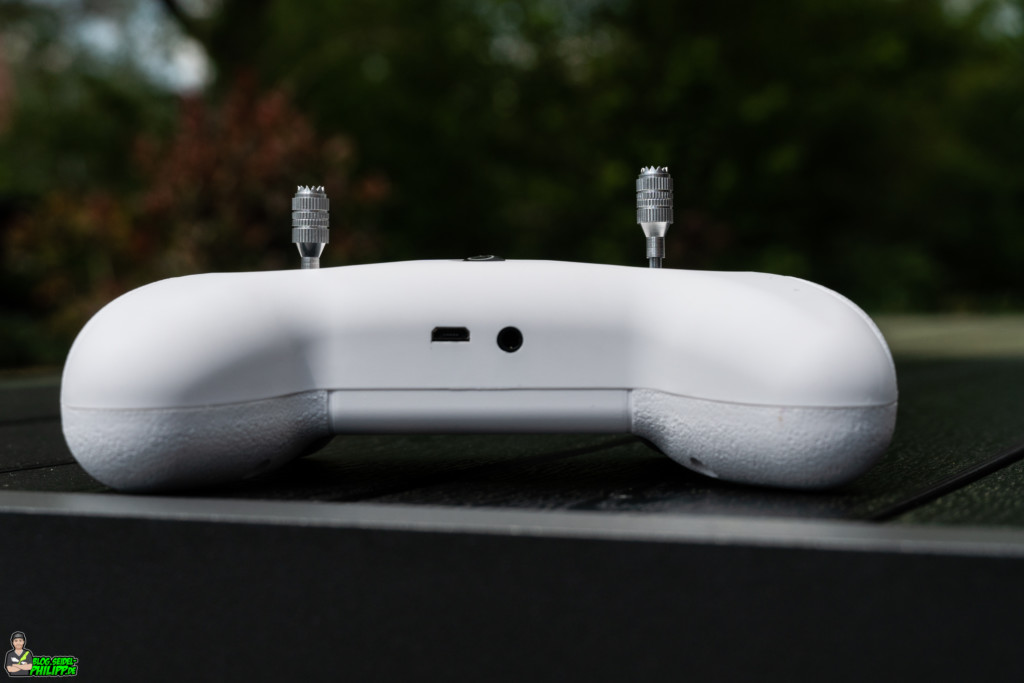
  • lässt sich per USB aufladen
  • haptisches Feedback durch Vibrationsmotor
  • ergonomisches Design
  • 8 Kanäle
  • 4 Schalter (2x 2-Wege, 2x 3-Wege)
  • OpenTX Trim Funktion
  • kann für Simulator verwendet werden
  • Trainer Funktion
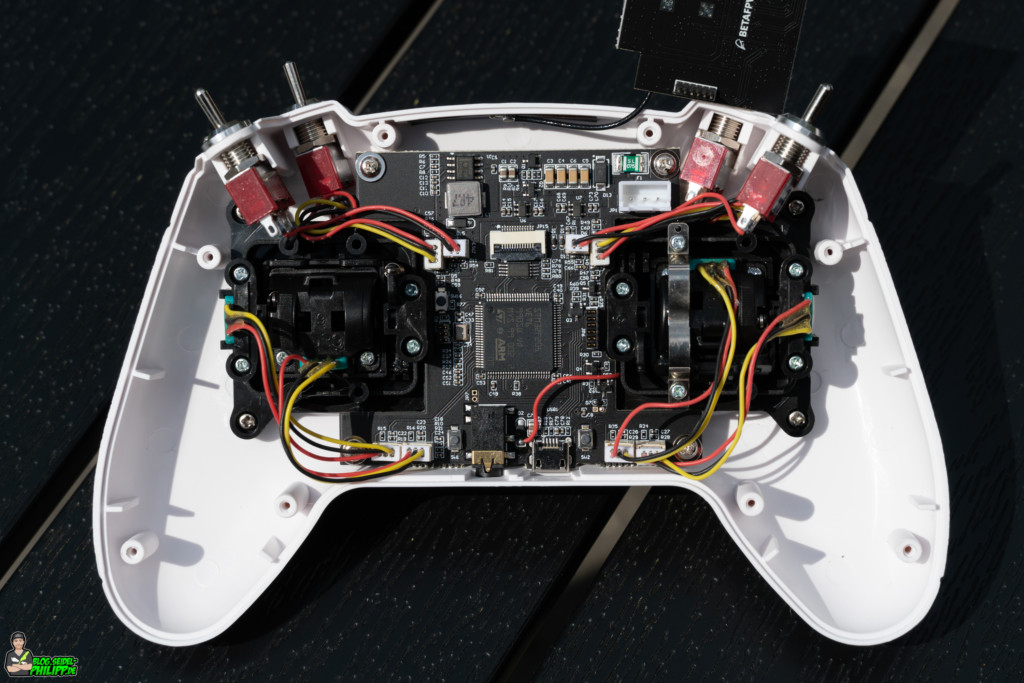
  • interne Antenne
  • „echte“ Gimbals
  • wiegt 230 g

Größe & Verarbeitung

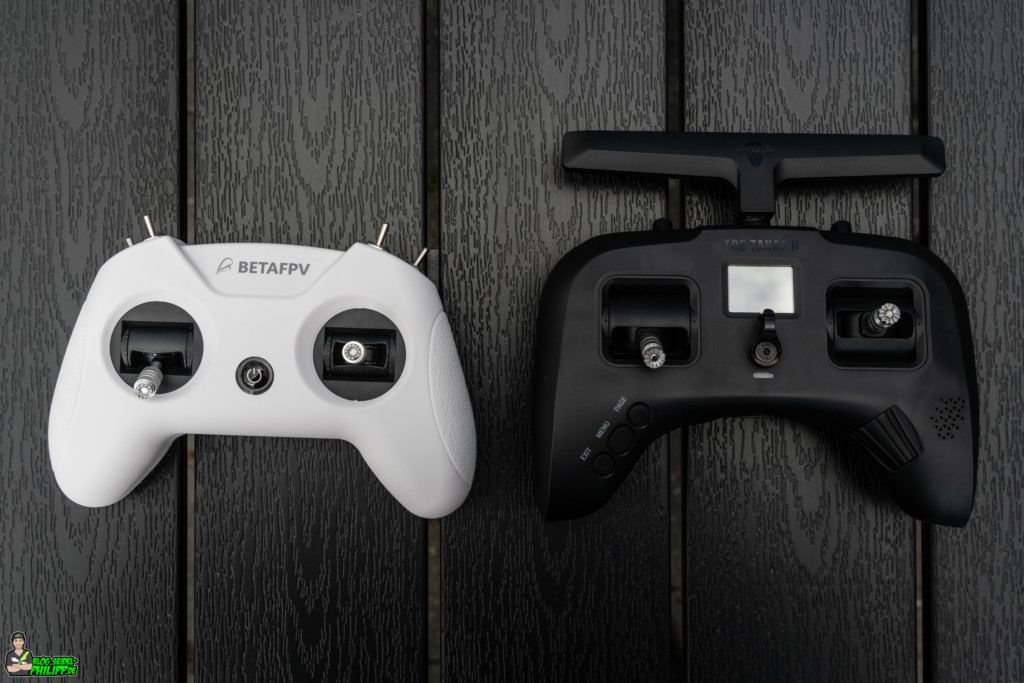
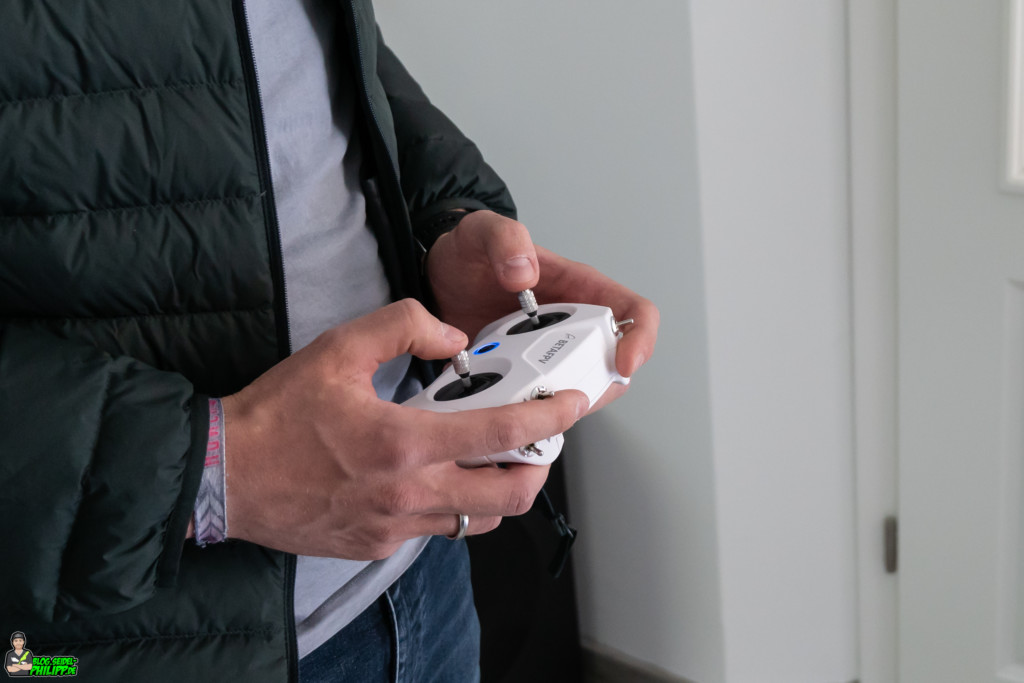
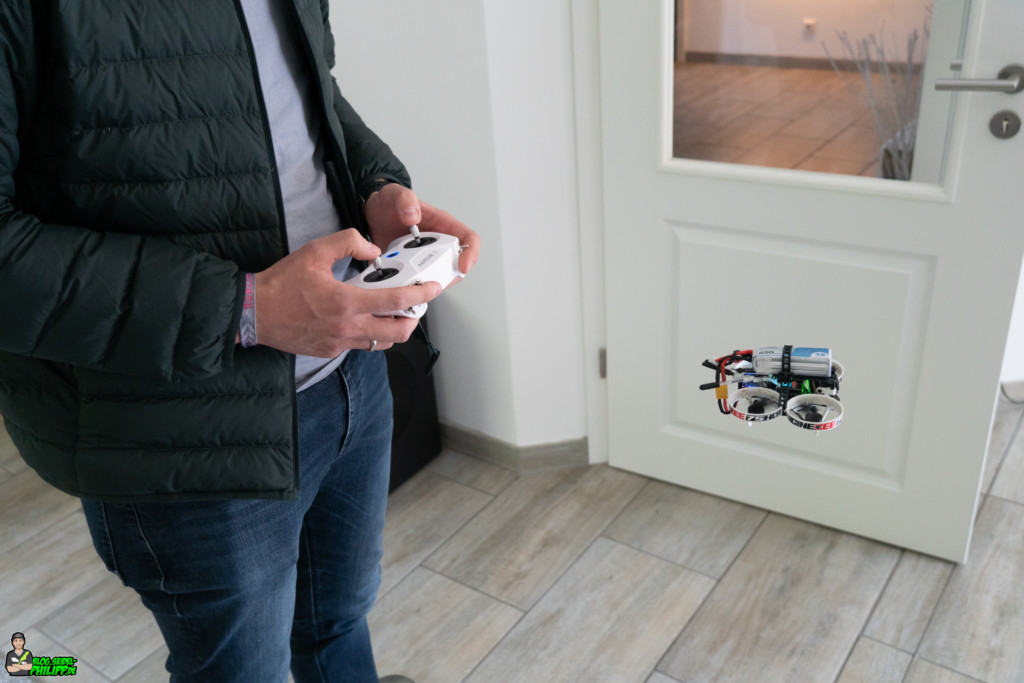
Die BetaFPV Lite Radio 2 ist nur minimal kleiner als die Tango 2. Sie liegt gut in meinen mittelgroßen Händen. Ideal ist sie denke ich für Kinder geeignet, für Menschen mit sehr großen Händen ist sie auf Dauer nicht wirklich geeignet.

Antenne

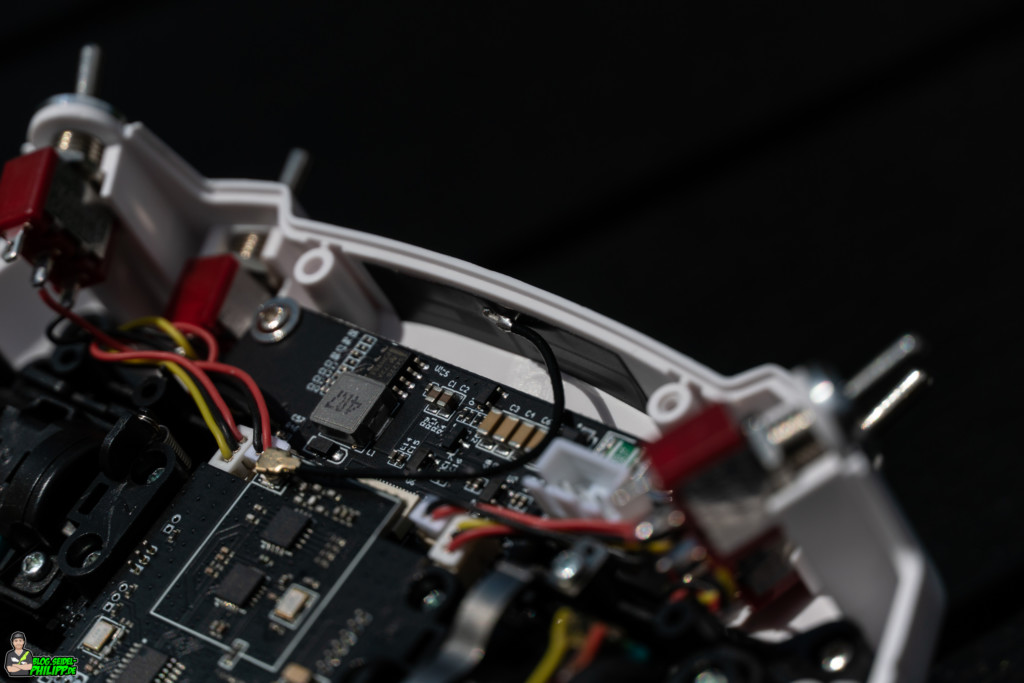
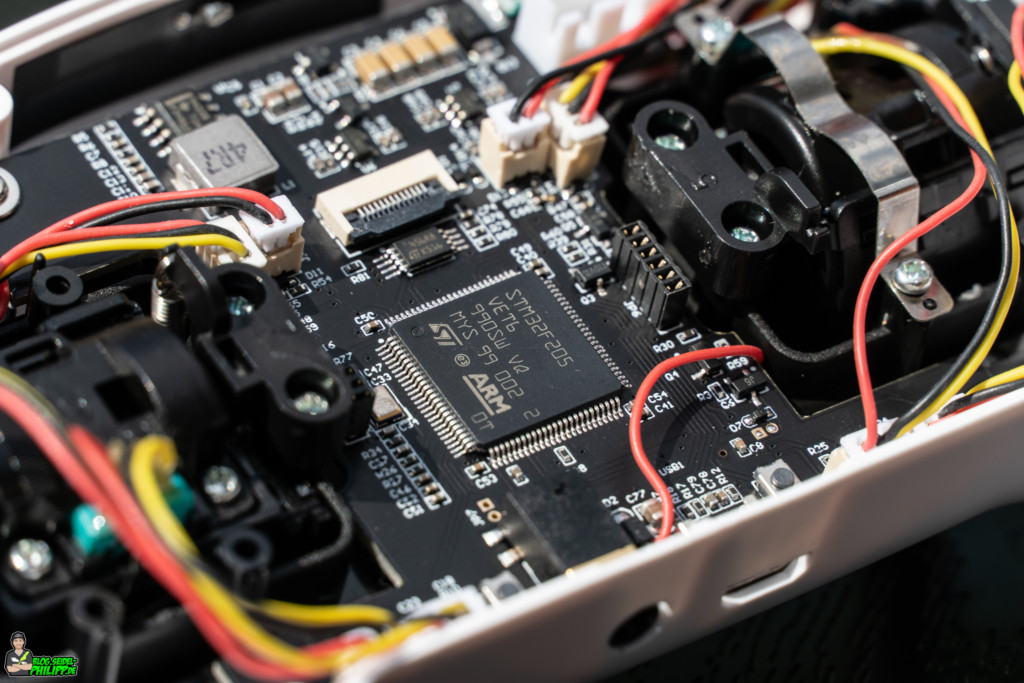
Die Fernsteuerung hat an der Oberseite eine integrierte Antenne, welche per U.FL Anschluss an dem Sende-Modul befestigt ist. Wenn man eine Externe Antenne verbauen möchte, kann die verklebte PCB Antenne einfach durch ein Loch mit SMA Anschluss ersetzt werden.

Gimbals

Ja, diese Fernsteuerung hat „echte“ Gimbals. Ein großer Kritikpunkt bei günstigen Fernsteuerungen sind meistens die Gimbals. Für eine 40 US$ teure Fernsteuerung fühlen sich diese Gimbals wirklich gut an!

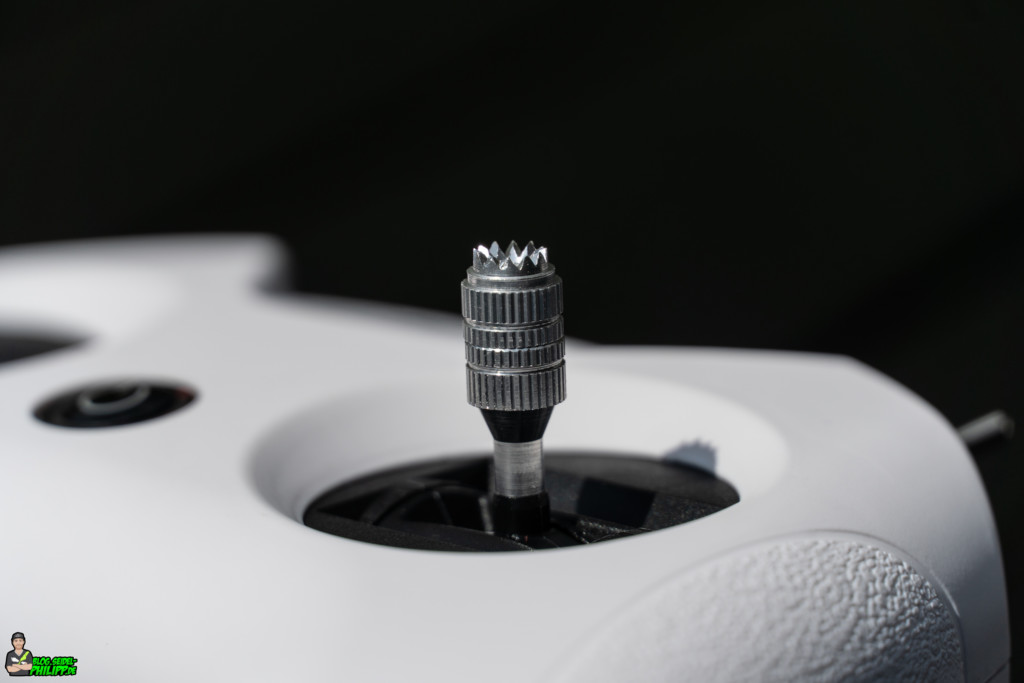
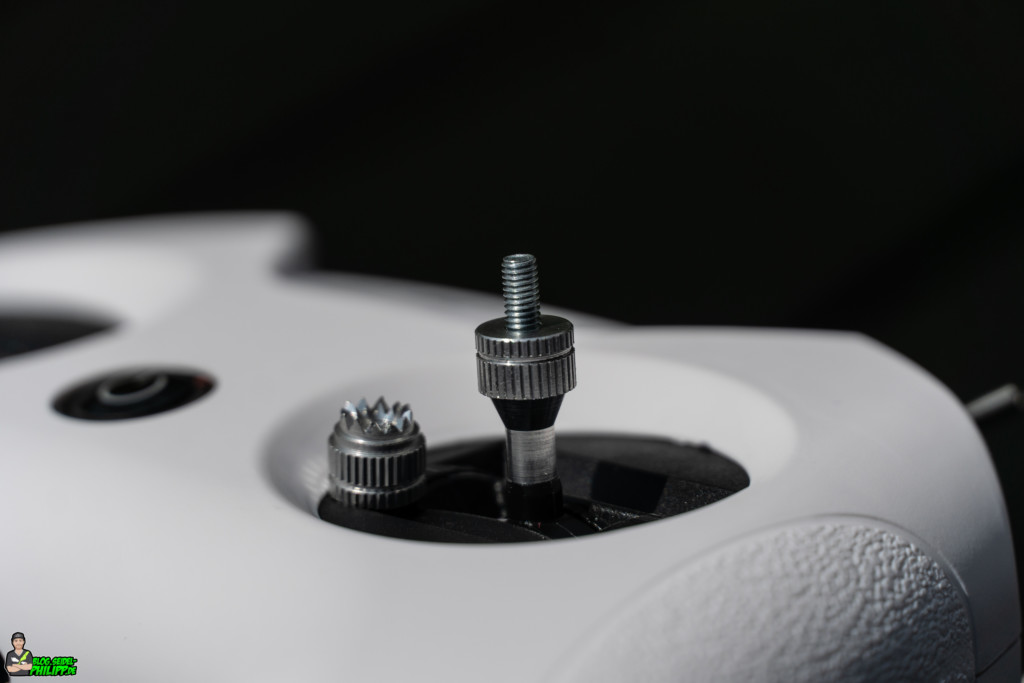
Die Steuerknüppel lassen sich in einer Höhe von 18 bis 22 mm stufenlos einstellen.

Wer alternative Steuerknüppel verwenden möchte kann einfach andere M3 Stick-Ends draufschrauben.

Meiner Meinung nach lassen, sich die Gimbals nicht einstellen. Ich habe keinerlei Schrauben gefunden, die dafür gedacht wären.

Schalter

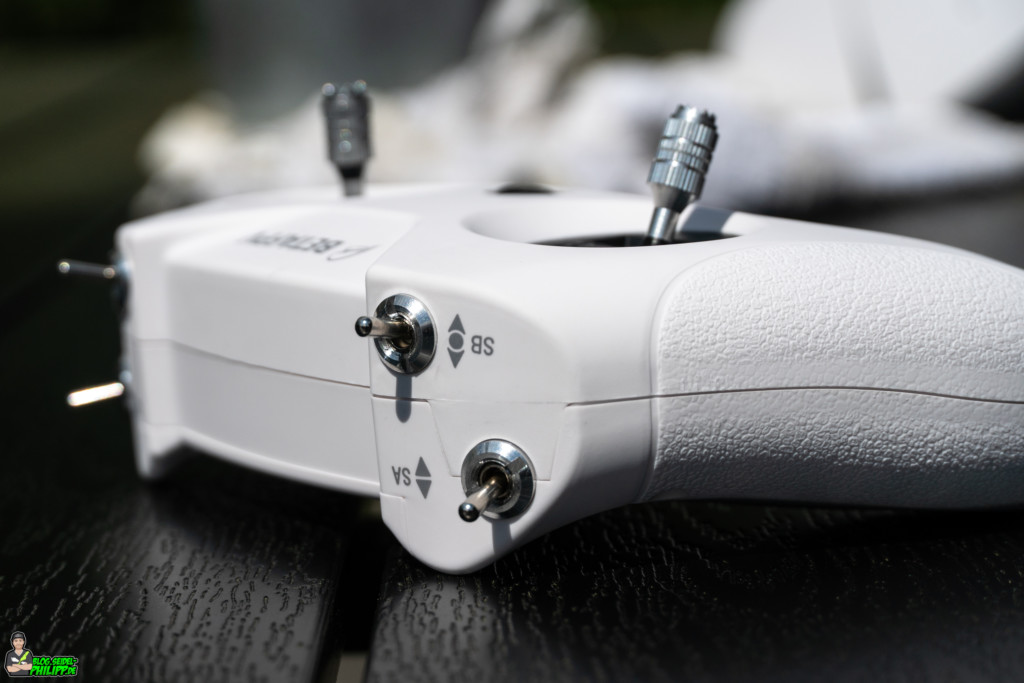
Die BetaFPV Lite Radio 2 verfügt insgesamt über 4 Schalter. Die Schalter sind ebenfalls mit einem Piktogramm gekennzeichnet.

Auf beiden Seiten finden sich unten jeweils 1 2-Wege-Schalter. Darüber befindet sich jeweils ein 3-Wege Schalter.

Die 9 mm langen Schalter lassen sich super schalten und auch zwischen den beiden Schaltern passt noch ein Zeigefinger dazwischen.

Die Schalter lassen sich bei Bedarf relativ leicht reparieren bzw austauschen.

OpenTX

BetaFPV bewirbt diese Fernsteuerung als OpenTX Fernsteuerung, allerdings ist das einzige was man mit der OpenTX Steuerung sinnvoll einstellen kann der Subtrim. Dafür muss eine eigenes für die Fernsteuerung angepasst OpenTX Companion Version heruntergeladen werden. Nicht, wie bei OpenTX üblich, gibt es hier leider keine Version für MacOSX, sondern nur eine Windows Version. Meiner Meinung nach, wären Trimmschalter hier deutlich einfacher gewesen, ich kann aber verstehen, dass diese Low-Cost Fernsteuerung für diesen Preis keine weiteren Knöpfe und Schalter haben kann.

Trimmung einstellen

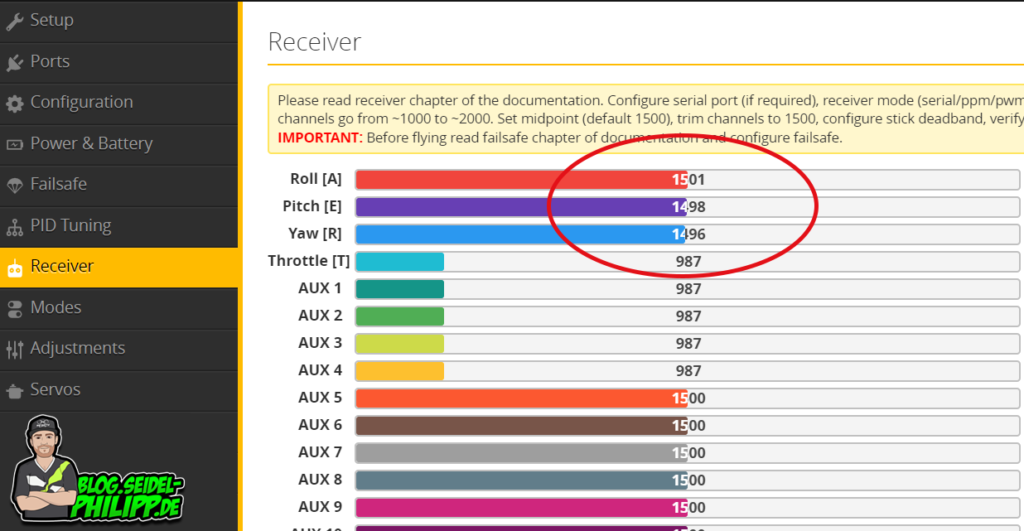
Ein wichtiger Punkt ist natürlich die Trimmung (Subtrim) der Funke. In der Mittelstellung der Gimbals, sollte jeder Kanal 1500us an die Flugsteuerung senden. Dies kann durch verschiedenste Gegebenheiten nicht immer genau passen. Deswegen muss diese Fernsteuerung per Subtrim eingestellt werden. Nachfolgend eine Schritt für Schritt Anleitung:

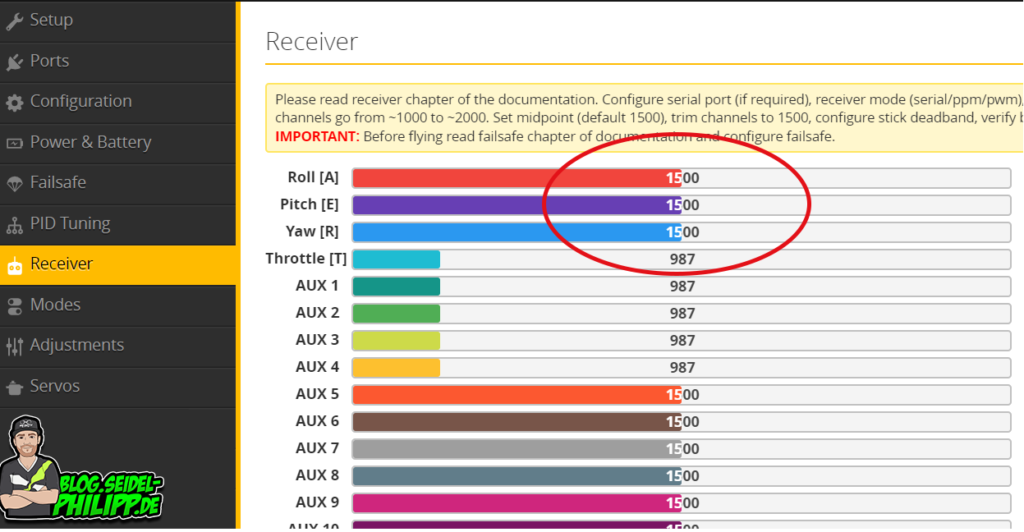
Als erstes prüfen wir, welche Kanäle korrigiert werden müssen. Verbinde dazu deine Drohne mit dem Betaflight GUI und rufe den Receiver Tab auf. Dort sollte Roll Pitch und Yaw immer auf 1500us stehen. Ist dies nicht der Fall, stellen wir nun die Trimmung ein.

Lade nun den OpenTX Companion herunter und installiere ihn. Benutze bitte nicht den originalen, sondern die Version aus dem nachfolgendem Link.

Download: https://github.com/BETAFPV/opentx/raw/LiteRadio/companion/companion-windows-2.2.4.exe

Wenn du den OpenTX Companion installiert hast, verbinde die BetaFPV Lite Radio 2 mit der GUI wie folgt:

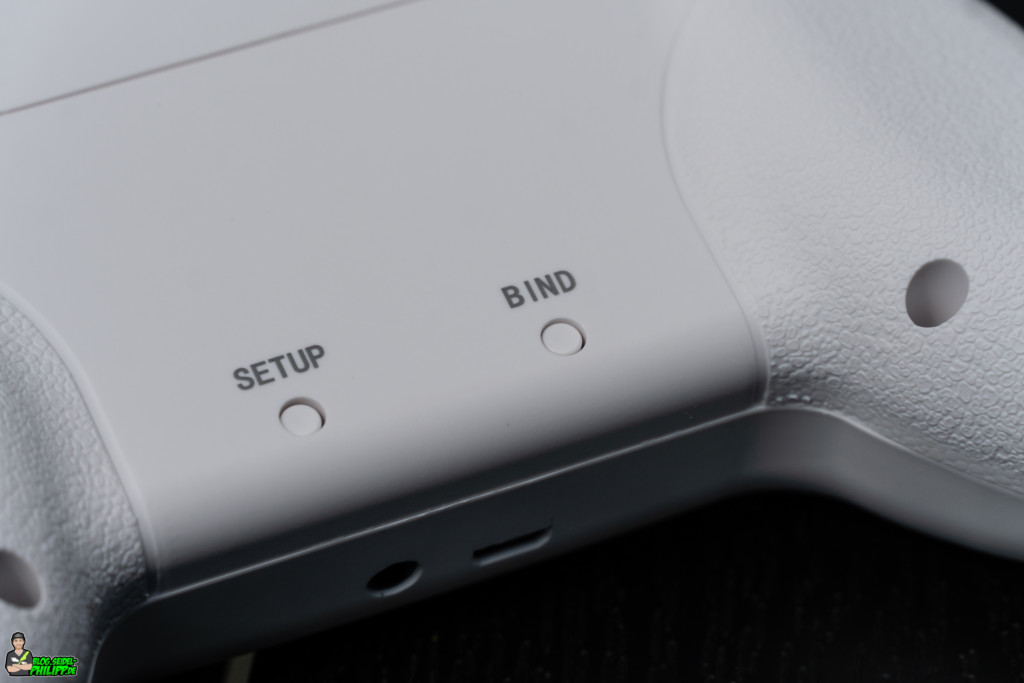
  1. Drücke und halte den SETUP Knopf auf der Rückseite
  2. Drücke den POWER Knopf auf der Vorderseite und lasse beide Knöpfe los. Der LED Ring wird NICHT aufleuchten.
  3. Verbinde die Fernsteuerung nun mit deinem Computer per Micro USB Kabel

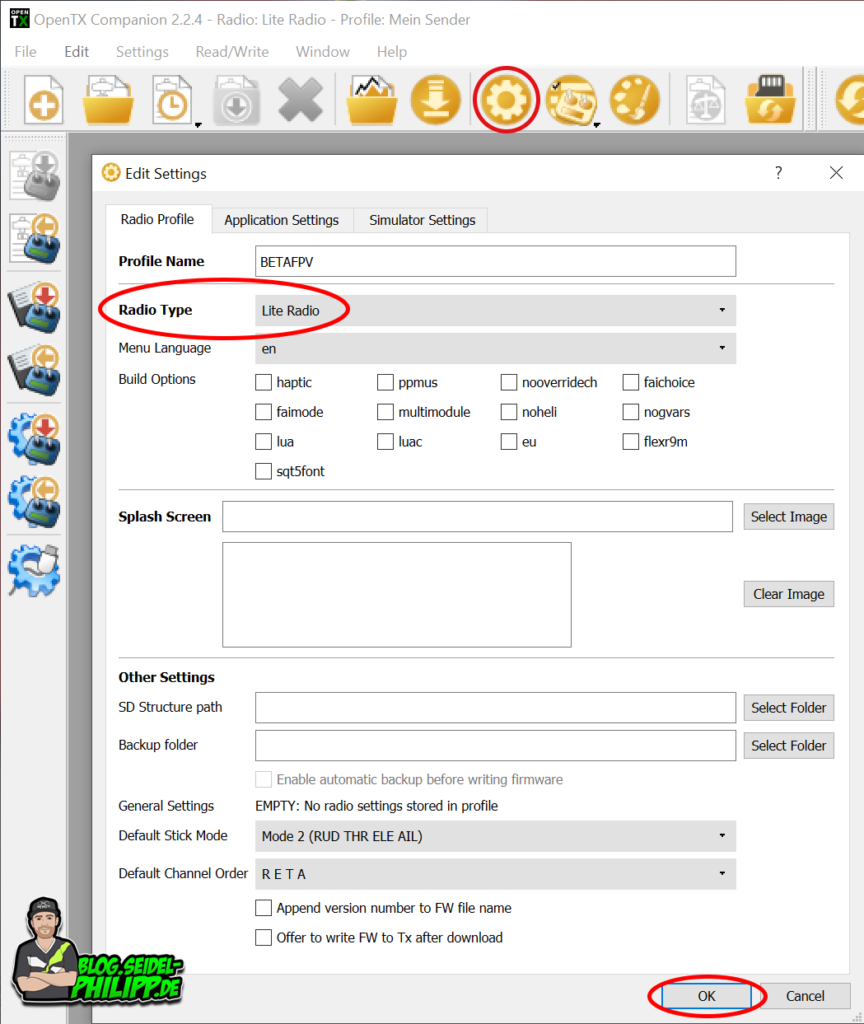
Klicke nun auf das Zahnrad Symbol und wähle „Lite Radio“ aus. Bestätige mit „OK“.

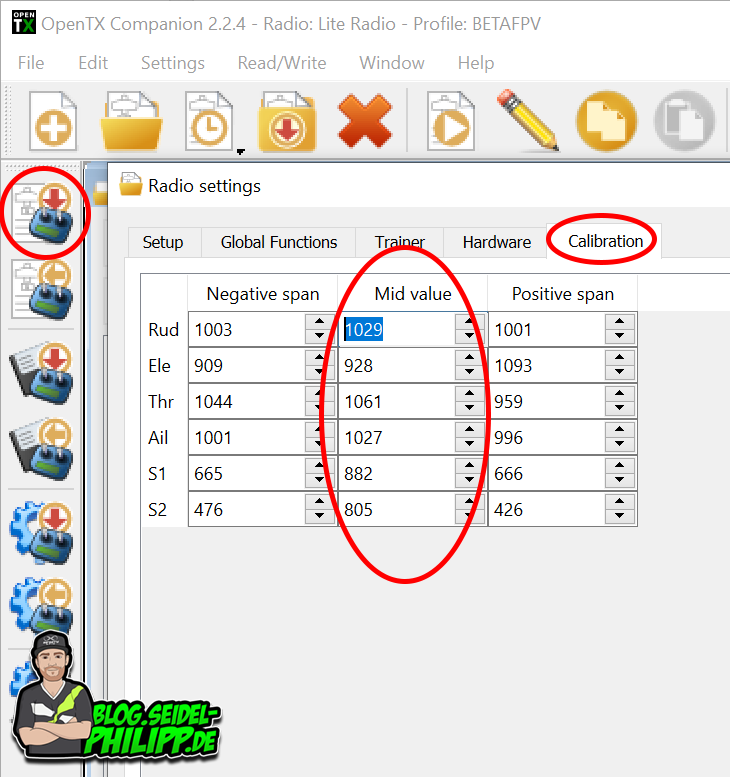
Nun laden wir uns die Konfiguration von der Fernsteuerung herunter. Klicke dazu auf das Symbol ganz links. Danach sollte ein weitere Fenster aufgehen, in dem du auf „Edit Radio Settings“ klickst.

Im Tab „Calibration“ kannst du nun den „Mid Value“ deiner Kanäle einstellen.

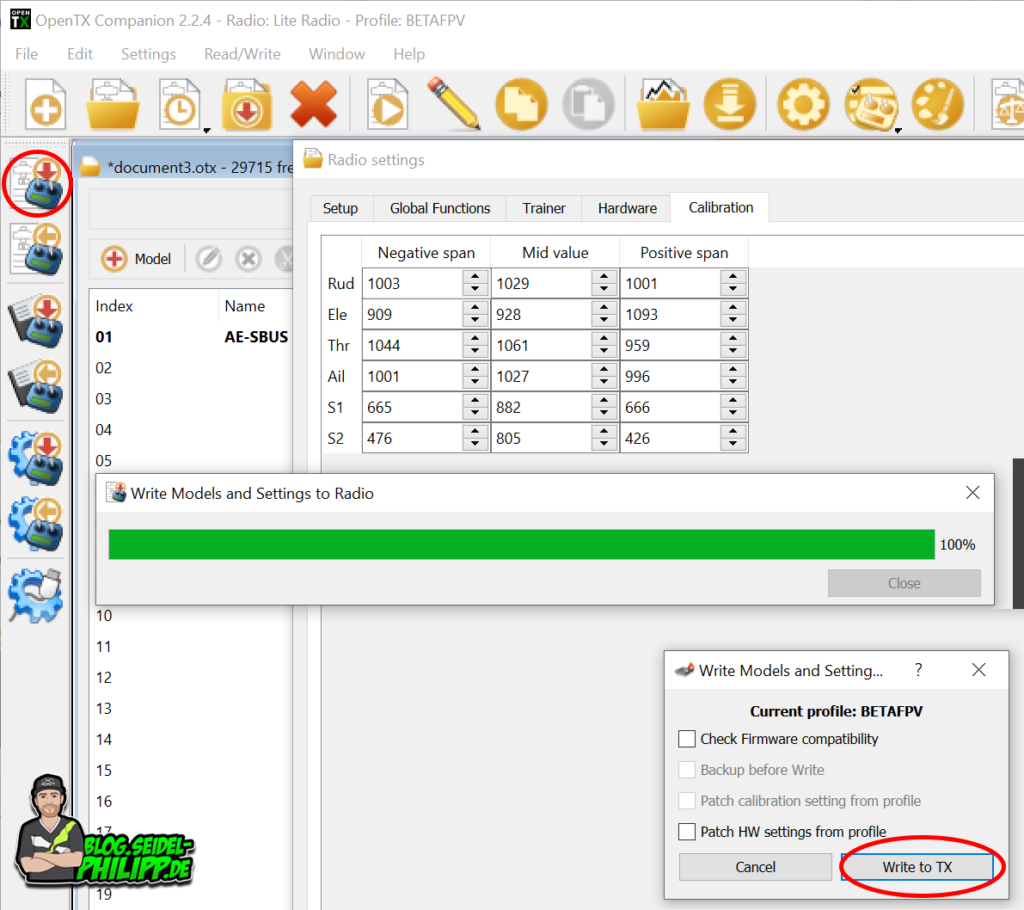
Um die geänderten Werte auf die Fernsteuerung zu übertragen drücke auf das Symbol links und danach auf „Write to TX„.

Danach prüfst du die Werte in der Betaflight GUI. Wiederhole den Vorgang so lange, bis du bei Roll, Pitch und Yaw 1500 stehen hast.

Original Anleitung von BetaFPV:

BetaFPV Lite Radio 2 laden

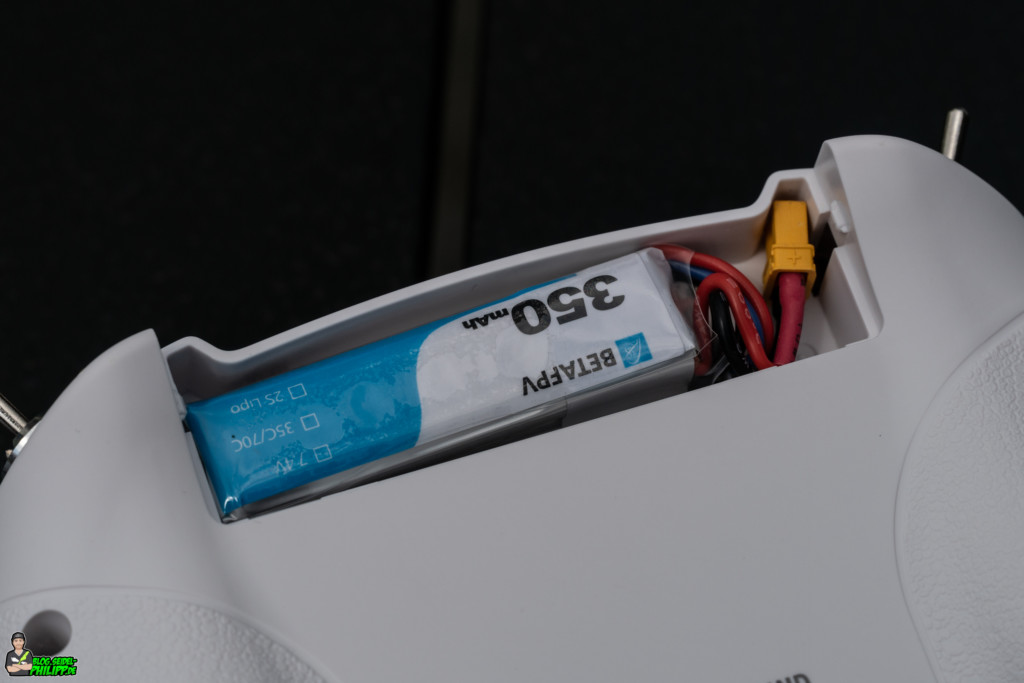
Die Fernsteuerung verfügt über einen Micro USB Anschluss mit der der 2S LiPo 350 mAh Akku geladen werden kann. Laut meiner Messung liegt der Ladestrom bei ca 900 mA, die Ladung endet automatisch, sobald der LiPo eine Spannung von 8,4 V erreicht hat.

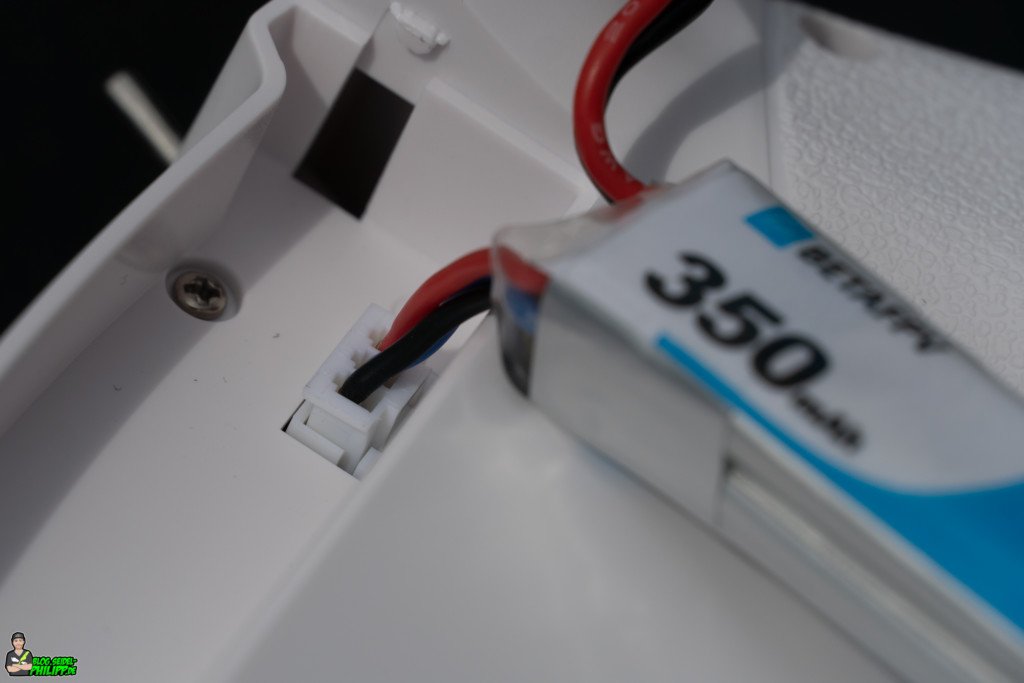
Der Akku wird per Balancer Anschluss angeschlossen und im Fach sicher verstaut! Vergisst man allerdings die Fernsteuerung auszuschalten, entlädt sie den Akku bis er tiefenentladen ist. Die LED blinkt zwar rot, wenn die Batterie zu niedrig ist, aber das kann man leicht übersehen, da es keinerlei haptisches Feedback oder einen Warnton gibt.

Trainer & Simulator

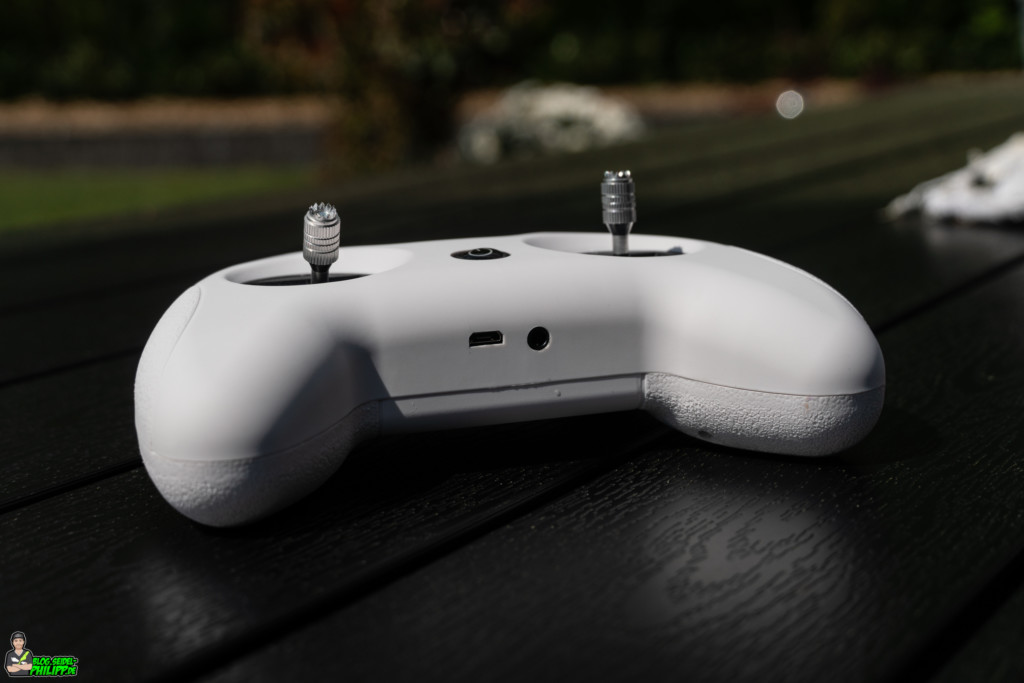
Gerade für Einsteiger ist es am Anfang leichter im Simulator zu üben. Das ist kein Problem! Einfach die Funke einschalten und per Micro USB Kabel anschließen und schon geht es los!
Neben dem Micro USB Eingang befindet sich übrigens der Trainer-Port. Mit diesem Port kannst du als Lehrer-Schüler Setup deine ersten Flüge üben und im Bedarfsfall übernimmt der Lehrer die Steuerung!

Tipp
Möchtest du komplett kabellos Simulator fliegen kannst du den Frsky XSR-SIM USB Dongle verwenden.

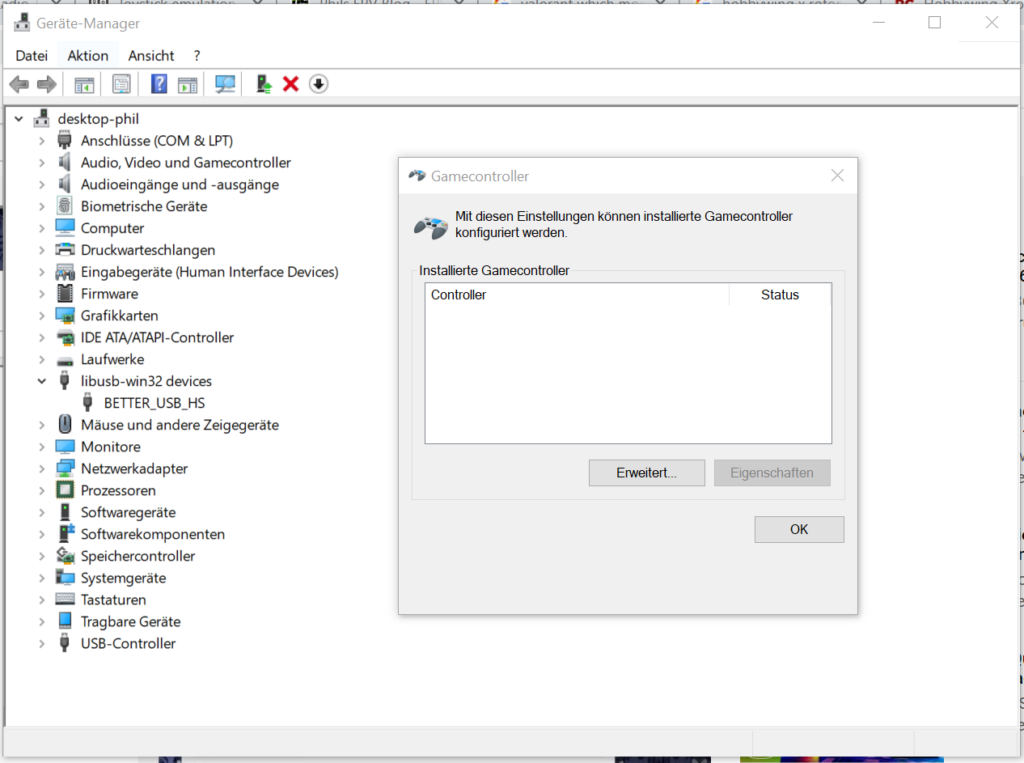
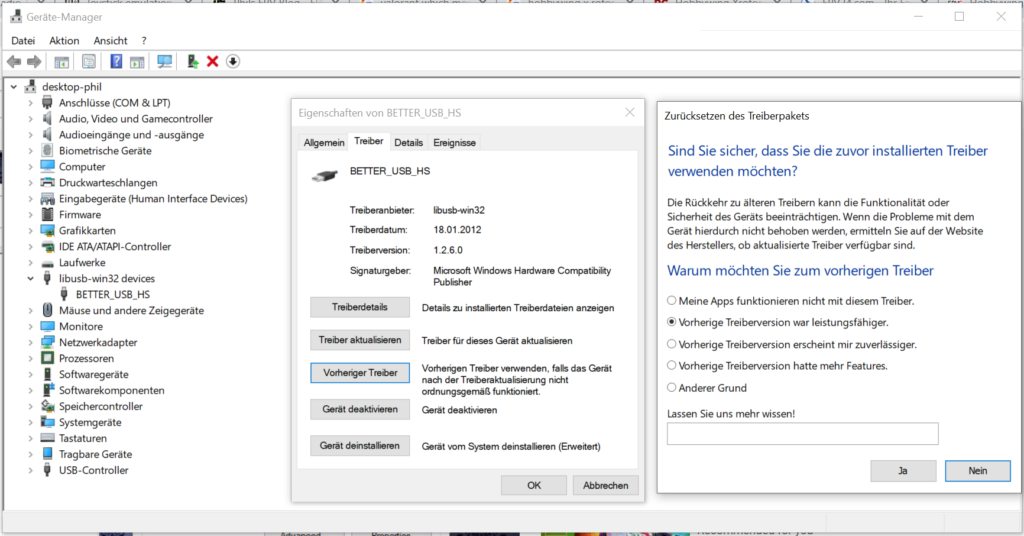
Ich hatte das Problem, das Windows die Fernsteuerung zunächst nicht erkannt hat. Dies ist ein Windows Treiber Problem und ich habe es wie folgt gelöst. Danke an Painless360 für den Tipp.

Gehe zuerst in den Gerätemanager von Windows und suche nach „BETTER_USB_HS

Wähle mit einem Rechtsklick auf „BETTER_USB_HS“ den Punkt „Vorheriger Treiber“ im Tab „Treiber“ aus.  Klicke danach auf „Vorherige Treiberversion war leistungsfähiger“ und bestätige mit „Ja„.

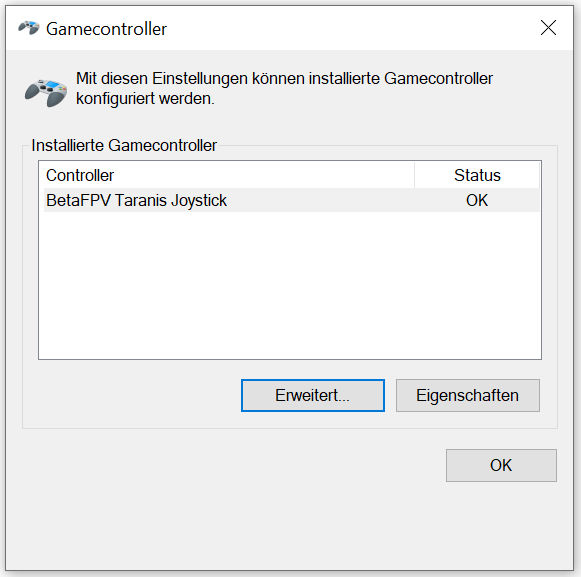
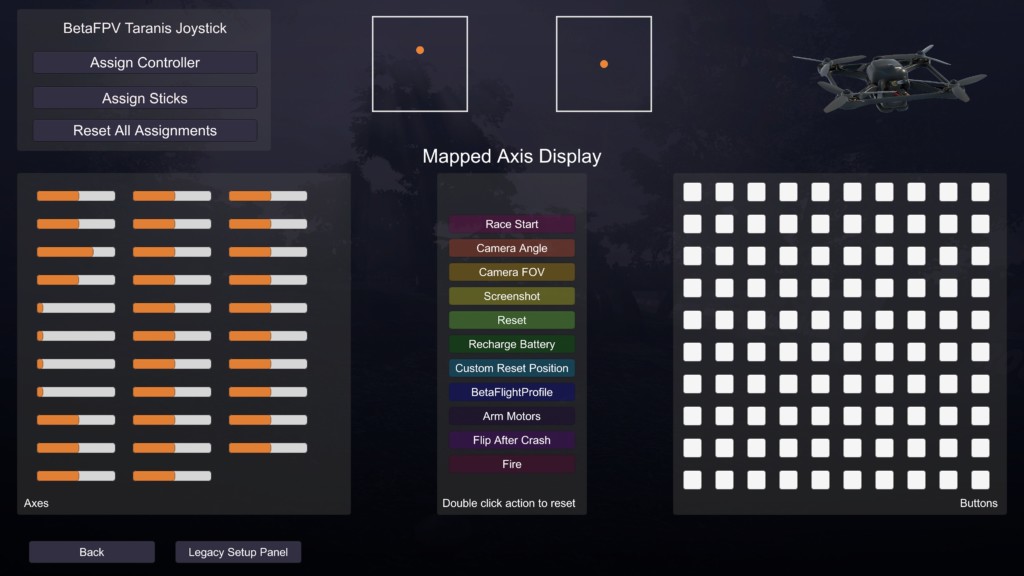
Danach kannst du die Fernsteuerung in Velocidrone ohne Probleme verwenden.

Binden

Binden kannst du deine Receiver mit dem „BIND“ Knopf auf der Rückseite. Du kannst ohne zu flashen zwischen FCC und LBT hin und herschalten.

Fazit BetaFPV Lite Radio 2

Für Leute, die für ihre erste Fernsteuerung nicht viel Geld ausgeben wollen aber dennoch in den Genuss von „richtigen“ Gimbals und der Simulator Funktion kommen wollen, ist diese Funke meiner Meinung nach die erste Wahl. Sie ist günstig, bietet viele Funktionen und kann für Tiny Woops auch als „Haupt-funke“ verwendet werden. Perfekt für Einsteiger oder Leute die einfach nur mal in das Hobby schnuppern wollen ohne gleich viel Geld für eine hochwertige Fernsteuerung ausgeben wollen. Natürlich gibt es noch günstigere Fernsteuerungen, allerdings sind diese Fernsteuerungen noch kleiner und deutlich schlechter verarbeitet und fühlen sich wirklich wie ein Spielzeug an.

Positiv
  • „echte“ Gimbals
  • Trainer Funktion
  • Simulator Funktion
  • klein und leicht
  • günstiger Preis
  • USB Ladefunktion
  • 8 Kanäle für Flugmodi und sonstige Funktionen
Neutral
  • vergisst man die Fernsteuerung auszuschalten, kann sich der LiPo tiefenentladen
  • leider nur in weiß verfügbar – wird wahrscheinlich sehr schnell dreckig.
  • OpenTX extrem abgespeckt – nur für Subtrim
  • kein OpenTX Companion für MacOS X
Negativ
  • keine akustische Batterie-Warnung

Der Beitrag BetaFPV Lite Radio 2 – Die perfekte Fernsteuerung für Einsteiger? erschien zuerst auf Phils FPV Blog.

BetaFPV Lite Radio 2 – The perfect remote control for beginners?

$
0
0

BetaFPV sent me the new BetaFPV Lite Radio 2 for this article. This new remote control with FrSky protocol costs less than US$ 40. In this article you will find out why I think it is currently the best remote control for beginners and people with TinyWoops.

Where to buy

You can find BetaFPV Lite Radio 2 in the following online shops:

Whats in the box?

  • BetaFPV Lite Radio 2 remote
  • 1x 350 mAh 2S LiPo
  • manual

Features

  • supports the following protocols: Frsky D8, Frsky D16 FCC / LBT or Bayang protocol
  • can be charged via USB
  • haptic feedback through vibration motor
  • ergonomic design
  • 8 channels
  • 4 switches (2x 2-way, 2x 3-way)
  • OpenTX Trim function
  • can be used for simulator
  • Trainer function
  • internal antenna
  • „real“ gimbals
  • weight: 230 g

Size & processing

The BetaFPV Lite Radio 2 is only minimally smaller than the Tango 2. It feels good in my medium-sized hands. I think it is ideal for children, in the long run it is not really suitable for people with very large hands.

Antenna

The remote control has an integrated antenna on the top, which is attached to the transmitter module via a U.FL connection. If you want to install an external antenna, the glued PCB antenna can simply be replaced by a hole with SMA connection.

Gimbals

Yes, this remote control has „real“ gimbals. A big criticism of cheap remote controls are usually the gimbals. For a US$ 40 remote control, these gimbals feel really good!

The sticksends can be adjusted from a height of 18 to 22 mm.

If you want to use alternative stick ends, you can simply screw on other M3 stick ends.

I have not found any screws to adjust tension of the gimbals.

Switches

The BetaFPV Lite Radio 2 has a total of 4 switches. The switches are also marked with a pictogram.

There are 1x 2-way switches on both sides at the bottom. There is also a 3-way switch on each sides.

The 9 mm long switches can be switched easily and there is also space between the two switches to fit your finger.

The switches can be relatively easily repaired or replaced if necessary.

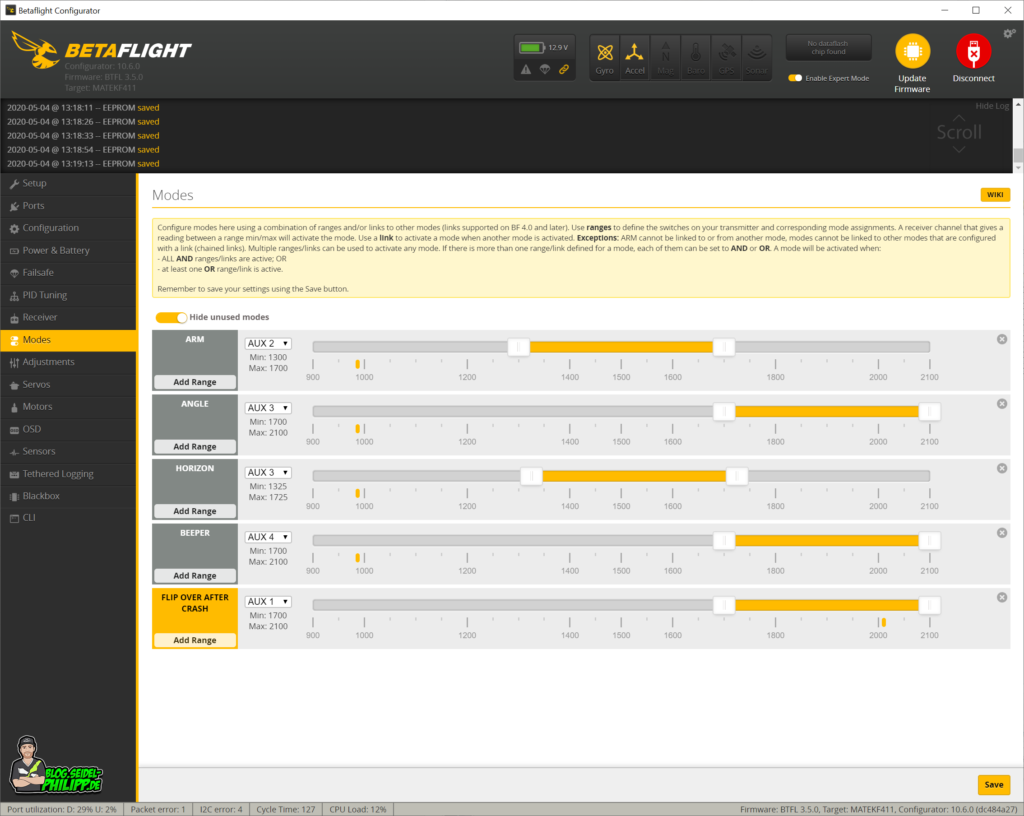
Here is a sample configuration of the modes for Betaflight.

OpenTX

BetaFPV advertises this remote control as OpenTX remote control, but the only thing that can be sensibly set with the OpenTX control is the subtrim. For this, a separate OpenTX Companion version adapted for this specific remote control must be downloaded. Not, as usual with OpenTX, there is unfortunately no version for MacOSX, only a Windows version. In my opinion, trim switches would have been much easier here, but I can understand that this low-cost remote control cannot have any other buttons and switches for this price.

Adjust trim

An important point is the trim (subtrim) of the remote. In the middle position of the gimbals, each channel should send 1500us to the flight controller. Due to various circumstances, this cannot always fit exactly. That is why this remote control must be set via subtrim. Below is a step by step guide:

First, we check which channels need to be corrected. To do this, connect your drone to the Betaflight GUI and open the Receiver tab. Roll, Pitch and Yaw should always be at 1500us. If this is not the case, we will now set the trim.

Download the OpenTX Companion and install it. Please do not use the original version. Use the version from the following link.

Download: https://github.com/BETAFPV/opentx/raw/LiteRadio/companion/companion-windows-2.2.4.exe

If you have installed the OpenTX Companion, connect the BetaFPV Lite Radio 2 to the GUI as follows:

  1. Press and hold the SETUP button on the back
  2. Press the POWER button on the front and release both buttons. The LED ring will NOT light up.
  3. Connect the remote control to your computer using a micro USB cable

Now click on the gear icon and select „Lite Radio„. Confirm with „OK„.

Now we download the configuration from the remote control. To do this, click on the symbol on the far left. Then another window should open in which you click on „Edit Radio Settings„.

In the „Calibration“ tab you can now set the „Mid Value“ of your channels.

To transfer the changed values to the remote control, press the symbol on the left and then „Write to TX„.

Then you can check again the values in the Betaflight GUI. Repeat the process until you have Roll, Pitch and Yaw 1500.

Original instructions from BetaFPV:

charge BetaFPV Lite Radio 2

The remote control has a micro USB port with which the 2S LiPo 350 mAh battery can be charged. According to my measurement, the charging current is around 900 mA, the charging ends automatically as soon as the LiPo has reached a voltage of 8.4 V.

The battery is connected via a balancer connection and safely stowed in the compartment! If you forget to switch off the remote control, it discharges the battery until it is deeply discharged. The LED flashes red when the battery is too low, but it’s easy to miss because there is no haptic feedback or warning sound.

Trainer & Simulator

Especially for beginners, it is easier to practice in the simulator at the beginning. This is not a problem! Simply switch on the remote and connect via a micro USB cable and off you go!
The trainer port is located next to the micro USB input. With this port you can practice your first flights as a teacher-student setup and if necessary the teacher takes over control!

By the way
If you want to use this remote completely wireless with a simulator, you can use the Frsky XSR-SIM USB dongle.

I had the problem that Windows did not recognize the remote control at first. This is a Windows driver problem and I solved it as follows. Thanks to Painless360 for the hint.

First go to the Windows Device Manager and search for „BETTER_USB_HS

Right-click on „BETTER_USB_HS“ and select „Roll bak driver“ in the „Driver“ tab. Then click on „Previous version of the driver performed better“ and confirm with „Yes„.

After that you can use the remote control in Velocidrone without any problems.

binding

You can bind your receiver with the „BIND“ button on the back. You can switch between FCC and LBT without flashing.

Conclusion BetaFPV Lite Radio 2

For people who do not want to spend a lot of money on their first remote control but still want to enjoy „real“ gimbals and the simulator function, this remote is in my opinion the first choice. It is cheap, offers many functions and can also be used as a „main remote“ for tiny woops. Perfect for beginners or people who just want to get a taste of the hobby without spending a lot of money on high-quality remote control. Of course, there are even cheaper remote controls, but these remote controls are even smaller and significantly worse processed and really feel like a toy.

Positiv
  • „real“ gimbals
  • Trainer function
  • Simulator function
  • small and light
  • low price
  • USB charging function
  • 8 channels for flight modes and other functions
Neutral
  • if you forget to switch off the remote control, the LiPo will be deeply discharged
  • unfortunately only available in white – will probably get dirty very quickly.
  • OpenTX extremely slimmed down – only for Subtrim
  • no OpenTX Companion for MacOS X
Negativ
  • no acoustic battery warning

Der Beitrag BetaFPV Lite Radio 2 – The perfect remote control for beginners? erschien zuerst auf Phils FPV Blog.


DroneMasters Academy – Ferienkurs in Hamburg

$
0
0

DroneMasters Academy- Ferienkurs in Hamburg

Ferienbetreuung mit Drohnen! In den Sommerferien richtet die DroneMasters Academy wieder Ferienkurse für Kinder und Jugendliche im Alter zwischen 10 und 15 Jahren aus. In den fünftägigen Kursen wird der spielerische Zugang zu Digitalisierung und Aerodynamik mittels Drohnen und Drone Racing vermittelt. Die Kurse behandeln verschiedene Themen der Mathematik, Informatik, Naturwissenschaft und Technik. Dabei lernen die Juniors eine Drohne zu fliegen und zeigen ihr Können bei einer abschließenden Flugschau.

Das Programm

Die Workshops der Junior Academy haben das Ziel, Kinder und Jugendliche für Drohnen-Technologie zu begeistern. Sie werden mit den physikalischen Grundlagen des Fliegens vertraut gemacht, lernen Aufbau und Technik von Drohnen kennen und fliegen ein eigenes Abschlussrennen. In allen Bereichen des Workshops werden die Juniors angeregt, eigene Ideen und Lösungen einzubringen. Wir legen besonderen Wert auf die Entwicklung von technischen Fertigkeiten und das Verständnis für den Aufbau von einfachen elektronischen Schaltungen. Die Kurse behandeln verschiedene wichtige Lernbereiche der Mathematik, Informatik, Naturwissenschaft und Technik (MINT). Diese Kenntnisse werden spielerisch und altersangemessen vermittelt.

Das Workshop-Programm findet jeweils zwischen 10 und 16 Uhr statt. Die Betreuung der Teilnehmenden wird von 09 bis 17 Uhr gewährleistet.

Weitere Infos

Das volle Programm, weitere Infos und Termine für andere Städte findest du hier.

Anmeldung

Denk daran, mit dem Code „Seidel“ erhälst du 20% Rabatt für den Ferienkurs (Einsteiger) vom 13. Juli bis 17. Juli 2020 (5 Tage) in Hamburg.

Zur Anmeldung

Der Beitrag DroneMasters Academy – Ferienkurs in Hamburg erschien zuerst auf Phils FPV Blog.

Pyrodrone F7 Flight Controller Anschlussplan / Wiringplan

$
0
0

I created this high resolution connection plan for the Pyrodrone F7 Flight Controller

This connection plan will be constantly updated.
Please always link to the original image (6614px × 4661px, right click -> save as) so that the latest version is always displayed.

https://blog.seidel-philipp.de/wp-content/uploads/2020/08/PYRODRONE_F7_Flight-Controller_Anschlussplan_Wiringplan.png

Click the image to enlarge
If you are looking for more wiring plans, go here

Hardware used in this wiringplan

Created by Philipp Seidel
Credits: Icons by rdy_fpv , Albert K and Me 😉

Der Beitrag Pyrodrone F7 Flight Controller Anschlussplan / Wiringplan erschien zuerst auf Phils FPV Blog.

KISS ULTRA Flight Controller Anschlussplan / Wiringplan

$
0
0

I created this high resolution connection plan for the KISS ULTRA Flight Controller by Alexander Fedorov

This connection plan will be constantly updated.
Please always link to the original image (6614px × 4661px, right click -> save as) so that the latest version is always displayed.

https://blog.seidel-philipp.de/wp-content/uploads/2021/08/KISS_ULTRA_Flight-Controller_Anschlussplan_Wiringplan.jpg

Click the image to enlarge
If you are looking for more wiring plans, go here

Hardware used in this wiringplan

Created by Philipp Seidel
Credits: Icons by rdy_fpv , Albert K and Me 😉

Der Beitrag KISS ULTRA Flight Controller Anschlussplan / Wiringplan erschien zuerst auf Phils FPV Blog.

Volksfräse VF1 / Tillboard Anschlussplan

$
0
0

Anschlussplan einer Volksfräse VF1 von Uncle Phil mit dem Tillboard (MPCNC Nano Estlcam Shield)

This connection plan will be constantly updated.
Please always link to the original image (6614px × 4661px, right click -> save as) so that the latest version is always displayed.

https://blog.seidel-philipp.de/wp-content/uploads/2021/12/Volksfraese_VF1_Tillboard_CNC_Anschlussplan.png


WICHTIGER HINWEIS!
Netzspannung – Lebensgefahr!
Installation nur von einem Elektro Fachbetrieb durchführen lassen! Ich übernehme keinerlei Haftung bei Personen-, Sach- und Vermögensschäden. Dieser Anschlussplan ist stark vereinfacht, kann Fehler beinhalten und dient nur der Darstellung einer möglichen Installation. Die hier gezeigten Informationen dürfen nur auf eigene Gefahr verwendet werden!

Anschlussplan einer Volksfräse VF1 von Uncle Phil mit dem Tillboard (MPCNC Nano Estlcam Shield)

Anschlussplan einer Volksfräse VF1 von Uncle Phil mit dem Tillboard (MPCNC Nano Estlcam Shield)

Änderungen:

  • 16.12.21 V1.2 – falsche Spannung an den Sensoren korrigiert
  • 15.12.21 V1.1 – WAGO Relais von 24V auf 12V. JP13 Jumper auf 12V/COM gesetzt und COM3 24V Leitung entfernt

In der Facebook Gruppe von Uncle Phil erhaltet ihr auch Support!

Verwendet Hardware

Weitere Links:

Created by Philipp Seidel


Druckteile um an der Volksfräse VF1 IGUS 61mm Schleppketten zu benutzen

Zum Download/Einkaufsliste


Der Beitrag Volksfräse VF1 / Tillboard Anschlussplan erschien zuerst auf Phils FPV Blog.

Viewing all 212 articles
Browse latest View live