Quantcast
Channel: Phils FPV Blog
Viewing all 212 articles
Browse latest View live

How to build a field charging battery out of recycled 18650 cells

$
0
0

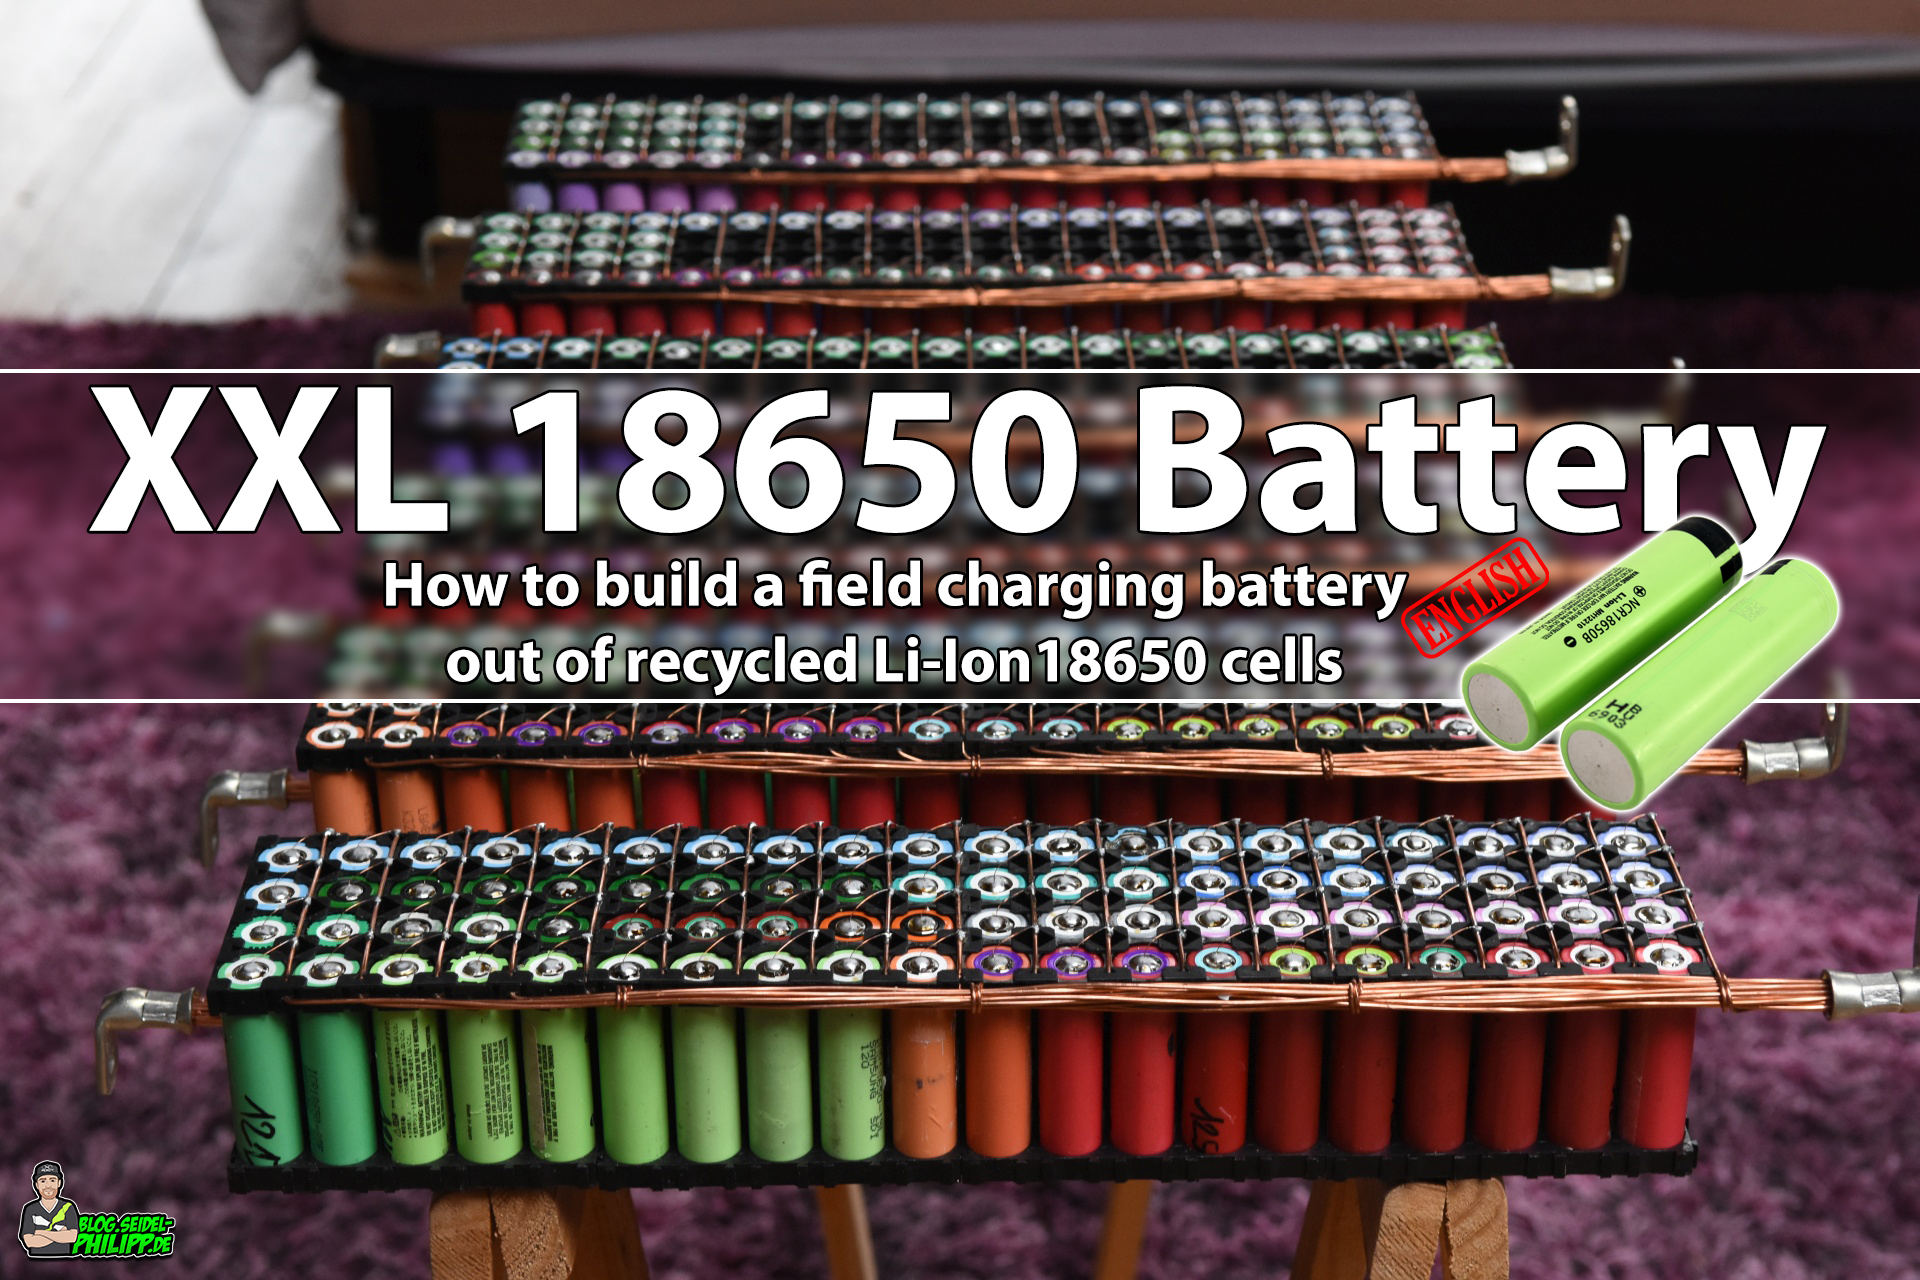
I’ve built a huge field battery, which will be charged via photovoltaic. For the battery type, I chose 18650 lithium-ion cells.
My goal is to build a battery that can store around 2KWh. I have decided to build a 6S40P battery with 22.2V.

Why 18650 cells

18650 powerwall

The Tesla Powerwall inspired me to use the 18650 Li-Ion cells. These cells have a very high energy density, no memory effect and you can leave the battery fully charged for a long time without it being damaged.
A small worldwide community builds their own powerwalls exactly this way and charges them via photovoltaic.

Where to get the 18650 cells

Laptop battery recycled 18650 cells
Another point why I chose 18650 cells is that you can find them in just about any battery. They are installed in power banks, e-bike batteries, laptop batteries or cordless screwdrivers. Unfortunately, old or defective rechargeable batteries are not recycled today and go into trash. However, if you open these batteries, you will find heaps of 18650er lithium ion cells. Most of the time, only a few cells of the battery are really damaged, and the rest can be tested for further use. In some cases only the PCB (BMS) is damaged and all cells are still working.

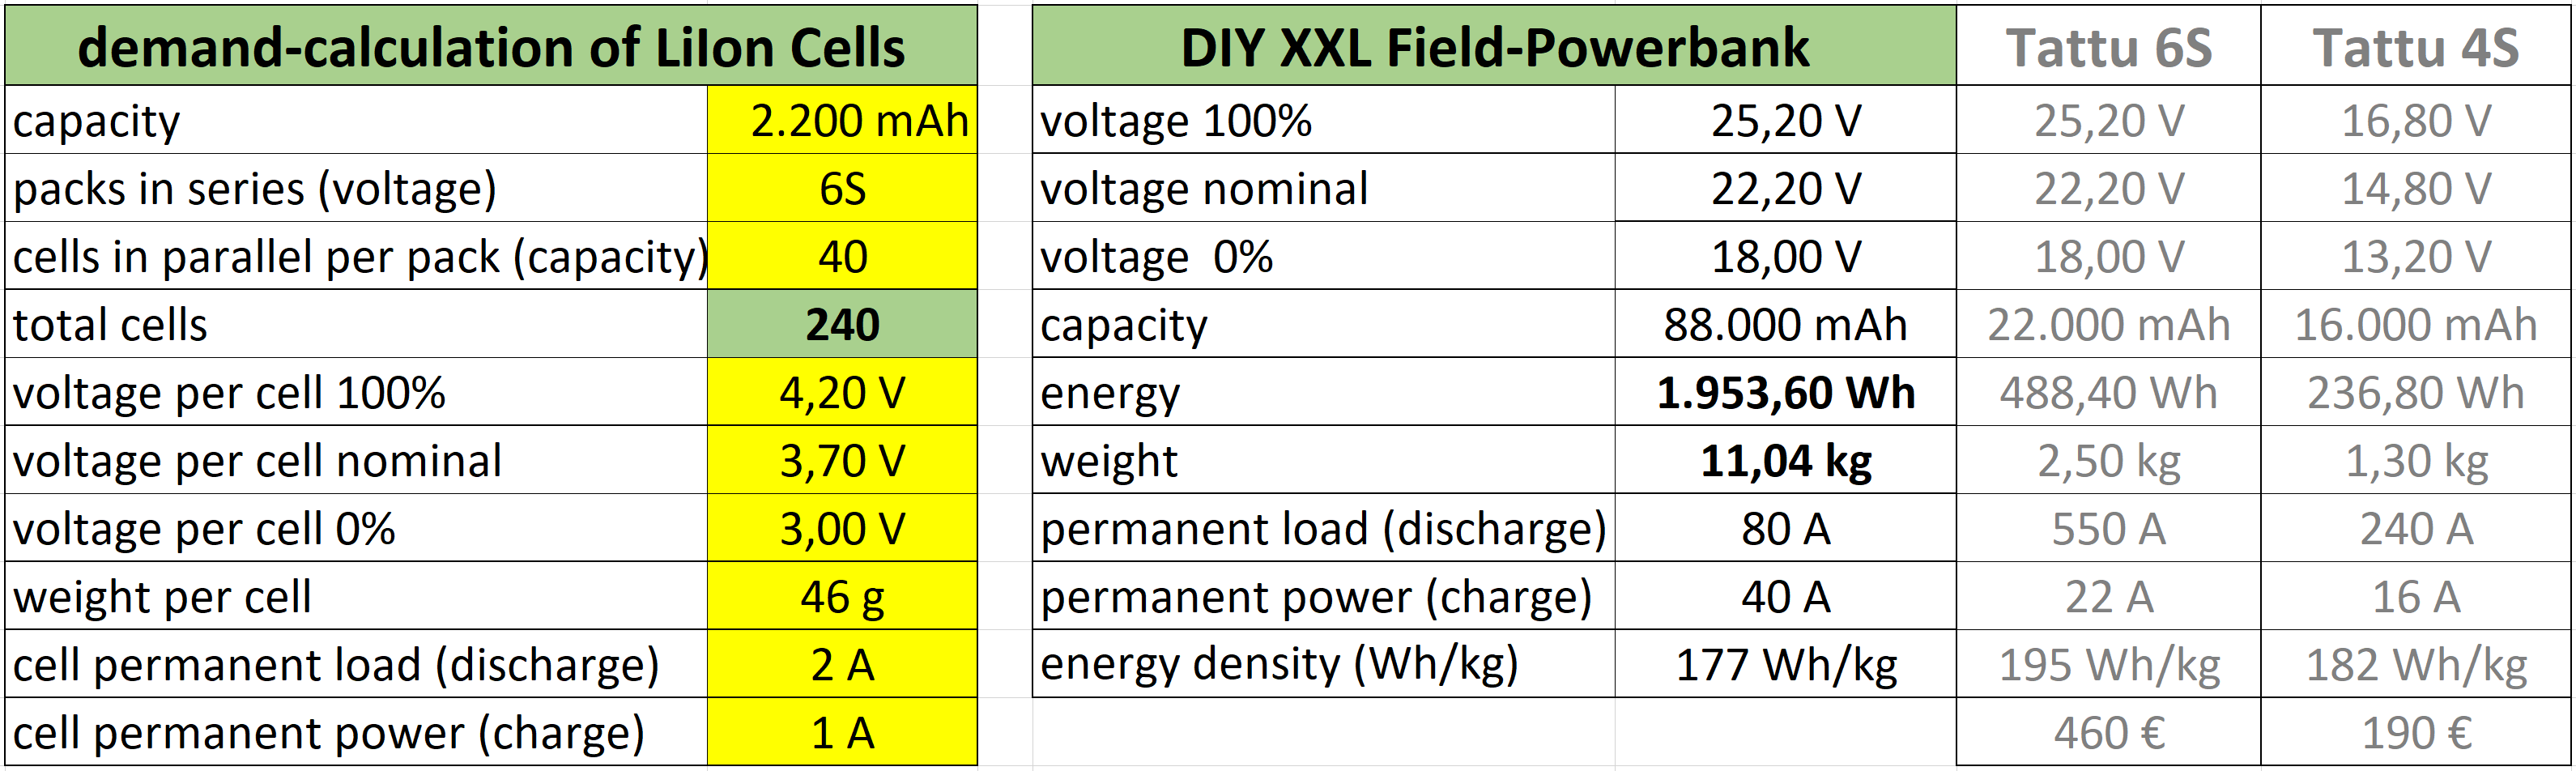
According to my calculator, for a 2KWh battery, I need about 240 good cells with an average capacity of 2200mAh.

Test method for used cells

To test the batteries, I have created a spreadsheet in which I collect the most important data. The table calculates all values for me and makes it much easier for me to work with so many 18650 cells. It calculates voltage differences, divides the cells into different classes and much more. Here you will find the latest version of about 525 cells.

spreadsheet Download:

The test procedure explained in a few steps:

  1. Open battery and expose cells (remove welded metal sheets, adhesive, and tape)
  2. Measure the voltage and enter it in the list. Each cell gets a unique ID (consecutive number). Depending on how high the voltage is, pre-selected ( see 0V cells)
  3. 0 V cells are trying to be brought back to life with a laboratory power supply. A low current (100mA) is used to „boost“ the cell. As soon as the cell has reached about 3 V, I charge it with 500mA full.
  4. Dead cells (0V) are binned if they can not be revived.
  5. Charge the cells (1A per cell) and sort out „Heater„. „Heater“ are cells that become extremely hot during charing. Cells that get warm should not be binned. As a rule of thumb, if you can not touch the cell and you feel your fingers burn, it’s a „Heater.“
  6. Fully automatic capacity test with Opus BT-C3100 charger: Insert all full cells and select „Discharge Test„. The cells are now fully charged to 4.2 V if necessary and then discharged down to 2.8 V. The extracted energy is measured and displayed. After the discharge, the cells will be automatically charged to 4.2V again and are ready for the next test.
  7. Now, write down the voltage of the full cell. Since the Opus charger does not always charge cells exactly to 4.2V, I measure all the cells and write the voltage in my Excel spreadsheet.
  8. Measure voltage loss: After at least 30 days of storage at 4.2 V (cell is fully charged) I measure the voltage again. If the voltage drop is too high (> = 0.1 V), this means that the cell discharges itself. If you put such a cell in a pack of other cells, it would slowly discharge all cells connected in parallel. These cells, immediately go into the trash and must be sorted out urgently.
  9. Measure internal resistance. I measured the internal resistance with the SM8124A meter. But since I could not derive any added value from the obtained data, I stopped this measurement. All cells that fall through the previous tests usually have too high internal resistance and would also be detected without the meter.
  10. Fully load 18650 cells and sort by capacity. I sort according to the following capacities:
    Range class
    min max
     0 mAh 499 mAh E
    500 mAh 999 mAh D
    1.000 mAh 1.499 mAh C
    1.500 mAh 1.999 mAh B
    2.000 mAh 3.500 mAh A

Statistics of tested batteries

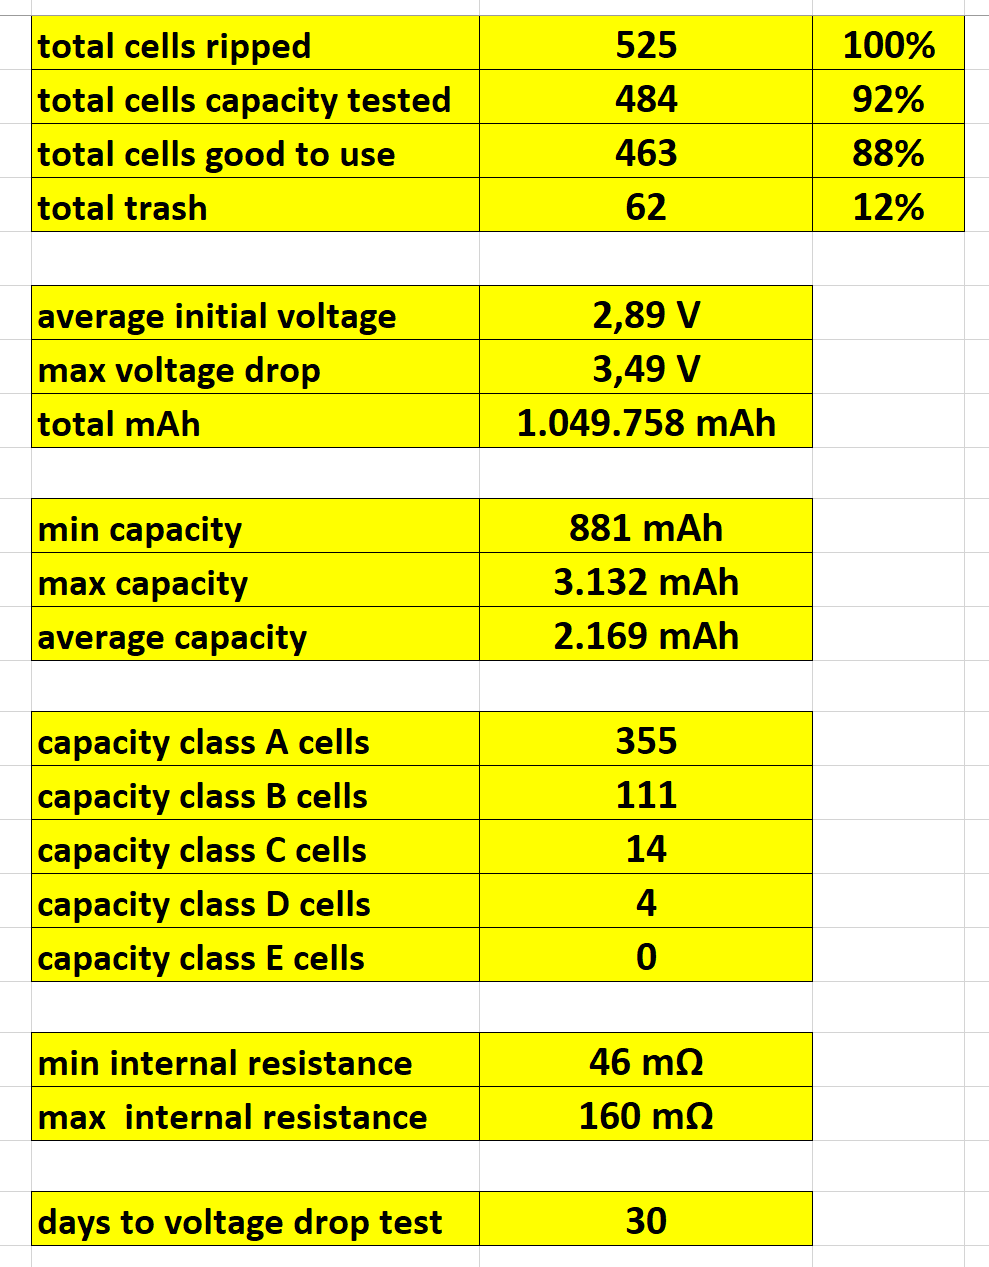
Currently I tested about 484 cells. Of 484 18650 cells there are about 12% reject (62 pieces).

capacity check

With the Opus BT-C3100, I test each cell for its capacity.
charging 18650 cells

Voltage drop test

After the capacity check, I leave my cells fully charged about 30 days or more. Before the voltage drop test starts, I write down the voltage of each cell so that after 30 days I can tell exactly how much voltage the cell has lost.
If the cell is a „drainer“ (discharges itself), the cells must be binned and cant be used for the project.

Sorting 18650 cells

After the voltage drop test, I sort the cells according to their capacity.

sorting 18650 cells

Pack Builder

I also „programmed“ a Pack Builder. All you have to do is enter the ID of the cell in the column of the relevant pack and calculate the capacity of the pack at the end. Why a Pack Builder: All 6 packs should have the same capacity as possible. This tool makes it easier to get the exact same capacity on every pack. Whether I will work later with this tool, I do not know exactly yet.

Update: I did not work with the tool due to time constraints and instead only installed category A cells. The cells I have divided in color (manufacturer/type) on all 6 packs to get as equal as possible capacity.
I will soon test each 1S pack and see how high the capacity really is.

Assembly

I have now tested over 500 cells and you could go on and on. I have now decided to build a large 6S battery from all „A cells„. I will connect 40 cells in parallel for each package. In the end it will be a 6S40P.

The battery:

  • 240 recycled 18650 lithium-ion cells
  • 6S40P (6 packets of 40 cells in series)
  • estimated capacity / energy: 88,000mAh or 1,953.60Wh
  • Voltage 100%: 25,20 V
  • Nominal voltage: 22.20 V
  • Voltage 0%: 18,00 V
  • Discharge. 80-120 A
  • Max. Charging current: 40 A

Material for assembly

bare copper wire for 18650 fuse wire

optional:

Divide cells

I divided the A-Cells by color on all 6 packs to get as equal as possible capacity. The probability that the same cell types have the same capacity is relatively high, which is why I sorted the cells by color.

Produce copper busbar

I twisted the copper wire with a cordless screwdriver. After that, cut all the wires to length.

bare copper bus bar

For the plus pole I bent the wire as follows.

bare copper bus bar for 18650 battery

Solder minus poles

Now I’ve connected all the negative cells first. I sanded the contacts slightly with the Dremel and a sanding attachment to get better solder joints.

This is what a pack looks like with a soldered negative poles.

Solder the positive pole

On the „+ side“ of the battery pack, I have now fused each cell with a „FuseWire“. This is extremely important for safety reasons. If a cell has a short and „burns out“, the cell automatically disconnects from the rest of the pack.
Once all the 18650 cells are connected, they begin to balance themselves so each cell has the same voltage.

Solder XT60 cable

The last step is soldering an XT60 cable. Please pay attention to the correct polarity of the Xt60 connector. If you make a mistake and later put the packs together, the whole battery will explode and my burn down your house!

18650 powerwall

Here a photo of the back (negative pole)

connect to 6S

To be able to switch all 6 packs together to a 6S battery, you now need a special cable like this:

If a balancer is to be connected, the balancer connections must be wired as follows.

„Phils-Li-Ion-Battery-Board“

I designd my own PCB. My goal was not to solder any balancer cables to my batteries and to do the cell monitoring with an ISDT BC-8S (Amazon).
The PCB measures approx. 10x8cm and includes 6 cell inputs, an output, a charging port and a balancer connector. In addition, a BC-8S is installed for cell monitoring as well as places for up to 3x 5V USB outputs to charge other hardware.

18650 powerwall PCB

18650 Powerwall PCB

This is what the front of the PCB looks like. You can either solder on the XT60 plug directly or extend it with a cable.

On the back I have deliberately decided against a coating. The copper tracks are exposed and should be „filled“ with sufficient solder, so that the cable cross-section increases and the PCB can withstand high current. After the solder has been applied, it should be ensured that no short circuit can occur. Ideally, the back should then be insulated with insulating tape.

The USB modules are soldered with standard pins from RM2.54 Pin headers.

Ich habe das PCB bei www.pcbway.com bestellt. PCBWAY ist eine chinesische Firma, die auch kleine Serien kostengünstig fertigen kann. Der Versand erfolgt sehr schnell per DHL Express. Wenn du dieses PCB bestellen möchtest, habe ich hier eine Anleitung wie der Bestellprozess abläuft. In der V1.1 habe ich noch eine Kupferschicht auf der Oberseite sowie teilweise auf der Unterseite hinzugefügt, die die Wärme aufnehmen soll, falls das Board extremen Bedingungen ausgesetzt ist.

I ordered the PCB from www.pcbway.com. PCBWAY is a Chinese company that can produce small series cost-effectively. Shipping is very fast via DHL Express. If you want to order this PCB, I have an instruction how to order. In V1.1, I’ve added a layer of copper on the top and some on the bottom to absorb heat if the board is exposed to extreme conditions.

PCB assembly

Github Page: https://github.com/ps915/Phils-Li-Ion-Battery-Board

Photos PCB V1.1


Photo PCB Prototype:


Der Beitrag How to build a field charging battery out of recycled 18650 cells erschien zuerst auf Phils FPV Blog.


FPV Festival Friedewalde 2019

$
0
0

FPV Festival Friedewalde 2019

Ablauf

  • 29.05.2019 (Mittwoch)
    • ab 15:00 – Anreise / eventuell freies Fliegen / FunRace
  • 30.05.2019 (Donnerstag)
    • 09:00-13:00 – freies Training
    • 13:00-14:30 – Freestyle (Wing / Copter / RC Car)
    • 14:30-18:00 – freies Training
    • ab 18:00 – Dragrace & Party
  • 31.05.2019  (Freitag)
    • 09:00-13:00 – freies Training
    • 13:00-14:30 – Freestyle (Wing / Copter / RC Car)
    • 14:30-18:00 – freies Training
    • ab 18:00 – Teamrace & Party
  • 01.06.2019 (Samstag)
    • 09:00-10:30 – Trainingsheat
    • 10:30 18:00 – voraussichtlich 5 Qualifikationen
    • ab 18:00 – FPVfree4all & Party
  • 02.06.2019 (Sonntag)
    • ab 09:00-12:00 – Qualifikationen
    • 12:00-15:00 – Finale
    • 15:00-16:00 – Siegerehrung
    • ab 16:00 – Abbau und tschüss!

Änderungen sind vorbehalten!

Kosten Hauptrennen

  • Startgebühr Piloten: 50€ (inklusive zelten zzgl. Zeltplatzpfand/Müll)

Kosten Nebenevents / Tagespilot

Wenn ihr nur einmal auf dem Track fliegen möchtet, könnt ihr euch vor Ort als Tagespilot melden.

  • Startgebühr für bereits registrierte Piloten/Tagespiloten: 0€
  • Startgebühr Tages-Piloten: 30€ (inklusive zelten zzgl. Müllpfand)
  • Startgebühr Tages-Piloten: 10€ (ohne zelten)

Kosten Zelten / Müllpfand

  • Besucher zelten: 20€ (zzgl. Müllpfand)
  • Zeltplatzpfand (Müll): 50€ 

Müllpfand, Startgebühr für Tagespiloten sowie Besuchergebühr werden vor Ort erhoben! Ihr erhaltet farbige Bändchen. Zutritt zu dem Gelände nur mit Band. Meldet euch sofort nach der Anreise bitte bei der Anmeldung und wir erklären euch alles!

Technische Vorraussetzungen des Copters

Die Sendeeinheiten dürfen nicht auf in Deutschland verbotenen Frequenzen oder zu hoher Sendeleistung senden.

  • Videosender: ImmersionRC,  Teamblacksheep oder FuriousFPV
  • RC Link: 2.4 GHz LBT oder Crossfire auf 868MHz
  • Video Antenne: linear oder RHCP

Sauberkeit

Da wir in den letzten Jahren große Probleme mit Müll hatten (das Event findet auf einer Futterwiese statt), führen wir einen Müllpfand ein. Hinterlasst ihr euren Zeltplatz nicht sauber, behalten wir diesen ein. Wir werden überall Aschenbecher aufstellen. Sollten wir trotzdem Leute erwischen, die Zigaretten/Müll wegwerfen, wird eine Ermahnung ausgesprochen. Beim zweiten Mal können diese Personen die Heimreise antreten. Bitte achtet alle gegenseitig auf Sauberkeit und ermahnt andere! Keine Diskussion!

Häufig gestellte Fragen

F: Gibt es Strom auf dem Zeltplatz?
A: Ja, es gibt einen Verteilerkasten auf dem Platz. Verlängerungskabel bitte selber mitbringen!

F: Gibt es Toiletten und Duschen?
A: Ja, es gibt einen Toilettenwagen und Duschen in der benachbarten Schule.

F: Benötige ich als Pilot eine Versicherung?
A: Ja, der Nachweis bzw. die Versicherungspolice ist bei der Anmeldung zwingend vorzulegen! Keine Versicherung, kein Start!

F: Kann ich mit dem Wohnmobil anreisen?
A: Na klar, wir haben genügend Platz!

F: Muss ich mich als Tagespilot irgendwo anmelden?
A: Nein, komm einfach vorbei und bezahle deine Tagesgebühr.

F: Muss ich mich als Tagespilot für Nebenevents (TeamRace, DragRace, Freestyle) irgendwo anmelden?
A: Ja, bitte verwende das Formular „Anmeldung für die Nebenevents“ weiter unten!

F: Ich habe vergessen das Startgeld innerhalb der Frist zu bezahlen. Ist mein Startplatz damit verfallen?
A: Ja, der Startplatz verfällt und wird unter allen Nachrückern verlost!

F: Ich stehe auf der Nachrücker Liste. Habe ich noch eine Chance doch im Rennen mitzufliegen?
A: Ja, alle Nachrücker die zustande kommen weil Piloten abspringen oder nicht bezahlen werden natürlich im Voraus nachgezogen. Es werden vor Ort nur Nachrücker gezogen, wenn ein Pilot nicht bis kurz vor den Qualifikationen am Samstag erscheint!

F: Kann ich meinen Startplatz freiwillig an eine Person weitergeben?
A: Nein, das ist nicht möglich! Du kannst deinen Platz nur freiwillig abtreten. Dadurch verfällt der Startplatz und wird unter allen Nachrückern verlost!

Auslosung der Piloten


Liste aller 120 Piloten: (hier klicken)
ID Vorname Nachname Pilot Name
1 Jochen Abele JOE
2 Deniz Akin DenyoFPV
4 Alexander Anlauf cordob4
5 Tom Bärhold torpedotomfpv
6 Axel Baro DerBaronFPV
9 Martin Bennat Deadsoil
10 Luk Beyerle LuxFPV
11 Daniel Billeter Billi
14 Thomas Blancke Tom  503
15 Stefan Blinkmann C3TAX
19 Nadeshda Boysen Schneck
25 Timon Caspari Timon-FPV
27 Christian Claußen Chris Titan
30 Ümit Degirmencioglu Umut FPV
31 Thorsten Deutsch Ironstone
32 Markus Dicks MaDix
33 Jan Dierolf CAL FPV
35 sebastian Engelhard Eliot Salem
36 Andreas Falk Falk_FPV
40 René Fischer-Gualdi RennRenn
41 Dennis Fleger Lee
42 Christian Gaebel Cillerloop
44 Michell Gailing Ricochet
47 Timm Gatzen McFly
48 Sven Marvin Getzke
49 Sven Getzke Pretender
50 Daniel Ghoreyshi DanO
51 Merlin Glander FPVogel
53 Laurent Graf Luxii
55 Falko Graul Falko_FPV
56 Marcel Gregor RaiTOR
57 Leon Grell Revotap
59 Matti GRIPP LeXXez
60 Olaf Gritzner Flash
62 Jonah Grothus jo.fpv
66 René Haim FpvLightning
67 Stefan Hassler Hase
69 Yannick Henschel STICKMAN
71 Chi-Tin Ho mr_Ho
73 Robert Hochstrat rob
74 Ralph Hogenbirk ShaggyFPV
77 Benni Hörner benzino
80 Daniel Jaredic Lyrecz
81 Marcel Jonczyk Marcel Jonczyk
82 Andreas Jürgensmeier GrOiLL
83 Michael Kaldenberg Micha
84 Sven Keim Zooz.FPV
85 Florian Kläser FlooFPV
86 Bastian Klausmeyer HoverFPV
87 Tobias Klostermann Jogerr_FPV
89 Patrick Kolb KOngOOttO
90 Daniel Krampitz Krampe
93 Christoph Krüger Chris_fpv
94 Jean Kuhlmann Killertoast96
95 Niklas Kuphal AirForce-N
97 Paweł Laszczak Pawelos
99 Thorsten Lenk BlueFox FPV
102 Andreas Lindemann DOC
104 Benjamin Lorenz BEN
105 Dominick Loria PhilAzn
107 Laura Maaß PrettyFly
108 Benjamin Mabtoul FPV Power
109 Dimitri Marker Dima MKR
111 Florian Maussner FloW FPV
112 Tim Mayer TitanTim
114 Malte Meibohm dekayz
116 Marcel Meier Gare FPV
120 Christian Mohr Cuxx
122 Andre Müller fpvandre
124 Felix Nagel Flipking
125 Florian Neumeyer Flo
129 Darius Nowakowski dario fpv
130 Adrian Ortmann Ronny5
132 Ingo Otten NulliFieD FPV
133 Jörg Pabsch MoJoe
134 Christoph Pabst FPVPope
136 Patrick Pascher Hecki104
138 Patrick Patschinsky patchinofpv
139 Torsten Zunker TeezeeFPV
142 Sven Petratschek Tzwaen
143 Helmut Pfaffenrot FlyingPfaff
145 Fabian Pocha BurnSkate
146 Lorenz Polzer Leines
148 benjamin pridat bennz
149 Alexander Pusch Akir404
150 Adam Pyschny aDamn
153 Julien Renaud Frenchy_FPV
154 Norbert Riegger Old Bone
155 Jannik Ritscher EMLT
157 Felix Rommel Hanni FPV
158 Markus Rommelsheim Bommel-FPV
161 Bennet Sauer BennetFPV
162 Michael Sauer mischello
163 Daniel Schäfer Memphisto
165 Dennis Schanze Hunter
166 Maik Schlothauer The PanikerFPV
168 Christian Schmidt Psyko_Propz
169 Marvin Schnabel MarvFPV
170 Nadia Schönknecht Pinki FPV
171 Stefan Schönknecht
173 Marco Schulz pizhaw.FPV
174 Peter Schüßler Hutzi
175 Lukas Schut luke_sht.fpv
176 Kai Seebach FPV_SEE
177 Daniela Seel FPV Angioletta
179 René Simon c00n
180 Kevin Skudze BenchpressHorst
182 Martin Sonntag prime1505
183 Frederik Stelljes FreddyMbN
184 Christopher Stockhorst RUFIO-FPV
186 Ludger Styra Gubernator46
190 Sebastian Tham Dundee
191 William Thielicke William Thielicke
194 Max von Gropper Glitch
195 Carsten Wache Lichtl
197 Jan Warneke Razorback
198 Daniel Weber GOOFY
201 André Westphal FastLine_Fpv
203 Sebastian Wolzenburg Airmopz
205 Robin Zelt TheGuy


Liste aller 85 Nachrücker: (hier klicken)
ID Vorname Nachname Pilot Name
3 Hakan Altintas Otto
7 Mitch Becker h-kon
8 Fabian Bender Fab. Sche
12 Kay Bischoff Nightfly
13 Tobias Bischoff Fpvtobi
16 Karsten Block D3ADSHOT
17 Thorsten Boddeutsch vex-sk
18 Marvin Bode mvn!
20 Sebastian Brandes Sb_fpv
21 Branko auf Console Branko auf Console Branko auf Console
22 Nils Brinkmann 1387
23 Benedikt Büsching Ben822
24 Florian Carlberg carli
26 Christian Christian FPV Bad Guy
28 Daniel Cremer Bigfoot
29 Sebastian Dahl Basteldawatzel
34 Patrick Dreyße
37 Daniel Falkner DANU
38 Martin Fedderau DarkFPV
39 Angelo Felchle Angelo Samuel
43 Andreas Gaida Gaizi
45 Dennis Ganguin Mr.D
46 Patrick Gantner TRICKK
52 Florian Graf Captain 4 Chaos
54 Maximilian Graf Psycho Kwad
58 Oliver Grill ProducerFPV
61 Kathrin Groß Crazzy_Kathy
63 Andreas Grzenia Vendo
64 Dominik Haag Gravity
65 Andreas Hahn McStralle
68 Michael Heid MowlFPV
70 Markus Hilla perk
72 Dennis Hochmann skAve
75 Philipp Hölscher Philipp
76 Jonas Holzapfel Holzii FPV
78 Philipp Horstmann MacPhly
79 Lexie Janson MaiOnHigh
88 Nicolas Knickmeier
91 Björn Kremer Chaos
92 Felix Krug fehliksfpv
96 Carsten Kutsch CRSTN FPV
98 Jannik Leenen
100 Nico Leske fpv B.P.
101 Kevin Lichius Kaotfpv
103 Stefan Löffler Eumel
106 Niels Lüddecke Niels3
110 Marco Matthäi VILANO
113 Niels Meerdink NelisFPV
115 Justin Meier JusMei-FPV
117 Markus Messerschmidt Messerschmidt
118 Christian Meurers SamyFPV
119 Sebastian Misdziol FPV Sebbo
121 Wolfgang Mueller FlyWulf
123 Lucas Munzel LucasM
126 Justin Nishida Just FPV
127 Nick Nolte NN FPV
128 Christoph Nordhoff NOR_fpv
131 Roy Ostrowski Prometheus_FPV
135 Vitaly Paliansky Vipa FPV
137 Henning Pasligh Mx_Passi
140 Tomass Petersony Tope FPV
141 Jamie Petratschek Jamie
144 Markus Pfefferkorn MaPf FPV
147 Robert Pommerenke RobFPV
151 Peter Reddingius Peeetz
152 Vladimir Rejno Sorry FPV
156 Holger Rogowski JustPsycho
159 David Rüb Alexg FPV
160 Sebastian Rüffer Quadraider
164 Markus Schaffrath MacBiBo
167 Jens Schluhe Broty
172 Benjamin Schöpp Tune_FPV
178 Jens Sichler El_Burrito
181 Niklas Solle Upsidedown FPV
185 Sergej Stürmer serg
187 Christian Szczepanski Panski
188 Marlon Tanner Samsi
189 Gerrit Teske GeX_fpv
192 Mathias Törmer Mat Zet
193 Tobias Treusch von Buttlar hirnschaden MMRC
196 Lucas Wahl Z
199 Mika Weiße-Blanke cito
200 Franz Wenzel Acilius
202 Sascha Wittwer Lizard
204 markus wuerzburger quadmovr


Liste aller Anmeldungen: (hier klicken)
ID Vorname Nachname Pilot Name
1 Jochen Abele JOE
2 Deniz Akin DenyoFPV
3 Hakan Altintas Otto
4 Alexander Anlauf cordob4
5 Tom Bärhold torpedotomfpv
6 Axel Baro DerBaronFPV
7 Mitch Becker h-kon
8 Fabian Bender Fab. Sche
9 Martin Bennat Deadsoil
10 Luk Beyerle LuxFPV
11 Daniel Billeter Billi
12 Kay Bischoff Nightfly
13 Tobias Bischoff Fpvtobi
14 Thomas Blancke Tom  503
15 Stefan Blinkmann C3TAX
16 Karsten Block D3ADSHOT
17 Thorsten Boddeutsch vex-sk
18 Marvin Bode mvn!
19 Nadeshda Boysen Schneck
20 Sebastian Brandes Sb_fpv
21 Branko auf Console Branko auf Console Branko auf Console
22 Nils Brinkmann 1387
23 Benedikt Büsching Ben822
24 Florian Carlberg carli
25 Timon Caspari Timon-FPV
26 Christian Christian FPV Bad Guy
27 Christian Claußen Chris Titan
28 Daniel Cremer Bigfoot
29 Sebastian Dahl Basteldawatzel
30 Ümit Degirmencioglu Umut FPV
31 Thorsten Deutsch Ironstone
32 Markus Dicks MaDix
33 Jan Dierolf CAL FPV
34 Patrick Dreyße
35 sebastian Engelhard Eliot Salem
36 Andreas Falk Falk_FPV
37 Daniel Falkner DANU
38 Martin Fedderau DarkFPV
39 Angelo Felchle Angelo Samuel
40 René Fischer-Gualdi RennRenn
41 Dennis Fleger Lee
42 Christian Gaebel Cillerloop
43 Andreas Gaida Gaizi
44 Michell Gailing Ricochet
45 Dennis Ganguin Mr.D
46 Patrick Gantner TRICKK
47 Timm Gatzen McFly
48 Sven Marvin Getzke
49 Sven Getzke Pretender
50 Daniel Ghoreyshi DanO
51 Merlin Glander FPVogel
52 Florian Graf Captain 4 Chaos
53 Laurent Graf Luxii
54 Maximilian Graf Psycho Kwad
55 Falko Graul Falko_FPV
56 Marcel Gregor RaiTOR
57 Leon Grell Revotap
58 Oliver Grill ProducerFPV
59 Matti GRIPP LeXXez
60 Olaf Gritzner Flash
61 Kathrin Groß Crazzy_Kathy
62 Jonah Grothus jo.fpv
63 Andreas Grzenia Vendo
64 Dominik Haag Gravity
65 Andreas Hahn McStralle
66 René Haim FpvLightning
67 Stefan Hassler Hase
68 Michael Heid MowlFPV
69 Yannick Henschel STICKMAN
70 Markus Hilla perk
71 Chi-Tin Ho mr_Ho
72 Dennis Hochmann skAve
73 Robert Hochstrat rob
74 Ralph Hogenbirk ShaggyFPV
75 Philipp Hölscher Philipp
76 Jonas Holzapfel Holzii FPV
77 Benni Hörner benzino
78 Philipp Horstmann MacPhly
79 Lexie Janson MaiOnHigh
80 Daniel Jaredic Lyrecz
81 Marcel Jonczyk Marcel Jonczyk
82 Andreas Jürgensmeier GrOiLL
83 Michael Kaldenberg Micha
84 Sven Keim Zooz.FPV
85 Florian Kläser FlooFPV
86 Bastian Klausmeyer HoverFPV
87 Tobias Klostermann Jogerr_FPV
88 Nicolas Knickmeier
89 Patrick Kolb KOngOOttO
90 Daniel Krampitz Krampe
91 Björn Kremer Chaos
92 Felix Krug fehliksfpv
93 Christoph Krüger Chris_fpv
94 Jean Kuhlmann Killertoast96
95 Niklas Kuphal AirForce-N
96 Carsten Kutsch CRSTN FPV
97 Paweł Laszczak Pawelos
98 Jannik Leenen
99 Thorsten Lenk BlueFox FPV
100 Nico Leske fpv B.P.
101 Kevin Lichius Kaotfpv
102 Andreas Lindemann DOC
103 Stefan Löffler Eumel
104 Benjamin Lorenz BEN
105 Dominick Loria PhilAzn
106 Niels Lüddecke Niels3
107 Laura Maaß PrettyFly
108 Benjamin Mabtoul FPV Power
109 Dimitri Marker Dima MKR
110 Marco Matthäi VILANO
111 Florian Maussner FloW FPV
112 Tim Mayer TitanTim
113 Niels Meerdink NelisFPV
114 Malte Meibohm dekayz
115 Justin Meier JusMei-FPV
116 Marcel Meier Gare FPV
117 Markus Messerschmidt Messerschmidt
118 Christian Meurers SamyFPV
119 Sebastian Misdziol FPV Sebbo
120 Christian Mohr Cuxx
121 Wolfgang Mueller FlyWulf
122 Andre Müller fpvandre
123 Lucas Munzel LucasM
124 Felix Nagel Flipking
125 Florian Neumeyer Flo
126 Justin Nishida Just FPV
127 Nick Nolte NN FPV
128 Christoph Nordhoff NOR_fpv
129 Darius Nowakowski dario fpv
130 Adrian Ortmann Ronny5
131 Roy Ostrowski Prometheus_FPV
132 Ingo Otten NulliFieD FPV
133 Jörg Pabsch MoJoe
134 Christoph Pabst FPVPope
135 Vitaly Paliansky Vipa FPV
136 Patrick Pascher Hecki104
137 Henning Pasligh Mx_Passi
138 Patrick Patschinsky patchinofpv
139 Torsten Zunker TeezeeFPV
140 Tomass Petersony Tope FPV
141 Jamie Petratschek Jamie
142 Sven Petratschek Tzwaen
143 Helmut Pfaffenrot FlyingPfaff
144 Markus Pfefferkorn MaPf FPV
145 Fabian Pocha BurnSkate
146 Lorenz Polzer Leines
147 Robert Pommerenke RobFPV
148 benjamin pridat bennz
149 Alexander Pusch Akir404
150 Adam Pyschny aDamn
151 Peter Reddingius Peeetz
152 Vladimir Rejno Sorry FPV
153 Julien Renaud Frenchy_FPV
154 Norbert Riegger Old Bone
155 Jannik Ritscher EMLT
156 Holger Rogowski JustPsycho
157 Felix Rommel Hanni FPV
158 Markus Rommelsheim Bommel-FPV
159 David Rüb Alexg FPV
160 Sebastian Rüffer Quadraider
161 Bennet Sauer BennetFPV
162 Michael Sauer mischello
163 Daniel Schäfer Memphisto
164 Markus Schaffrath MacBiBo
165 Dennis Schanze Hunter
166 Maik Schlothauer The PanikerFPV
167 Jens Schluhe Broty
168 Christian Schmidt Psyko_Propz
169 Marvin Schnabel MarvFPV
170 Nadia Schönknecht Pinki FPV
171 Stefan Schönknecht
172 Benjamin Schöpp Tune_FPV
173 Marco Schulz pizhaw.FPV
174 Peter Schüßler Hutzi
175 Lukas Schut luke_sht.fpv
176 Kai Seebach FPV_SEE
177 Daniela Seel FPV Angioletta
178 Jens Sichler El_Burrito
179 René Simon c00n
180 Kevin Skudze BenchpressHorst
181 Niklas Solle Upsidedown FPV
182 Martin Sonntag prime1505
183 Frederik Stelljes FreddyMbN
184 Christopher Stockhorst RUFIO-FPV
185 Sergej Stürmer serg
186 Ludger Styra Gubernator46
187 Christian Szczepanski Panski
188 Marlon Tanner Samsi
189 Gerrit Teske GeX_fpv
190 Sebastian Tham Dundee
191 William Thielicke William Thielicke
192 Mathias Törmer Mat Zet
193 Tobias Treusch von Buttlar hirnschaden MMRC
194 Max von Gropper Glitch
195 Carsten Wache Lichtl
196 Lucas Wahl Z
197 Jan Warneke Razorback
198 Daniel Weber GOOFY
199 Mika Weiße-Blanke cito
200 Franz Wenzel Acilius
201 André Westphal FastLine_Fpv
202 Sascha Wittwer Lizard
203 Sebastian Wolzenburg Airmopz
204 markus wuerzburger quadmovr
205 Robin Zelt TheGuy


Anmeldung für die Nebenevents

Nach dem Absenden des Formulars erhältst du eine automatische Antwort mit deinen Daten. Nur wenn du die Antwort Email erhältst, ist deine Anmeldung eingegangen.

  • Dragrace: Zwei Piloten treten jeweils gegeneinander auf gerader Strecke an.
  • Teamrace: Jedes Team (max 8 Teams) muss mit stark begrenztem Zeitkontingent und Material seine schnellsten Runden abliefern (4 Piloten). Nach der Qualifikation werden die Karten neu gemischt und vom Teammanager „auf den Tisch gelegt“. Dieser wird zwar nicht fliegen aber sollte dafür gut zu Fuß unterwegs sein. Bei mehr als 8 Teams gilt die Reihenfolge der Anmeldungen!
  • Freestyle: Bring deine eigene Musik mit und zeig allen was du drauf hast! Ob Freestyle Copter, Wing oder RC-Car spiet keine Rolle!

[contact-form-7]

Der Beitrag FPV Festival Friedewalde 2019 erschien zuerst auf Phils FPV Blog.

Team Blacksheep – Unify EVO VTX Anschlussplan / Wiringplan

$
0
0

I created this high resolution connection plan for the TBS Unify EVO

This connection plan will be constantly updated.
Please always link to the original image (4641px × 3705px, right click -> save as) so that the latest version is always displayed.

https://blog.seidel-philipp.de/wp-content/uploads/2019/03/teamblacksheep_unify_evo_wiring.png

Click the image to enlarge
If you are looking for more wiring plans, go here

Hardware used in this wiringplan

Created by Philipp Seidel
Credits: Icons by rdy_fpv , Albert K and Me 😉

Der Beitrag Team Blacksheep – Unify EVO VTX Anschlussplan / Wiringplan erschien zuerst auf Phils FPV Blog.

iFlight SucceX F7 Flight Controller Anschlussplan / Wiringplan

$
0
0

I created this high resolution connection plan for the iFlight SucceX F7 Flight Controller

This connection plan will be constantly updated.
Please always link to the original image (7069px × 4982px, right click -> save as) so that the latest version is always displayed.

https://blog.seidel-philipp.de/wp-content/uploads/2019/05/iFlight_Succex_F7_Flight-Controller_Anschlussplan_Wiringplan.png

Click the image to enlarge
If you are looking for more wiring plans, go here

Hardware used in this wiringplan

Created by Philipp Seidel
Credits: Icons by rdy_fpv , Albert K and Me 😉

Der Beitrag iFlight SucceX F7 Flight Controller Anschlussplan / Wiringplan erschien zuerst auf Phils FPV Blog.

Interview with Felix Niessen from FETtec Electronics

$
0
0

Recently I received an interesting call from Felix Niessen, the developer of the KISS series. To my surprise, he told me that he has founded a new company called FETtec Electronics with Erhan and Torsten.

I immediately took the initiative and did a little interview with Felix, which I can now present to you guys!

This is the translated version of the original interview in german.

If you have further questions / remarks or even product suggestions to Felix and his team, please post them in the comments below!

Phil: Hello Felix,
thank you for taking the time to do this interview. Please introduce yourself personally.

Hello and thanks for the opportunity to introduce us.
I am Felix Niessen, most known as the developer of the KISS series, and I am now starting my own project with my 2 colleagues


Phil: You founded the company FETtec, what exactly do you guys do?

We are an electronics company specializing in drone parts for the drone scene and also industrial use.


Phil: What did you do before founding FETtec?

Before founding FETtec, I worked as a Technical Developer at Flyduino.net. The KISS series has probably the greatest awareness of my projects so far, which I was allowed to develop in software and hardware


Phil: What is the meaning behind the name FETtec?

FET – that’s us, Felix, Erhan and Torsten.
Not coincidentally, the abbreviation also fits to an important element of our hardware development (Field Effect Transistor) 🙂
And since we are a technical-electronic company, the name FETtec came together


Phil: Which products can we expect from you?

Our first product will be a 4in1 ESC with 20x20mm mounting holes. We also plan to produce a matching FC and a separate frame, so that you can buy the whole package from us.


Phil: What sets your FETtec ESC apart from others?

Software and hardware are developed explicitly for each other. This results in many advantages and less problems. It will be user-friendly and versatile. Through the selection of modern components and their optimal interaction we also reach a good price-performance ratio of the final product.


Phil: What makes your ESC software better than others?

Quite simple, it flies stable and can be used with standard settings on nearly all quads.
For the nerds: The ESC prdoduces a sine wave which makes the motor run much smoother. This is only possible with 128kHz PWM at high field speeds, as we need in racecopters. Compared to standard block-commutating ESCs, the smoth running motor results in fewer losses, fewer current spikes, which requires fewer capacitors. Thus, the ESC also disturbs connected hardware less. In addition, there will be an esc configuration tool with much more features than before, like motor and telemety testing.


Phil: Where are your products actually made?

Our ESC’s are made in EU, the development is done exclusively in germany and the production site is based in Bulgaria


Phil: What visions / goals do you have? Where do you see yourself in 3 years?

We want to bring a solid product range to the market, identify ourselves with quality, and also bring the industry to a more advanced state of the art.


Phil: Will FETtec be represented at fairs or events?

Yes, we start this year at the FFF in Friedewalde with the presentation of our company and our products. We will have a booth there and are ready to answer any question. If you stop by to get to know us, you might be lucky to get a little surprise.


Phil: So what will happen to the Flyduino KISS Series?

We have a contract with Flyduino to work on the KISS Series in the future!

Thanks a lot to Felix and the whole FETtec Electronics team for this interview!

If you have further questions / remarks or even product suggestions to Felix and his team, please post them in the comments below!

Der Beitrag Interview with Felix Niessen from FETtec Electronics erschien zuerst auf Phils FPV Blog.

Interview mit Felix Niessen von FETtec Electronics

$
0
0

Vor kurzer Zeit erhielt ich einen interessanten Anruf von Felix Niessen, dem Entwickler der KISS Serie. Zu meiner Überraschung teilte er mir mit, dass er mit Erhan und Torsten eine neue Firma namens FETtec Electronics gegründet hat.

Ich habe gleich die Initiative ergriffen und ein kleines Interview mit Felix gemacht, welches ich euch nun hier präsentieren darf!

Wenn ihr weitere Fragen/Anmerkungen oder sogar Produktvorschläge an Felix und sein Team habt, stellt diese gerne unten in den Kommentaren!

Phil: Hallo Felix,
danke, dass du dir für dieses Interview Zeit genommen hast. Stelle dich persönlich bitte kurz vor.

Hallo und danke für die Möglichkeit uns vorzustellen.
Ich bin Felix Niessen, den Meisten bekannt als der Entwickler der KISS Serie, und starte jetzt mit meinen 2 Kollegen in ein neues eigenes Projekt


Phil: Du hast die Firma FETtec gegründet, was genau macht ihr?

Wir sind ein Elektronikunternehmen, welches sich auf Copterteile für den Modellsport und weitere Ansteuerungssysteme für die Industrie spezialisiert


Phil: Was hast du vor der Gründung von FETtec gemacht?

Vor der Gründung von FETtec war ich als Technischer Entwickler bei Flyduino.net tätig. Die KISS Serie hat wohl den größten Bekanntheitsgrad von meinen Projekten bislang, welche ich in Soft- und Hardware entwickeln durfte


Phil: Was für eine Bedeutung steckt eigentlich hinter dem Namen FETtec?

FET – das sind wir, Felix, Erhan und Torsten.
Nicht zufällig passt die Abkürzung auch zu einem wichtigen Element unserer Hardwareentwicklung (Feldeffekttransistor) 🙂
Und da wir ein technisch-elektronisches Unternehmen sind, kam der Name FETtec zusammen


Phil: Welche Produkte können wir von euch erwarten?

Also als Erstes wird unser FETtec ESC erscheinen, ein 4in1 Board mit dem Lochmaß 20x20mm
In Planung sind auch eine passende FC und ein eigener Frame, so dass man bei uns das Gesamtpaket erwerben kann.


Phil: Was zeichnet dein FETtec ESC gegenüber anderen aus?

Soft- und Hardware werden explizit füreinander entwickelt. Dadurch ergeben sich viele Vorteile und es gibt weniger Probleme. Das Ganze wird
benutzerfreundlich und vielfältig einsetzbar.
Durch die Auswahl modernster Komponenten und deren optimalen Zusammenspiel erreichen wir u.a. auch ein gutes Preis-Leistungs-Verhältnis beim Endprodukt.


Phil: Was macht deine ESC Software besser als andere?

Ganz einfach, sie fliegt stabil und lässt sich ohne ewiges Einstellen benutzen.
Für die Technikfreaks: Sie macht eine Sinusansteuerung wodurch der Motor runder läuft. Das ist bei hohen Felddrehzahlen, wie wir sie bei Racecoptern brauchen nur möglich durch 128kHz PWM. Im Vergleich zu normalen blockkommutierenden ESCs führt der rundere Motorlauf zu weniger Verlusten, weniger Stromspitzen, wodurch man weniger Kondensatoren braucht. Somit stört das ESC auch sein Umfeld weniger.
Außerdem wird es einen Konfigurator geben mit dem deutlich mehr möglich ist als bisher, u.a. auch Motortests und Telemetrie


Phil: Wo werden eure Produkte eigentlich hergestellt?

Unsere ESC´s sind made in EU, die Entwicklung läuft ausschließlich in Deutschland und die Herstellung der Produkte wird in Bulgarien vorgenommen


Phil: Welche Visionen/Ziele habt ihr? Wo seht ihr euch in 3 Jahren?

Wir möchten eine stabile Produktpalette an den Markt bringen, uns selbst mit der Qualität identifizieren können, und auch die Industrie auf einen moderneren Stand der Technik bringen.


Phil: Werdet ihr auf Messen oder Veranstaltungen vertreten sein?

Ja, wir starten dieses Jahr beim FFF in Friedewalde mit der Vorstellung unserer Firma und unserer Produkte. Wir werden dort einen Stand haben und jederzeit ansprechbar für Fragen sein. Wer vorbeischaut um uns kennen zu lernen, darf sich auch über ein kleines Eigenprodukt freuen.

Phil: Und was passiert nun mit der KISS Serie?

Wir haben einen Vertrag mit Flyduino und werden weiterhin an der KISS Serie für Flyduino arbeiten

Vielen Dank an Felix und das Team von FETtec Electronics, dass ich dieses Interview mit euch führen durfte!

Wenn ihr weitere Fragen/Anmerkungen oder sogar Produktvorschläge an Felix und sein Team habt, stellt diese gerne unten in den Kommentaren!

Der Beitrag Interview mit Felix Niessen von FETtec Electronics erschien zuerst auf Phils FPV Blog.

Motor KV Ratgeber – 6S Hype?

$
0
0

Gastbeitrag
Dieser Beitrag ist von meinem Gast-Autor Felix Niessen (Interview mit Felix) von FETtec und soll den aktuellen Trend der immer höher werdenden Motor KV Zahlen in Zusammenhang mit dem „6S Hype“ beleuchten.

Die aktuellen Motor KV Trends (Umdrehungen pro Minute pro Volt) gehen zu immer höheren Werten. Ein Gedanke, der dem oft zu Grunde liegt ist, dass man ja „nichts verliert“ wenn man nie Vollgas geben muss.

Das ist allerdings falsch!

Mit einem hohen KV-Wert hat man bei Vollgas natürlich etwas mehr Leistung, diese geht allerdings auf Kosten der Effizienz bei niedrigeren Gaswerten. Daher sollte man sich überlegen, wie viel Vollgas man tatsächlich braucht, denn je niedriger das durchschnittliche Gas ist, desto höher sind die Strom-Verluste im ESC und den Motorkabeln.

Verluste entstehen bei elektrischen Leitern durch die Höhe des Stroms (Ampere), nicht der Spannung (Volt). Die transportierte Leistung (Watt) ergibt sich aus beiden Werten (Volt × Ampere).
2 Volt und 10 Ampere sind 20 Watt genau wie auch 10 Volt und 2 Ampere 20 Watt sind:

  •   2 Volt × 10 Ampere = 20 Watt
  • 10 Volt ×   2 Ampere = 20 Watt

So verringert man Verluste in dem man Strom (A) durch Spannung (V) ersetzt.

Hier Beispiel Rechnungen:

Setup 1 und Setup 2 sind Beispiele für 4S Setups. Setup 1 mit einem effizienten KV-Wert und Setup 2 mit einem sehr hohen KV-Wert.
In diesem Beispiel wird die gleiche Leistung (Drehzahl) an den Motor gebracht, das Gas wurde dem Motor KV-Wert angepasst.

Setup 3 und Setup 4 sind Beispiele für 6S Setups in ähnlichem Verhältnis wie Setup 1 und Setup 2, es wird immer die gleiche Leistung umgesetzt und Drehzahl erreicht.

Bei beiden Beispielen sieht man deutlich, dass der Strom (Ampere) bei dem höheren KV-Wert auch höher ist, obwohl die gleiche Leistung erbracht wird.
Das ESC spielt hier den Transformator und macht im nötigen Verhältnis Spannung (V) zu Strom (A). Wie stark diese Wandlung ist, hängt von der gewünschten Drehzahl (dem Gas-Signal) ab, da Motoren mit höherem KV-Wert bei geringerem Gas-Signal (Geringerer Spannung (V)) höher drehen.

Durch die höheren Ströme (A) im mittleren Gas Bereich bei hohen KV-Werten einstehen hier im ESC und den Motor Kabeln auch höhere Verluste, was ESC und Kabel belastet (erhitzt).

Das Durchschnittsgas sinkt mit einem höheren KV-Wert, da der Pilot durch einen anderen Motor ja nicht unbedingt schneller durch den Track fliegen kann.
Niemand würde auf die Idee kommen wieder 2S oder 3S LiPos an seinen 5“ Racer zu hängen.
Man geht eher Richtung 6S, um geringere Ströme und so geringere Verluste zu haben.
Wenn man aber die Motor KV so hoch wählt, dass man mit 4S eigentlich immer nur Halbgas fliegt, fliegt man von der Effizienz her quasi 2S.

Man sollte also abwägen, ob man wirklich einen höheren Motor KV-Wert braucht, um in Vollgas Passagen noch etwas schneller zu sein, oder ob man lieber effizienter und leichter unterwegs ist.
Diese Verluste äußern sich natürlich auch im Verbrauch. So kann man je nach Setup einen leichteren Akku wählen und kommt dennoch ins Ziel.

Wie seht ihr den aktuellen Trend zu hohen KV-Werten und 6S? Was für Setup fliegt ihr? Schreibt es in die Kommentare!

Credits: Free Vectors via Vecteezy.com

Der Beitrag Motor KV Ratgeber – 6S Hype? erschien zuerst auf Phils FPV Blog.

Motor KV Guide – 6S Hype?

$
0
0

Guest Article
This post is from my guest author Felix Niessen (interview with Felix) from FETtec and will shed light on the current trend of increasing motor KV numbers in connection with the „6S Hype“.

The current motors KV trends (rounds per minute per volt) go to ever higher values. People think you „cant loose something“ if you never go full throttle.

That is not correct!

Of course you have a bit more power with a high KV motors at full throttle, but it is less efficient at lower throttle levels. Therefore, you should consider how much full throttle you really need, because the lower the average throttle is, the higher the current losses in the ESC and the motor cables are.

Losses occur in electrical conductors by the amount of the current (ampere), not the voltage (volts). The transported power (Watt) results from both values ​​(Volt × Ampere).

  •   2 volts × 10 amps = 20 watts
  • 10 volst ×   2 amps = 20 watts

You can reduces losses by replacing current (A) with voltage (V).

For example:

Setup 1 and Setup 2 are examples of 4S setups. Setup 1 with an efficient KV value and Setup 2 with a very high KV value.
In this example, the same power (rpm) is on the motor, the throttle has been adjusted to the motor KV value.

Setup 3 and Setup 4 are examples of 6S setups in a similar ratio to Setup 1 and Setup 2, with the same performance and rpm achieved.

Obviously in both examples the current (ampere) is higher at the higher KV value, at the same power. The ESC is used as the transformer and makes voltage (V) to current (A) in the required ratio. How strong this transformation is, depends on the desired rpm (the throttle signal), because motors with higher KV value run at higher rpm with a lower throttle signal (lower voltage (V)).

Due to the higher currents (A) in the mid-throttle range at high KV values, the losses of ESC and motor cables are higher, which results in heat on the ESC and the motor cables.

The average throttle decreases with a higher KV value, since the pilot can not necessarily fly the track faster with a higher KV value.

Of course, nowadays, no one would consider using 2S or 3S LiPo batterys on their 5“ racers.
It is more likely to use 6S to have lower currents and so less losses.
But if you choose the motor KV so that you mostly fly half throttle on 4S, the efficiency is almost like with 2S.

Choose the motor KV considering only the full throttle you really need. Your setup will be more efficent the lower you can go. These losses do also result in a higher consumption. By choosing a more efficent setup you might be able to use a lighter battery.
You should consider whether you really need a motor with higher KV value to be faster in full throttle passages, or whether you prefer to be more efficient and lighter on the track.

How do you see the current trend for high KV values and 6S? What setup do you fly? Write it in the comments!

Credits: Free Vectors via Vecteezy.com

Der Beitrag Motor KV Guide – 6S Hype? erschien zuerst auf Phils FPV Blog.


SP Racing H7 EXTREME – Flight Controller Anschlussplan / Wiringplan

$
0
0

I created this high resolution connection plan for the SP Racing H7 EXTREME Flight Controller (Documentation)

This connection plan will be constantly updated.
Please always link to the original image (8268px × 5827px, right click -> save as) so that the latest version is always displayed.

https://blog.seidel-philipp.de/wp-content/uploads/2019/08/SP_Racing_H7_EXTREME_Flight-Controller_Anschlussplan_Wiringplan.png

Click the image to enlarge
If you are looking for more wiring plans, go here


Hardware used in this wiringplan

Created by Philipp Seidel
Credits: Icons by rdy_fpv , Albert K and Me 😉

Der Beitrag SP Racing H7 EXTREME – Flight Controller Anschlussplan / Wiringplan erschien zuerst auf Phils FPV Blog.

iFlight SucceX F7 Bluetooth Flight Controller Anschlussplan / Wiringplan

$
0
0

I created this high resolution connection plan for the iFlight SucceX F7 Bluetooth Flight Controller

This connection plan will be constantly updated.
Please always link to the original image (7069px × 4982px, right click -> save as) so that the latest version is always displayed.

https://blog.seidel-philipp.de/wp-content/uploads/2019/09/iFlight_Succex_F7_BT_Flight-Controller_Anschlussplan_Wiringplan.png

Click the image to enlarge
If you are looking for more wiring plans, go here

Hardware used in this wiringplan

Created by Philipp Seidel
Credits: Icons by rdy_fpv , Albert K and Me 😉

Der Beitrag iFlight SucceX F7 Bluetooth Flight Controller Anschlussplan / Wiringplan erschien zuerst auf Phils FPV Blog.

Hobbywing XRotor F4 G3 Flight Controller Anschlussplan / Wiringplan

$
0
0

I created this high resolution connection plan for the Hobbywing XRotor F4 G3 Flight Controller

This connection plan will be constantly updated.
Please always link to the original image (7069px × 4982px, right click -> save as) so that the latest version is always displayed.

https://blog.seidel-philipp.de/wp-content/uploads/2019/09/Hobbywing_XRotor_F4_G3_Flight-Controller_Anschlussplan_Wiringplan.png

Click the image to enlarge
If you are looking for more wiring plans, go here

Hobbywing XRotor F4 G3

Hardware used in this wiringplan

Created by Philipp Seidel
Credits: Icons by rdy_fpv , Albert K and Me 😉

Der Beitrag Hobbywing XRotor F4 G3 Flight Controller Anschlussplan / Wiringplan erschien zuerst auf Phils FPV Blog.

FrSky ISRM Modus (EU/LBT & FCC) wechseln per LUA Script

$
0
0


Einige Kunden von neuen FrSky Fernbedienungen haben das Problem, dass das interne Modul nicht mehr von EU auf FCC und andersherum geflasht werden kann. Aufgefallen ist dies, weil FrSky falsche ISRM Versionen an Kunden herausgeschickt hat. Nach Beschwerden von einigen Kunden, hat FrSky nun eine Lösung für das Problem bereitgestellt, hält diese aber zurück und hilft betroffenen Kunden nur nachdem sie den Support anschreiben. Ich finde, die Lösung sollte öffentlich zugänglich sein, deswegen veröffentliche ich diese nun hier auf meinem Blog.

Was wird benötigt

  • OpenTX 2.3.0 oder höher
  • SD-Karte

Schritt 1: OpenTX Version installieren

Frsky Taranis X-Lite change IRSM EU LBT FCC

Du musst mindestens OpenTX 2.3.0 auf deiner Fernsteuerung installieren.

Schritt 2: ISRM Mode kontrollieren

Frsky Taranis X-Lite change IRSM EU LBT FCC

Gehe nun auf Seite 7/7 in deinen „Radio Settings“ und wähle aus „Modules RX / Version„. Dort findest du Angaben zu deinem ISRM Modul.


Schritt 3: LUA Script installieren

Frsky Taranis X-Lite change IRSM EU LBT FCC

Lade das LUA Script (isrm_mode_1.lua) herunter und kopiere es auf deine SD-Karte in den Order „Scripts“ -> „Tools„.


Schritt 4: LUA Script ausführen

Frsky Taranis X-Lite change IRSM EU LBT FCC

Begib dich nun in den Order „Scripts“ -> „Tools“ und führe das LUA Script (isrm_mode_1.lua) aus. Markiere dazu das Script und drücke lange auf dem Joystick bis ein Untermenü erscheint. Klicke nun auf „Execute„.


Schritt 5: ISRM Modus wechseln

Frsky Taranis X-Lite change IRSM EU LBT FCC

Nun kannst du mit dem Joystick hin und her switchen um den Mode deines ISRM Moduls zu ändern.


Schritt 6: Überprüfen

Frsky Taranis X-Lite change IRSM EU LBT FCC

Prüfe nun, ob das Modul die Einstellung angenommen hat! Fertig!

Übrigens: Du brauchst deine Modell nicht erneut binden!

Der Beitrag FrSky ISRM Modus (EU/LBT & FCC) wechseln per LUA Script erschien zuerst auf Phils FPV Blog.

Change FrSky ISRM Mode (EU/LBT & FCC) via LUA Script

$
0
0


Some customers of new FrSky remote controls have the problem that the internal module can no longer be flashed from EU to FCC and vice versa. This is noticeable because FrSky has sent out wrong ISRM versions to customers. Following complaints from some customers, FrSky has now provided a solution to the problem but wont publish it offically. I think the solution should be public, so I’m releasing it here on my blog.

What do we need

  • OpenTX 2.3.0 or higher
  • SD-Card

Step 1: install OpenTX

Frsky Taranis X-Lite change IRSM EU LBT FCC

You have to install at least OpenTX 2.3.0 on your remote!

Step 2: check ISRM Mode

Frsky Taranis X-Lite change IRSM EU LBT FCC

Now go to page 7/7 in your „Radio Settings“ and select „Modules RX / Version„. There you will find information about your ISRM module.


Step 3: install LUA Script

Frsky Taranis X-Lite change IRSM EU LBT FCC

Download the LUA script (isrm_mode_1.lua) and copy it to your SD card in the folder „Scripts“ -> „Tools„.


Step 4: run LUA Script

Frsky Taranis X-Lite change IRSM EU LBT FCC

Now go to the folder „Scripts“ -> „Tools“ and execute the LUA script (isrm_mode_1.lua). To do this, select the script and press and hold the joystick until a submenu appears. Now click on „Execute„.


Step 5: change ISRM Mode

Frsky Taranis X-Lite change IRSM EU LBT FCC

You can now switch back and forth with the joystick to change the mode of your ISRM module.


Step 6: Check it!

Frsky Taranis X-Lite change IRSM EU LBT FCC

Now check if the module has accepted the setting! Finished!

By the way: You don’t have to rebind your models!

Der Beitrag Change FrSky ISRM Mode (EU/LBT & FCC) via LUA Script erschien zuerst auf Phils FPV Blog.

Betafpv HX115 FPV Mini Quad

$
0
0

WERBUNG

HX115 Wo kaufen?

Der Betafpv HX115 wird in zwei Versionen angeboten. Die hier vorgestellte Version ist die FPV Version, welche gegenüber der HD Version (nimmt Videos in FullHD 1018p auf) günstiger und einige Gramm leichter ist.

FPV Version:

HD Version:

Eigenschaften

Frame

CFK

Die Arme sind 6 mm breit und 4,2 mm dick. Das macht den Frame sehr stabil. Das CFK ist rundherum angefast, und macht einen hochwertigen Eindruck.

Canopy

Das Canopy ist flexibel, jedoch etwas zu groß geraten. Es ist noch viel Platz unter dem Canopy. Leider ist das Canopy auch nur an zwei Standoffs befestigt. Der vordere Standoff fehlt im Gegensatz zu der HD Version des HX155. Dadurch ist das Canopy anfälliger für Frontal-Crashes und biegt sich nach hinten.

Mit einer Metallschraube habe ich vorsichtig ein Gewinde in das Schraubenlocher der Canopy gemacht. Danach habe ich einfach einen passenden Nylon-Spacer hineingedreht und von unten mit einer Metall-Schraube fixiert. Dadurch hat die Canopy deutlich an Stabilität gewonnen, da sie nun über drei Punkte befestigt ist.

Batteriepad

Auf der Unterseite befindet sich im Frame selber eine Aussparung wo der Empfänger liegt. Darüber ist ein Silikon Batteriepad verklebt. Bei der Version mit Crossfire Empfänger verschwindet der Empfänger jedoch nicht komplett in der Aussparung, was zur Folge hat, dass die Batterie ständig auf den Empfänger drückt. Ich würde empfehlen, den Empfänger besser unter der Canopy zu verstauen damit bei einem Crash nicht die Batterie auf den Empfänger drücken kann.

Antennen

Die verlegten Crossfire Antennen sind leider ab Werk viel zu lang und könnten von den Propellern sehr leicht beschädigt werden. Auch hier empfehle ich noch vor dem ersten Flug die Antennen besser zu verlegen. Entweder mit zwei Kabelbindern an einem Arm nach außen verlegen, oder die Immortal-T Antenne verwenden und ebenfalls unter dem Arm befestigen.

Ich habe mit dafür entschlossen eine Immortal-T Antenne zu verbauen.

Ebenso ist die FPV Antenne gefährdet. Durch den Schlitz kann die Antenne ebenfalls von den Propellern beschädigt werden.

Hier reicht allerdings ein Tropfen Heißkleber aus, um den Schlitz zu verschließen und somit verhindert, dass die Antenne durch den Schlitz gelangt.

Flugsteuerung und ESCs

Die Flugsteuerung und der ESCs ist auf einer Platine verbaut. Dabei handelt es sich um eine F4 Flugsteuerung. Als Betaflight Target wurde MAMBAF411(MATEKF411) verwendet.
Die Motoren sind per Stecker mit dem ESC verbunden, welches eine einfachen Wechsel (ohne löten) eines Motors bietet.

Der BLHeli_S ESC hält Spannungen von 2 bis 4S stand und leistet 12A. Achtet darauf, die richtige Propeller/LiPo Kombination zu fliegen, damit der ESC nicht beschädigt wird.

Softmount

Die Flugsteuerung ist an 4 Stellen mit jeweils zwei dünnen Silikon-Ringen weich gelagert.


FPV Kamera und VTX – Videosender

Kamera und Videosonder sind mit der Canopy verschraubt und werden mit einem 5 Adrigen Kabel mit der Flugsteuerung verbunden.

FPV Kamera

Als FPV Kamera kommt die Caddx Kangaroo Kamera zum Einsatz. Sie bietet ein gutes und scharfes Bild. (DVR folgt)

VTX – Videosender

Der Videosender verfügt über 48 Kanäle und hat eine Sendeleistung von 25mW sowie 200mW. Darüber hinaus hat er SmartAudio und Pitmode mit an Board.


Batterie

Auch die benötigten LiPos hat Betafpv im Angebot. Ich verwende einen 3S 450mAh Akku mit XT30 Anschluss. Für meinen Geschmack ist das Balancer-Kabel hier etwas zu lang. Hier könnte mein noch ein paar Gramm einsparen, wenn man es kürzt.

Motoren und Propeller

Als Motor ist ebenfalls der eigene BetaFPV 1105 5000KV Motor verbaut. Um Gewicht zu sparen sind alle Motoren jeweils nur mit 2 Schrauben befestigt, was meiner Meinung nach völlig ausreichend ist.

Propeller

Da ich 3S fliege habe ich die 3Blatt HQ3030 Propeller verbaut. Wenn du 4S fliegen möchtest verwende bitte die Zweiblatt HQ3020 Propeller.

Konfiguration HX115

Nachfolgende eine kurze Auflistung der Einstellungen welche ich für den Copter zusätzlich zu den Standardeinstellungen vorgenommen habe.

Betaflight 4.1.x

Wenn du Betaflight 4.1.1 verwenden möchtest, findest du hier die verschiedenen DIFF Dateien.

Betaflight

Nachfolgend die Konfiguration für die Stock-Firmware: Betaflight / MATEKF411 (MK41) 3.5.6

Hier die Einstellung für verschiedene Flugmodi und Turtle-Mode

Damit RSSI im OSD angezeigt wird, stelle im Tab „Receiver“ den „RSSI Channel“ auf „AUX 4)

Danach kannst du unter „OSD“ dein RSSI Wert im OSD einfügen.

Crossfire Setup

Wenn wir 3 Modes, RSSI, den Buzzer sowie Turtle-Mode verwenden wollen, stellen wir den NanoRX auf 12 Kanäle. Telemetry auf ON!

Konfiguriere die Output Map wiefolgt:

Die Channel Map wird ebenfalls so wie hier konfiguriert. Auf Kanal 8 (AUX4 in Betaflight) senden wir LQ zum Copter zurück.

OpenTX Setup

Unter Inputs habe die die einzelnen Sticks zugeordnet. Dies sollte bei der Erstellung des Modells jedoch schon standardmäßig gesetzt werden. Der Vollständigkeit halber habe ich es trotzdem mit angefügt.

Auf der Seite „MIXER“ siehst du welchen Kanälen ich welche Funktion zugeordnet habe.

  • Kanal 1 bis 4: Steuerung (die beiden Sticks deiner Fernbedienung)
  • Kanal 5: Arming (3 Positionen Schalter)
  • Kanal 6: Buzzer (2 Positionen Schalter)
  • Kanal 7: Turtle Mode (2 Positionen Schalter)
  • Kanal 8: nichts, da der NanoRX auf diesem Kanal LQ sendet
  • Kanal 9: Flugmodes Schalter (3 Positionen Schalter)

Af der nächsten Seite siehst du, dass ich die Kanäle 1-4 per Subtrim so eingestellt habe, dass genau 1000us bzw 1500us sowie 2000us an den Copter gesendet habe, wenn ich die Sticks an das Minimum, die Mitte oder an das Maximum bewege.

DVR

Aufgrund des Wetters, folgen DVR Aufnahmen demnächst. Der Artikel wird dementsprechend angepasst.

Fazit

Wer gerade in der regnerischen Zeit einen kleinen Indoor Copter sucht ist mit dem HX115 genau richtig. Als negativ empfinde ich die sehr schlecht verlegten Antennen des Empfängers. Dies hätte ab Werk besser sein können.

  • geringes Gewicht
  • perfekt für Indoor Flüge (Sporthalle, Parkhaus)
  • angefaste CFK-Kanten
  • SmartAudio Funktion
  • hochwertige Propeller von HQ
  • Ausfräsung für Crossfire Empfänger nicht tief genug
  • Akku drück auf Crossfire Empfänger
  • Canopy zu groß
  • Canopy nur an zwei Standoffs montiert und dadurch nicht sehr stabil
  • mangelhafte Verlegung der Empfänger Antennen

Der Beitrag Betafpv HX115 FPV Mini Quad erschien zuerst auf Phils FPV Blog.

Betafpv HX115 FPV Mini Quad (english version)

$
0
0

WERBUNG

Where to buy the HX115?

The Betafpv HX115 is available in two versions. The version presented here is the FPV version, which compared to the HD version (takes videos in FullHD 1018p) cheaper and a few grams lighter.

FPV Version:

HD Version:

Specs

Frame

Carbon

The arms are 6mm wide and 4.2mm thick. This makes the frame very stiff. The edges of the frame are all chamfered. Overall it looks like high-quality.

Canopy

The canopy is flexible but a little too big. There is still plenty of space under the canopy. Unfortunately, the canopy is only attached to two standoffs. The front standoff is missing unlike the HD version of the HX155. This makes the canopy more susceptible to frontal crashes and bends backwards.

With a metal screw, I carefully made a thread in the screw holes of the canopy. Then I just screwed in a matching nylon spacer and fixed from below with a metal screw. As a result, the canopy has clearly gained in stability, since it is now attached over three points.

Batterypad

On the bottom there is a recess in the frame itself where the receiver is located. A silicone battery pad is glued over it. However, in the version with Crossfire receiver, the receiver does not completely disappear in the recess, with the result that the battery constantly presses on the receiver. I would recommend storing the receiver under the canopy so that in the event of a crash the battery can not damage the receiver.

Antennas

The installed Crossfire antennas are unfortunately far too long and can easily be damaged by the propellers. I recommend to relocate the antennas before the first flight. Either use two cable ties or use the Immortal-T antenna and attach it under the arm.

I decided to use an Immortal-T antenna mounted with zipties to one of the rear arms

Likewise, the FPV antenna can also be damaged when it slips through the slot.

Here, however, a drop of hot glue is sufficient to close the slot and thus prevents the antenna from slipping through the slot.

Flight control and ESCs

The flight control and the ESCs are installed on one single board. Its a F4 flight control flashed with the Betaflight Target MAMBAF411 (MATEKF411).
The motors are connected via a 3pin plug with the ESC board, which is an easy way (without soldering) to swap out motors.

The BLHeli_S ESC is capable from 2 to 4S and provides 12A. Be sure to use the correct propeller / LiPo combination do not damage the ESC.

Softmount

The flight control is softmounted in 4 places.


FPV camera and VTX (video transmitter)

Camera and video transmitter are bolted to the canopy and connected to the flight control with a 5-pin cable.

FPV Camera

In the FPV Version, they used the Caddx Kangaroo camera. It offers a good and sharp picture. (DVR follows)

VTX – Video transmitter

The video transmitter has 48 channels and has a transmitting power of 25mW and 200mW. It also has SmartAudio and Pitmode on board.


Battery

I use a 3S 450mAh battery with XT30 connection. For my taste, the balancer cable is a little too long here. They could have saved some grams, if it were shorter.

Motors and propellers

The motors are BetaFPV 1105 5000KV. To save weight, all motors are only attached with 2 screws, which is completely sufficient in my opinion.

Propellers

Since I fly 3S I use the three-blade HQ3030 propeller. If you want to fly 4S please use the two-blade HQ3020 propellers.

HX115 Configuration

Below is a short list of the settings I have made for the copter in addition to the default settings.

Betaflight 4.1.x

If you want to use Betaflight 4.1.1, you will find the various DIFF files here.

Betaflight

Below is the configuration for the stock firmware: Betaflight / MATEKF411 (MK41) 3.5.6

Here is the setting for different flight modes and turtle mode

To display RSSI in the OSD, set the „RSSI Channel“ to „AUX 4“ in the „Receiver“ tab

Afterwards you can activate your RSSI in the OSD in the „OSD“ tab.

Crossfire Setup

If we want to use 3 modes, RSSI, buzzer and turtle mode, we set the NanoRX to 12 channels. Telemetry on ON!

Configure the output map as follows:

The Channel Map will also be configured as followed. On channel 8 (AUX4 in Betaflight) we send LQ back to the drone.

OpenTX Setup

On the „Inputs“ Page, we have assigned the individual sticks. However, this should be set by default when creating the model. For the sake of completeness, I added it anyway.

On the page „MIXER“ you can see which channels I have assigned which function.

  • Channel 1 to 4: Control (the two sticks of your remote control)
  • Channel 5: Arming (3 position switch)
  • Channel 6: Buzzer (2 positions switch)
  • Channel 7: Turtle Mode (2 positions switch)
  • Channel 8: nothing, because the NanoRX sends LQ on this channel
  • Channel 9: Flight mode switch (3 position switch)

On the next page you can see that I have set channels 1-4 by subtrim to send exactly 1000us, 1500us and 2000us to the copter when I move the sticks to the minimum, the middle or the maximum.

DVR

Due to the weather, DVR recordings will follow soon. The article will be adapted accordingly.

Conclusion

If you’re looking for a small indoor copter in the rainy season, the HX115 is the perfect choice. As a negative point I feel the very poorly laid antennas of the receiver. This could have been made better at the factory.

  • low weight
  • perfect for indoor flights (sports hall, parking garage)
  • Chamfered carbon edges
  • SmartAudio function
  • high quality propellers from HQ
  • Cutout for Crossfire receiver not deep enough
  • Battery presses on Crossfire receiver
  • Canopy too big
  • Canopy only mounted on two standoffs and therefore not very stable
  • poor installation of the receiver antennas

Der Beitrag Betafpv HX115 FPV Mini Quad (english version) erschien zuerst auf Phils FPV Blog.


FETtec KISS FC Flight Controller Anschlussplan / Wiringplan

$
0
0

I created this high resolution connection plan for the FETtec KISS FC Flight Controller

This connection plan will be constantly updated.
Please always link to the original image (6614px × 4661px, right click -> save as) so that the latest version is always displayed.

https://blog.seidel-philipp.de/wp-content/uploads/2019/12/FETtec_KISS_FC_F7_Flight-Controller_Anschlussplan_Wiringplan.png

Click the image to enlarge
If you are looking for more wiring plans, go here

Hardware used in this wiringplan

Created by Philipp Seidel
Credits: Icons by rdy_fpv , Albert K and Me 😉

Der Beitrag FETtec KISS FC Flight Controller Anschlussplan / Wiringplan erschien zuerst auf Phils FPV Blog.

ImpulseRC WOLF PDB V3 + FETTec KISS FC Anschlussplan / Wiringplan

$
0
0

I created this high resolution connection plan for the ImpulseRC WOLF PDB V3
You can buy it at www.flyingmachines.de

This connection plan will be constantly updated.
Please always link to the original image (6614px × 4661px, right click -> save as) so that the latest version is always displayed.

https://blog.seidel-philipp.de/wp-content/uploads/2019/12/ImpulseRC_WOLF_PDB_V3_OSD_FETTEC_KISS_Anschlussplan_Wiringplan.png

Click the image to enlarge
If you are looking for more wiring plans, go here


Hardware used in this wiringplan

Created by Philipp Seidel
Credits: Icons by rdy_fpv , Albert K and Me 😉

Der Beitrag ImpulseRC WOLF PDB V3 + FETTec KISS FC Anschlussplan / Wiringplan erschien zuerst auf Phils FPV Blog.

What is FETtec OneWire?

$
0
0

What is FETtec OneWire?

„OneWire“ is a half duplex serial protocol with a 2M Baudrate created by Felix Niessen (former Flyduino KISS developer) from FETtec. For example, you can connect a 4in1 ESC with only 1 Signal wire and 1 GND wire to your FC. By the way, OneWire is limited to 24 ESCs (You hardly ever have to use more than 8 for a drone).

Check out my interview with Felix.

What was DShot again?

Check out my article about Dshot!
And for the real nerds: Sinwave / BackEMF Hybrid-Commutation

What is a Serial Connection?

Serial interfaces send/receive their data in binary pulses.


More Info here: Serial Communication

Simplex

The Simplex method is a one-way communication technique. If a sender (TX) transmits, the receiver (RX) can only accept the transmission.

Half Duplex

Half Duplex can send/receive in both directions, but just one direction at a time.

Full Duplex

Full Duplex can send and receive simultaneously in both directions.

Settings and CRC

OneWire scans for new ESCs automatically. Besides that, you can change way more settings of the ESC over OneWire than over DShot. It also has a better cyclic redundancy check (CRC) than Dshot offers. CRC checks if there are any signal errors that occur in the communication between FC and ESC

Telemetry

After every sent throttle-signal, a telemetry response from the ESC will be returned. You might know the RPM-Filter in Betaflight. This filter needs the RPM value from each ESC in order to work correctly.
With OneWire however, in addition to the RPM values of each ESC, there are also various other telemetry data (e.g voltage, amp draw, …) which is also sent back to the FC. Furthermore, the FC can decide which ESC Telemetry value should be sent back. This open up room for new filters and features to be developed and integrated in the future.

How fast is FETtec OneWire?

When using 4 ESCs at the same time, you will have a 8kHz looptime which equals Dshot600.

How to wire FETtec OneWire up?

You only need two cables. OneWire (Telemetry) and GND.
In my connectionplan for the FETtec FC, you can see in the lower right hand corner how to hook up OneWire.

Der Beitrag What is FETtec OneWire? erschien zuerst auf Phils FPV Blog.

Was ist FETtec OneWire?

$
0
0

Was ist FETtec OneWire?

„OneWire“ ist ein serielles „half duplex“ Protokoll mit einer 2M Baudrate. Felix Niessen (ehemaliger Flyduino KISS Entwickler) von FETtec hat dieses ESC Protokoll entworfen.
Zum Beispiel kannst du einen 4in1 ESC mit nur einem Signalkabel und einem GND-Kabel an die FC anschließen. Übrigens, OneWire unterstützt bis zu 24 ESCs (Du wirst selten mehr als 8 für eine Drohne verwenden ;).

Hier ein Interview mit Felix.

Was war nochmal Dshot?

Hier mein Artikel zu Dshot!
Für die richtigen Nerds: Sinwave / BackEMF Hybrid-Kommutierung

Was ist eine serielle Verbindung?

Serielle Schnittstellen senden / empfangen ihre Daten in binären Impulsen.


Mehr Infos: Serial Communication

Simplex

Die Simplex-Methode ist eine wie eine one-way Kommunikation. Wenn ein Sender (TX) sendet, kann der Empfänger (RX) nur die Übertragung akzeptieren aber niemals senden.

Half Duplex

Half Duplex kann senden und empfangen, allerdings nur eines zur Zeit.

Full Duplex

Full Duplex kann gleichzeitig senden und empfangen.

Einstellungen und CRC

OneWire sucht automatisch nach neuen ESCs. Außerdem kann man über OneWire wesentlich mehr Einstellungen des ESC ändern als über DShot. Es hat auch eine bessere zyklische Redundanzprüfung (CRC) als Dshot bietet. CRC prüft, ob bei der Kommunikation zwischen FC und ESC Signalfehler auftreten.

Telemetrie

Nach jedem gesendeten Gassignal wird eine Telemetrie-Antwort vom ESC zurückgesendet. Vielleicht kennst du den RPM-Filter in Betaflight. Dieser Filter benötigt den Drehzahlwert von jedem ESC, um korrekt zu funktionieren.
Bei OneWire gibt es jedoch zusätzlich zu den Drehzahlwerten der einzelnen ESC auch verschiedene andere Telemetriedaten (z. B. Spannung, Stromaufnahme usw.), die ebenfalls an den FC zurückgesendet werden. Darüber hinaus kann der FC entscheiden, welcher ESC-Telemetriewert zurückgesendet werden soll. Dies eröffnet Raum für die Entwicklung und Integration neuer Filter und Funktionen in der Zukunft.

Wie schnell ist FETtec OneWire?

Wenn 4 ESCs gleichzeitig verwenden werden, ist eine maximale Looptime von 8kHz machbar. Dies entspricht Dshot600.

Wie wird FETtec OneWire verkabelt?

Du benötigst nur zwei Kabel. OneWire (Telemetrie) und GND.
In meinem Anschlussplan für die FETtec FC kannstdu in der unteren rechten Ecke sehen, wie OneWire angeschlossen wird.

Der Beitrag Was ist FETtec OneWire? erschien zuerst auf Phils FPV Blog.

ImpulseRC Apex OSD V2.0 + FETTec KISS FC Anschlussplan / Wiringplan

$
0
0

I created this high resolution connection plan for the ImpulseRC Apex OSD V2.0
You can buy it at www.rctech.de

This connection plan will be constantly updated.
Please always link to the original image (6614px × 4661px, right click -> save as) so that the latest version is always displayed.

https://blog.seidel-philipp.de/wp-content/uploads/2019/12/ImpulseRC_APEX_OSD_FETTEC_KISS_Anschlussplan_Wiringplan.png

Click the image to enlarge
If you are looking for more wiring plans, go here

Connection plan for the ImpulseRC Apex OSD V2.0 and FETTec KISS FC. Anschlussplan zum ImpulseRC Apex OSD V2.0 und FETTec KISS FC


Hardware used in this wiringplan

Created by Philipp Seidel
Credits: Icons by rdy_fpv , Albert K and Me 😉

Der Beitrag ImpulseRC Apex OSD V2.0 + FETTec KISS FC Anschlussplan / Wiringplan erschien zuerst auf Phils FPV Blog.

Viewing all 212 articles
Browse latest View live